go语言打包的网页wasm示例详解
来源:脚本之家
时间:2022-12-27 21:29:51 337浏览 收藏
怎么入门Golang编程?需要学习哪些知识点?这是新手们刚接触编程时常见的问题;下面golang学习网就来给大家整理分享一些知识点,希望能够给初学者一些帮助。本篇文章就来介绍《go语言打包的网页wasm示例详解》,涉及到go打包、网页、wasm,有需要的可以收藏一下
基本环境
有时需要做一些前端的数据处理,但是又不想把数据出来的方式就这么简单的暴露在js里,然后就用了wasm来包装这个处理函数,当然,这样也能提高性能。
新建文件 index.js
const fastify = require('fastify')({ logger: true })
const path = require('path')
// Serve the static assets
fastify.register(require('fastify-static'), {
   root: path.join(__dirname, ''),
   prefix: '/'
})
const start = async () => {
   try {
       await fastify.listen(8080, "0.0.0.0")
       fastify.log.info(`server listening on ${fastify.server.address().port}`)
   } catch (error) {
       fastify.log.error(error)
   }
}
start()
package.json
{
  "scripts": {
    "dev": "node index.js"
  },
  "dependencies": {
    "fastify": "^3.6.0",
    "fastify-static": "^3.2.1"
  }
}
index.html
    hello
hello
运行 npm run dev 打开http://127.0.0.1:8080
wasm部分
新建 go.mod
module hello-world
go 1.18
main.go
package main
import (
"syscall/js"
)
func main() {
message := "? Hello World ?"
document := js.Global().Get("document")
h2 := document.Call("createElement", "h2")
h2.Set("innerHTML", message)
document.Get("body").Call("appendChild", h2)
运行 go env win下
GOOS=windows
GOARCH=amd64
需要配置环境变量为 win 下设置 cmd运行 set GOOS=js set GOARCH=wasm
生成必要文件(cmd会报错 powershell可以执行) cp "$(go env GOROOT)/misc/wasm/wasm_exec.js" . 会多出一个wasm_exec.js的文件
go打包成wasm 运行go build -o main.wasm 运行结束后会生成一个名为main.wasm的文件
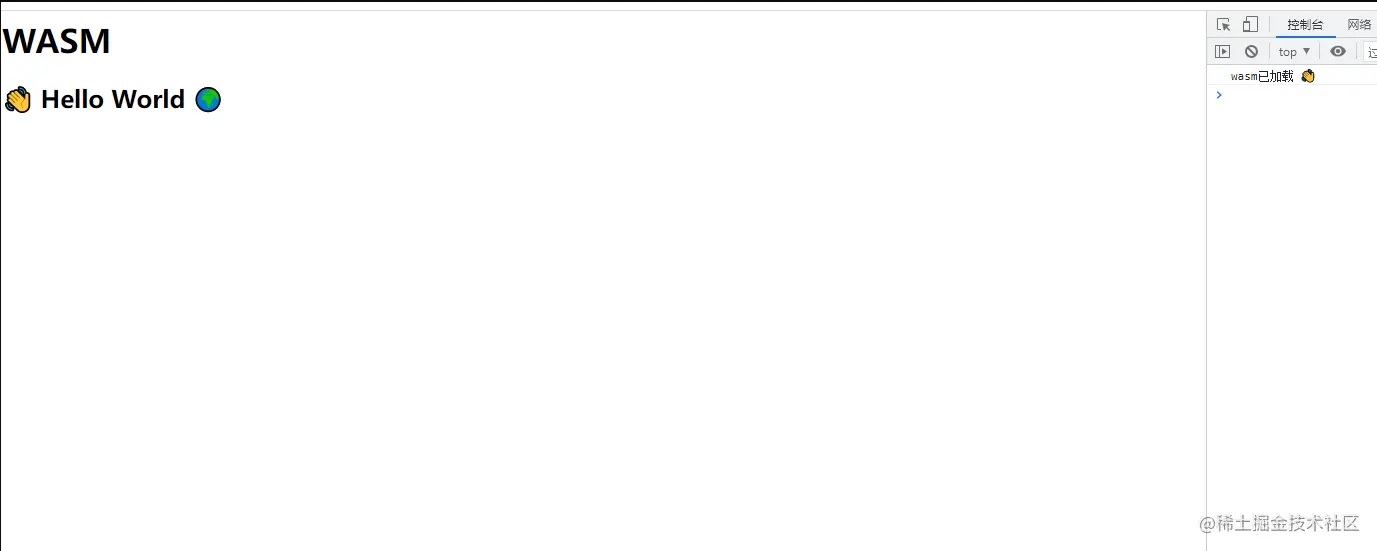
然后修改之前的index.html文件
WASM
然后刷新浏览器就能看到这么一个界面
今天关于《go语言打包的网页wasm示例详解》的内容就介绍到这里了,是不是学起来一目了然!想要了解更多关于golang的内容请关注golang学习网公众号!
声明:本文转载于:脚本之家 如有侵犯,请联系study_golang@163.com删除
相关阅读
更多>
-
237 收藏
-
133 收藏
-
169 收藏
-
452 收藏
最新阅读
更多>
-
Golang · Go教程 | 3天前 | 并发 · 闭包 · for range · 迁移 · Go教程 · Go 1.22 · Goroutine 闭包 循环变量 Go教程 Go 1.22 for range113 收藏
-
331 收藏
-
Golang · Go教程 | 3天前 | 单元测试 · 错误处理 · Go教程 · errors.Join · errors.Is · errors.Is Go错误处理 Go教程 errors.Join 多错误返回 批量校验352 收藏
-
Golang · Go教程 | 3天前 | Context · 超时控制 · Go教程 · http.Client · Transport · Go context 请求超时 Transport http.Client Client.Timeout ResponseHeaderTimeout218 收藏
-
Golang · Go教程 | 3天前 | 文件下载 · Go教程 · 审计日志 · 接口安全 · 路径穿越 · Go 文件下载 审计日志 HTTP接口 filepath.Clean 安全下载 路径穿越362 收藏
-
273 收藏
-
Golang · Go教程 | 3天前 | CI/CD · gitHub actions · Go教程 · 自托管 Runner · 持续集成 · Go 持续集成 CI Go test GitHub Actions self-hosted runner 自托管 runner340 收藏
-
124 收藏
-
Golang · Go教程 | 3天前 | HTTP · 文件下载 · Go教程 · Range请求 · ServeContent · 断点续传 Content-Range Go教程 HTTP Range ServeContent 206 Partial Content 视频拖动250 收藏
-
Golang · Go教程 | 4天前 | csv · Go教程 · 后端架构 · 流式响应 · 大文件导出 · 大文件下载 FLUSH CSV导出 Go教程 流式写出 csv.Writer rows.Next251 收藏
-
Golang · Go教程 | 4天前 | HTTP服务 · Go教程 · 后端开发 · 超时配置 · 服务稳定性 · net/http WriteTimeout HTTP超时 Go教程 ReadHeaderTimeout IdleTimeout140 收藏
-
Golang · Go教程 | 4天前 | 错误处理 · Context · 并发控制 · Go教程 · 并发控制 Go教程 context取消 context.WithCancelCause context.Cause342 收藏
课程推荐
更多>
-

- 前端进阶之JavaScript设计模式
- 设计模式是开发人员在软件开发过程中面临一般问题时的解决方案,代表了最佳的实践。本课程的主打内容包括JS常见设计模式以及具体应用场景,打造一站式知识长龙服务,适合有JS基础的同学学习。
- 立即学习 543次学习
-

- GO语言核心编程课程
- 本课程采用真实案例,全面具体可落地,从理论到实践,一步一步将GO核心编程技术、编程思想、底层实现融会贯通,使学习者贴近时代脉搏,做IT互联网时代的弄潮儿。
- 立即学习 516次学习
-

- 简单聊聊mysql8与网络通信
- 如有问题加微信:Le-studyg;在课程中,我们将首先介绍MySQL8的新特性,包括性能优化、安全增强、新数据类型等,帮助学生快速熟悉MySQL8的最新功能。接着,我们将深入解析MySQL的网络通信机制,包括协议、连接管理、数据传输等,让
- 立即学习 500次学习
-

- JavaScript正则表达式基础与实战
- 在任何一门编程语言中,正则表达式,都是一项重要的知识,它提供了高效的字符串匹配与捕获机制,可以极大的简化程序设计。
- 立即学习 487次学习
-

- 从零制作响应式网站—Grid布局
- 本系列教程将展示从零制作一个假想的网络科技公司官网,分为导航,轮播,关于我们,成功案例,服务流程,团队介绍,数据部分,公司动态,底部信息等内容区块。网站整体采用CSSGrid布局,支持响应式,有流畅过渡和展现动画。
- 立即学习 485次学习