golang网络通信超时设置方式
来源:脚本之家
时间:2022-12-30 17:28:19 182浏览 收藏
在Golang实战开发的过程中,我们经常会遇到一些这样那样的问题,然后要卡好半天,等问题解决了才发现原来一些细节知识点还是没有掌握好。今天golang学习网就整理分享《golang网络通信超时设置方式》,聊聊超时、网络通信,希望可以帮助到正在努力赚钱的你。
网络通信中,为了防止长时间无响应的情况,经常会用到网络连接超时、读写超时的设置。
本文结合例子简介golang的连接超时和读写超时设置。
1.超时设置
1.1 连接超时
func DialTimeout(network, address string, timeout time.Duration) (Conn, error)
第三个参数timeout可以用来设置连接超时设置。
如果超过timeout的指定的时间,连接没有完成,会返回超时错误。
1.2 读写超时
在Conn定义中,包括读写的超时时间设置。
type Conn interface {
 // SetDeadline sets the read and write deadlines associated
 // with the connection. It is equivalent to calling both
 // SetReadDeadline and SetWriteDeadline.
 //
 ... ...
 SetDeadline(t time.Time) error
 // SetReadDeadline sets the deadline for future Read calls
 // and any currently-blocked Read call.
 // A zero value for t means Read will not time out.
 SetReadDeadline(t time.Time) error
 // SetWriteDeadline sets the deadline for future Write calls
 // and any currently-blocked Write call.
 // Even if write times out, it may return n > 0, indicating that
 // some of the data was successfully written.
 // A zero value for t means Write will not time out.
 SetWriteDeadline(t time.Time) error
}
通过上面的函数说明,可以得知,这里的参数t是一个未来的时间点,所以每次读或写之前,都要调用SetXXX重新设置超时时间,
如果只设置一次,就会出现总是超时的问题。
2.例子
2.1 server
server端监听连接,如果收到连接请求,就是创建一个goroutine负责这个连接的数据收发。
为了测试超时,我们在写操作之前,sleep 3s。
package main
import (
  "net"
  "log"
  "time"
)
func main() {
  addr := "0.0.0.0:8080"
  tcpAddr, err := net.ResolveTCPAddr("tcp",addr)
  if err != nil {
    log.Fatalf("net.ResovleTCPAddr fail:%s", addr)
  }
  listener, err := net.ListenTCP("tcp", tcpAddr)
  if err != nil {
    log.Fatalf("listen %s fail: %s", addr, err)
  } else {
    log.Println("listening", addr)
  }
  for {
    conn, err := listener.Accept()
    if err != nil {
      log.Println("listener.Accept error:", err)
      continue
    }
    go handleConnection(conn)
  }
}
func handleConnection(conn net.Conn) {
  defer conn.Close()
  var buffer []byte = []byte("You are welcome. I'm server.")
  for {
    time.Sleep(3*time.Second)// sleep 3s
    n, err := conn.Write(buffer)
    if err != nil {
      log.Println("Write error:", err)
      break
    }
    log.Println("send:", n)
  }
  log.Println("connetion end")
}
2.2 client
client建立连接时,使用的超时时间是3s。
创建连接成功后,设置连接的读超时。
每次读之前,都重新设置超时时间。
package main
import (
  "log"
  "net"
  "os"
  "time"
)
func main() {
  connTimeout := 3*time.Second
  conn, err := net.DialTimeout("tcp", "127.0.0.1:8080", connTimeout) // 3s timeout
  if err != nil {
    log.Println("dial failed:", err)
    os.Exit(1)
  }
  defer conn.Close()
  readTimeout := 2*time.Second
  buffer := make([]byte, 512)
  for {
    err = conn.SetReadDeadline(time.Now().Add(readTimeout)) // timeout
    if err != nil {
      log.Println("setReadDeadline failed:", err)
    }
    n, err := conn.Read(buffer)
    if err != nil {
      log.Println("Read failed:", err)
      //break
    }
    log.Println("count:", n, "msg:", string(buffer))
  }
}
输出结果
2019/05/12 16:18:19 Read failed: read tcp 127.0.0.1:51718->127.0.0.1:8080: i/o timeout
2019/05/12 16:18:19 count: 0 msg:
2019/05/12 16:18:20 count: 28 msg: You are welcome. I'm server.
2019/05/12 16:18:22 Read failed: read tcp 127.0.0.1:51718->127.0.0.1:8080: i/o timeout
2019/05/12 16:18:22 count: 0 msg: You are welcome. I'm server.
2019/05/12 16:18:23 count: 28 msg: You are welcome. I'm server.
2019/05/12 16:18:25 Read failed: read tcp 127.0.0.1:51718->127.0.0.1:8080: i/o timeout
2019/05/12 16:18:25 count: 0 msg: You are welcome. I'm server.
2019/05/12 16:18:26 count: 28 msg: You are welcome. I'm server.
补充:Golang中的并发限制与超时控制
并发
package main
import (
"fmt"
"time"
)
func run(task_id, sleeptime int, ch chan string) {
time.Sleep(time.Duration(sleeptime) * time.Second)
ch
函数 run() 接受输入的参数,sleep 若干秒。然后通过 go 关键字并发执行,通过 channel 返回结果。
channel 顾名思义,他就是 goroutine 之间通信的“管道"。管道中的数据流通,实际上是 goroutine 之间的一种内存共享。我们通过他可以在 goroutine 之间交互数据。
ch
channel 分为无缓冲(unbuffered)和缓冲(buffered)两种。例如刚才我们通过如下方式创建了一个无缓冲的 channel。
ch := make(chan string)
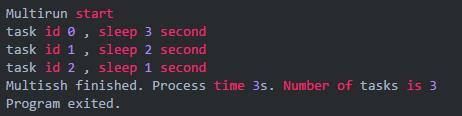
channel 的缓冲,我们一会再说,先看看刚才看看执行的结果。
三个 goroutine `分别 sleep 了 3,2,1秒。但总耗时只有 3 秒。所以并发生效了,go 的并发就是这么简单。
按序返回
刚才的示例中,我执行任务的顺序是 0,1,2。但是从 channel 中返回的顺序却是 2,1,0。这很好理解,因为 task 2 执行的最快嘛,所以先返回了进入了 channel,task 1 次之,task 0 最慢。
如果我们希望按照任务执行的顺序依次返回数据呢?可以通过一个 channel 数组(好吧,应该叫切片)来做,比如这样
package main
import (
"fmt"
"time"
)
func run(task_id, sleeptime int, ch chan string) {
time.Sleep(time.Duration(sleeptime) * time.Second)
ch
超时控制
刚才的例子里我们没有考虑超时。然而如果某个 goroutine 运行时间太长了,那很肯定会拖累主 goroutine 被阻塞住,整个程序就挂起在那儿了。因此我们需要有超时的控制。
通常我们可以通过select + time.After 来进行超时检查,例如这样,我们增加一个函数 Run() ,在 Run() 中执行 go run() 。并通过 select + time.After 进行超时判断。
package main
import (
"fmt"
"time"
)
func Run(task_id, sleeptime, timeout int, ch chan string) {
ch_run := make(chan string)
go run(task_id, sleeptime, ch_run)
select {
case re :=
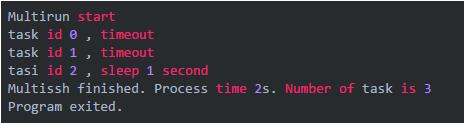
运行结果,task 0 和 task 1 已然超时
并发限制
如果任务数量太多,不加以限制的并发开启 goroutine 的话,可能会过多的占用资源,服务器可能会爆炸。所以实际环境中并发限制也是一定要做的。
一种常见的做法就是利用 channel 的缓冲机制。我们分别创建一个带缓冲和不带缓冲的 channel 看看
ch := make(chan string) // 这是一个无缓冲的 channel,或者说缓冲区长度是 0
ch := make(chan string, 1) // 这是一个带缓冲的 channel, 缓冲区长度是 1
这两者的区别在于,如果 channel 没有缓冲,或者缓冲区满了。goroutine 会自动阻塞,直到 channel 里的数据被读走为止。举个例子
package main
import (
"fmt"
)
func main() {
ch := make(chan string)
ch
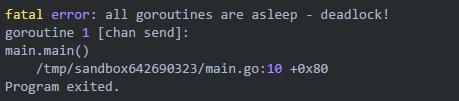
这段代码执行将报错
fatal error: all goroutines are asleep - deadlock!
goroutine 1 [chan send]:
main.main()
/tmp/sandbox531498664/main.go:9 +0x60
Program exited.
这是因为我们创建的 ch 是一个无缓冲的 channel。因此在执行到 ch
如果我们改成这样,程序就可执行
package main
import (
"fmt"
)
func main() {
ch := make(chan string, 1)
ch
执行
123
Program exited.
如果我们改成这样
package main
import (
"fmt"
)
func main() {
ch := make(chan string, 1)
ch
尽管读取了两次 channel,但是程序还是会死锁,因为缓冲区满了,goroutine 阻塞挂起。第二个 ch
因此,利用 channel 的缓冲设定,我们就可以来实现并发的限制。我们只要在执行并发的同时,往一个带有缓冲的 channel 里写入点东西(随便写啥,内容不重要)。让并发的 goroutine 在执行完成后把这个 channel 里的东西给读走。这样整个并发的数量就讲控制在这个 channel 的缓冲区大小上。
比如我们可以用一个 bool 类型的带缓冲 channel 作为并发限制的计数器。

然后在并发执行的地方,每创建一个新的 goroutine,都往 chLimit 里塞个东西。
for i, sleeptime := range input {
chs[i] = make(chan string, 1)
chLimit
这里通过 go 关键字并发执行的是新构造的函数。他在执行完原来的 Run() 后,会把 chLimit 的缓冲区里给消费掉一个。
limitFunc := func(chLimit chan bool, ch chan string, task_id, sleeptime, timeout int) {
Run(task_id, sleeptime, timeout, ch)
这样一来,当创建的 goroutine 数量到达 chLimit 的缓冲区上限后。主 goroutine 就挂起阻塞了,直到这些 goroutine 执行完毕,消费掉了 chLimit 缓冲区中的数据,程序才会继续创建新的 goroutine。我们并发数量限制的目的也就达到了。
完整示例代码
package main
import (
"fmt"
"time"
)
func Run(task_id, sleeptime, timeout int, ch chan string) {
ch_run := make(chan string)
go run(task_id, sleeptime, ch_run)
select {
case re :=
运行结果
Multirun start
task id 0 , timeout
task id 1 , timeout
task id 2 , sleep 1 second
Multissh finished. Process time 5s. Number of task is 3
Program exited.
chLimit 的缓冲是 1。task 0 和 task 1 耗时 2 秒超时。task 2 耗时 1 秒。总耗时 5 秒。并发限制生效了。
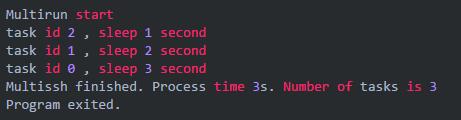
如果我们修改并发限制为 2
chLimit := make(chan bool, 2)
运行结果
Multirun start
task id 0 , timeout
task id 1 , timeout
task id 2 , sleep 1 second
Multissh finished. Process time 3s. Number of task is 3
Program exited.
task 0 , task 1 并发执行,耗时 2秒。task 2 耗时 1秒。总耗时 3 秒。符合预期。
有没有注意到代码里有个地方和之前不同。这里,用了一个带缓冲的 channel
chs[i] = make(chan string, 1)
还记得上面的例子么。如果 channel 不带缓冲,那么直到他被消费掉之前,这个 goroutine 都会被阻塞挂起。
然而如果这里的并发限制,也就是 chLimit 生效阻塞了主 goroutine,那么后面消费这些数据的代码并不会执行到。。。于是就 deadlock 拉!
for _, ch := range chs {
fmt.Println(
所以给他一个缓冲就好了。
以上为个人经验,希望能给大家一个参考,也希望大家多多支持golang学习网。如有错误或未考虑完全的地方,望不吝赐教。
到这里,我们也就讲完了《golang网络通信超时设置方式》的内容了。个人认为,基础知识的学习和巩固,是为了更好的将其运用到项目中,欢迎关注golang学习网公众号,带你了解更多关于golang的知识点!
-
126 收藏
-
162 收藏
-
207 收藏
-
208 收藏
-
210 收藏
-
386 收藏
-
234 收藏
-
Golang · Go教程 | 19小时前 | 工具链 · Go教程 · Go 1.26 · go fix · 代码迁移 · Go工具链 Go 1.26 go fix -diff 代码现代化 gofix476 收藏
-
176 收藏
-
194 收藏
-
471 收藏
-
392 收藏
-
418 收藏
-
Golang · Go教程 | 1星期前 | goroutine · Context · 超时控制 · Go教程 · 后端开发 · Go Goroutine context 超时控制 WithTimeout Done QueryContext166 收藏
-
Golang · Go教程 | 2星期前 | WaitGroup · channel · 并发编程 · 优雅关闭 · Go教程 · WaitGroup Channel关闭 Go channel 并发收尾 done信号165 收藏
-
332 收藏
-
115 收藏
-

- 前端进阶之JavaScript设计模式
- 设计模式是开发人员在软件开发过程中面临一般问题时的解决方案,代表了最佳的实践。本课程的主打内容包括JS常见设计模式以及具体应用场景,打造一站式知识长龙服务,适合有JS基础的同学学习。
- 立即学习 543次学习
-

- GO语言核心编程课程
- 本课程采用真实案例,全面具体可落地,从理论到实践,一步一步将GO核心编程技术、编程思想、底层实现融会贯通,使学习者贴近时代脉搏,做IT互联网时代的弄潮儿。
- 立即学习 516次学习
-

- 简单聊聊mysql8与网络通信
- 如有问题加微信:Le-studyg;在课程中,我们将首先介绍MySQL8的新特性,包括性能优化、安全增强、新数据类型等,帮助学生快速熟悉MySQL8的最新功能。接着,我们将深入解析MySQL的网络通信机制,包括协议、连接管理、数据传输等,让
- 立即学习 500次学习
-

- JavaScript正则表达式基础与实战
- 在任何一门编程语言中,正则表达式,都是一项重要的知识,它提供了高效的字符串匹配与捕获机制,可以极大的简化程序设计。
- 立即学习 487次学习
-

- 从零制作响应式网站—Grid布局
- 本系列教程将展示从零制作一个假想的网络科技公司官网,分为导航,轮播,关于我们,成功案例,服务流程,团队介绍,数据部分,公司动态,底部信息等内容区块。网站整体采用CSSGrid布局,支持响应式,有流畅过渡和展现动画。
- 立即学习 485次学习
-

- 还单身的柜子
- 这篇文章太及时了,太全面了,感谢大佬分享,mark,关注博主了!希望博主能多写Golang相关的文章。
- 2023-01-18 10:02:39
-
- 腼腆的秀发
- 很有用,一直没懂这个问题,但其实工作中常常有遇到...不过今天到这,看完之后很有帮助,总算是懂了,感谢楼主分享技术贴!
- 2023-01-01 19:23:53