将您的电子商务商店提升到一个新的水平:使用 Nuxtjs 构建购物车和愿望清单功能
来源:dev.to
时间:2024-07-31 08:46:28 351浏览 收藏
从现在开始,努力学习吧!本文《将您的电子商务商店提升到一个新的水平:使用 Nuxtjs 构建购物车和愿望清单功能》主要讲解了等等相关知识点,我会在golang学习网中持续更新相关的系列文章,欢迎大家关注并积极留言建议。下面就先一起来看一下本篇正文内容吧,希望能帮到你!

在我的网络笔记中查看这篇文章!
今天我们将在创建电商店铺的旅程中又迈出一步。在上一部分中,我们已经添加了获取和呈现产品数据的功能,现在我们将为我们的在线商店添加更多改进。我们将构建将产品添加到用户的购物车和愿望清单的功能,并更新我们的购物车和愿望清单页面,以便它们显示产品列表并且用户可以修改它们。是的,像往常一样,还有很多工作要做,所以让我们制定一个工作计划并开始吧。
- 实现“添加到购物车”和“添加到愿望清单”功能。
- 改进购物车页面,用户可以在其中查看和管理购物车中的商品、更新数量、删除商品以及继续结帐。
- 构建愿望清单页面功能,显示用户已添加到愿望清单中的产品,并提供将商品移至购物车或从愿望清单中删除的选项。
制定好工作计划后,让我们深入研究实施细节并开始将这些功能变为现实。首先,我们将解决将产品添加到购物车和愿望清单的核心功能。
1. 实现“添加到购物车”和“添加到愿望清单”功能。
让我们澄清一下:我们没有用户个人资料页面或类似的东西,我们不会在数据库中存储任何用户数据,这就是为什么我们将在用户端保存购物车和愿望清单数据并使用本地存储。
好吧,我们开始吧。打开“产品”商店并添加新的“shoppingcart”和“wishlist”变量作为空数组。接下来创建“aaddtoshoppingcart”操作,它将检查本地存储中是否有“购物车”项目,是的,它将重写我们的购物车变量,然后将新项目添加到购物车中,最后更新本地存储中的值贮存。此外,我们将返回某种响应,以便我们知道要显示什么类型的消息。
aaddtoshoppingcart(product) {
    const shoppingcart = localstorage.getitem('shopping-cart');
    if (shoppingcart) {
        this.shoppingcart = json.parse(shoppingcart);
    } else {
        localstorage.setitem('shopping-cart', json.stringify(this.shoppingcart));
    }
    const productexist = this.shoppingcart.find(el => el === product.id);
    if (productexist) {
        return {code: 400, msg: 'product already in cart'};
    }
    this.shoppingcart.push(product.id);
    localstorage.setitem('shopping-cart', json.stringify(this.shoppingcart));
    return {code: 200, msg: 'product added to cart'};
},
我认为我们的愿望清单将有相同的保存过程,但有一个愿望清单数组。
aaddtowishlist(product) {
    const wishlist = localstorage.getitem('wishlist');
    if (wishlist) {
        this.wishlist = json.parse(wishlist);
    } else {
        localstorage.setitem('wishlist', json.stringify(this.wishlist));
    }
    const productexist = this.wishlist.find(el => el === product.id);
    if (productexist) {
        return {code: 400, msg: 'product already in wishlist'};
    }
    this.wishlist.push(product.id);
    localstorage.setitem('wishlist', json.stringify(this.wishlist));
    return {code: 200, msg: 'product added to wishlist'};
},
太棒了。我们需要将此功能添加到每个“添加到购物车”和“添加到愿望清单”按钮。让我们使用产品卡组件,在方法部分中创建一个新函数“addtocart”,它将简单地调用我们的“aaddtoshoppingcart”操作,然后根据结果代码来显示通知。
addtocart() {
    const result = this.productsstore.aaddtoshopingcart(this.product);
    if (result.code === 200) {
        this.basestore.asetnotification({
            type: 'success',
            msg: 'product was added to cart!'
        })
    } else if (result.code === 400) {
        this.basestore.asetnotification({
            type: 'warning',
            msg: result.msg
        })
    }
},
心愿单按钮应该有同样的功能,我们只需要改变动作即可。
接下来,我们需要在模板中添加这些函数到点击事件。
<li class="overlay__list--item icon-left" @click="addtowishlist">
    <nuxticon name="heart-regular" size="20" class="overlay__list--icon"/>
</li>
<li class="overlay__list--item">
    <button class="overlay__list--button" @click="addtocart">add to cart</button>
</li>
不要忘记重新启动开发服务器并检查结果,也请自行将此功能添加到其他组件(预览模式、产品页面...),然后我们可以继续。
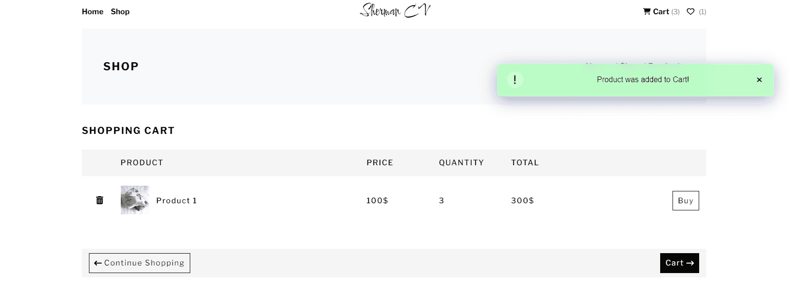
2. 改进购物车页面,用户可以在其中查看和管理购物车中的商品、更新数量、删除商品以及继续结账。
在我们的购物车页面中,我们有一个要出售的商品列表,但它们目前是静态的。让我们创建一个包含我们的产品的“productslist”数组,然后在安装的生命周期挂钩中,我们将调用操作来获取整个产品列表并仅过滤添加到购物车的产品。
methods: {
    preparecartlist() {
        this.productslist = [];
        const productids = json.parse(localstorage.getitem('shopping-cart'));
        if (productids && productids.length > 0) {
            this.productsstore.gproductslist.foreach(product => {
                if (productids.includes(product.id)) {
                    this.productslist.push(product);
                }
            })
        }
    }
},
async mounted() {
    const productsstore = useproductsstore();
    await productsstore.agetallproducts();
    this.preparecartlist();
}
此外,我们需要添加从购物车中删除产品的可能性,我们将在产品商店中创建一个“aremovefromcart”操作,该操作将从本地存储中查找并删除项目,然后保存修改后的数组。
aremovefromcart(product) {
    const index = this.shopingcart.indexof(product.id);
    if (index > -1) {
        this.shopingcart.splice(index, 1);
    }
    localstorage.setitem('shopping-cart', json.stringify(this.shopingcart));
    return {code: 200, msg: 'product removed from cart'};
}
然后在购物车页面内,我们将创建一个“removeproduct”函数,它将调用此操作并显示结果消息。
removeproduct(product) {
    const result = this.productsstore.aremovefromcart(product);
    if (result.code === 200) {
        this.basestore.asetnotification({
            type: 'success',
            msg: 'product was removed from cart!'
        })
        this.preparecartlist();
    }
},
最后一步,我们需要删除静态列表并将其替换为动态列表,以呈现产品列表数组。
<div class="table-body">
    <ul class="table-body__list" v-for="(product, index) in productslist" :key="index">
        <li class="table-body__list--item product">
            <nuxtlink to="/shop/product" class="table-body__list--link">
                <img :src="product.image" :alt="product.name" :title="product.name">
            </nuxtlink>
            <nuxtlink :to="`/shop/${product.id}`" class="table-body__list--link">
                {{ product.name }}
            </nuxtlink>
        </li>
        <li class="table-body__list--item price">{{ product.price }}$</li>
        <li class="table-body__list--item quantity">{{ product.quantity }}</li>
        <li class="table-body__list--item total">{{ product.price * product.quantity }}$</li>
        <li class="table-body__list--item remove">
            <button class="table-body__list--item--btn" @click="removeproduct(product)">
                <nuxticon name="trash-can-solid" size="20" class="table-body__list--icon"/>
            </button>
        </li>
    </ul>
</div>
就是这样,现在我们可以将一些商品添加到购物车,然后打开购物车并检查结果或将其删除。
3. 构建愿望清单页面功能,显示用户已添加到愿望清单中的产品,并提供将商品移至购物车或从愿望清单中删除的选项。
应添加所有几乎相同的功能:
- 从愿望清单中删除该项目;
- 准备渲染列表;
- 预填充产品数组;
- 用动态数据更新列表数组;
<script>
import { useproductsstore } from "@/store/products";
import { usebasestore } from "@/store/base";
import breadcrumbs from "../../components/common/breadcrumbs.vue";
export default {
    name: "wishlist",
    components: {
        breadcrumbs,
    },
    data() {
        return {
            productslist: [],
        }
    },
    computed: {
        productsstore() {
            return useproductsstore();
        },
        basestore() {
            return usebasestore();
        },
    },
    methods: {
        removeproduct(product) {
            const result = this.productsstore.aremoveproductfromwishlist(product);
            if (result.code === 200) {
                this.basestore.asetnotification({
                    type: 'success',
                    msg: 'product was removed from wishlist!'
                })
                this.preparewishlist();
            }
        },
        preparewishlist() {
            this.productslist = [];
            const productids = json.parse(localstorage.getitem('wishlist'));
            if (productids && productids.length > 0) {
                this.productsstore.gproductslist.foreach(product => {
                    if (productids.includes(product.id)) {
                        this.productslist.push(product);
                    }
                })
            }
        }
    },
    async mounted() {
        const productsstore = useproductsstore();
        await productsstore.agetallproducts();
        this.preparewishlist();
    }
}
</script>
此外,我们需要记住,我们必须向产品商店添加删除项目操作。
aremoveproductfromwishlist(product) {
    const index = this.wishlist.indexof(product.id);
    if (index > -1) {
        this.wishlist.splice(index, 1);
    }
    localstorage.setitem('wishlist', json.stringify(this.wishlist));
    return {code: 200, msg: 'product removed from wishlist'}
}
还有一件事,我们有一个“购买”按钮,这个按钮应该从愿望清单中删除一个项目并将该项目添加到购物车列表中。为此,我们将向产品商店添加一个新操作,该操作将独立完成所有流程。
aAddToCartFromWishlist(product) {
    const shoppingCart = localStorage.getItem('shopping-cart');
    if (shoppingCart) {
        this.shoppingCart = JSON.parse(shoppingCart);
    } else {
        localStorage.setItem('shopping-cart', JSON.stringify(this.shoppingCart));
    }
    const productExist = this.shoppingCart.find(el => el === product.id);
    if (productExist) {
        return {code: 400, msg: 'Product already in cart'};
    }
    this.shoppingCart.push(product.id);
    localStorage.setItem('shopping-cart', JSON.stringify(this.shoppingCart));
    const index = this.wishlist.indexOf(product.id);
    if (index > -1) {
        this.wishlist.splice(index, 1);
    }
    localStorage.setItem('wishlist', JSON.stringify(this.wishlist));
    return {code: 200, msg: 'Product added to cart'}
}
现在,保存所有更改并检查结果。
在我们电子商务商店开发之旅的这一部分中,我们实施了多项关键功能,以增强在线购物平台的用户体验和功能。通过添加“添加到购物车”和“添加到愿望清单”功能,我们使用户能够管理他们想要的产品,为无缝购物体验铺平了道路。
总的来说,这些功能的实现让我们距离创建一个全面且用户友好的电子商务商店又近了一步。请继续关注,因为我们的下一步将创建一个简单的结账流程。
如果您需要本教程的源代码,可以在这里获取。
到这里,我们也就讲完了《将您的电子商务商店提升到一个新的水平:使用 Nuxtjs 构建购物车和愿望清单功能》的内容了。个人认为,基础知识的学习和巩固,是为了更好的将其运用到项目中,欢迎关注golang学习网公众号,带你了解更多关于的知识点!
-
502 收藏
-
501 收藏
-
501 收藏
-
501 收藏
-
501 收藏
-
318 收藏
-
472 收藏
-
125 收藏
-
370 收藏
-
493 收藏
-
194 收藏
-
135 收藏
-
253 收藏
-
113 收藏
-
182 收藏
-
145 收藏
-
156 收藏
-

- 前端进阶之JavaScript设计模式
- 设计模式是开发人员在软件开发过程中面临一般问题时的解决方案,代表了最佳的实践。本课程的主打内容包括JS常见设计模式以及具体应用场景,打造一站式知识长龙服务,适合有JS基础的同学学习。
- 立即学习 543次学习
-

- GO语言核心编程课程
- 本课程采用真实案例,全面具体可落地,从理论到实践,一步一步将GO核心编程技术、编程思想、底层实现融会贯通,使学习者贴近时代脉搏,做IT互联网时代的弄潮儿。
- 立即学习 516次学习
-

- 简单聊聊mysql8与网络通信
- 如有问题加微信:Le-studyg;在课程中,我们将首先介绍MySQL8的新特性,包括性能优化、安全增强、新数据类型等,帮助学生快速熟悉MySQL8的最新功能。接着,我们将深入解析MySQL的网络通信机制,包括协议、连接管理、数据传输等,让
- 立即学习 500次学习
-

- JavaScript正则表达式基础与实战
- 在任何一门编程语言中,正则表达式,都是一项重要的知识,它提供了高效的字符串匹配与捕获机制,可以极大的简化程序设计。
- 立即学习 487次学习
-

- 从零制作响应式网站—Grid布局
- 本系列教程将展示从零制作一个假想的网络科技公司官网,分为导航,轮播,关于我们,成功案例,服务流程,团队介绍,数据部分,公司动态,底部信息等内容区块。网站整体采用CSSGrid布局,支持响应式,有流畅过渡和展现动画。
- 立即学习 485次学习

