Redis在项目中的使用(JedisPool方式)
来源:脚本之家
时间:2022-12-30 21:17:25 123浏览 收藏
在数据库实战开发的过程中,我们经常会遇到一些这样那样的问题,然后要卡好半天,等问题解决了才发现原来一些细节知识点还是没有掌握好。今天golang学习网就整理分享《Redis在项目中的使用(JedisPool方式)》,聊聊使用、JedisPoolRedis,希望可以帮助到正在努力赚钱的你。
springboot中redis相关配置
1、pom.xml中引入依赖
redis.clients jedis 2.9.0
2、springboot的习惯优于配置。也在项目中使用了application.yml文件配置mysql的基本配置项。这里也在application.yml里面配置redis的配置项。
spring:
  datasource:
        # 驱动配置信息
        url: jdbc:mysql://localhost:3306/spring_boot?useUnicode=true&characterEncoding=utf8
        username: root
        password: root
        type: com.alibaba.druid.pool.DruidDataSource
        driver-class-name: com.mysql.jdbc.Driver

        # 连接池的配置信息
        filters: stat
        maxActive: 20
        initialSize: 1
        maxWait: 60000
        minIdle: 1
        timeBetweenEvictionRunsMillis: 60000
        minEvictableIdleTimeMillis: 300000
        validationQuery: select 'x'
        testWhileIdle: true
        testOnBorrow: false
        testOnReturn: false
        poolPreparedStatements: true
        maxOpenPreparedStatements: 20
  redis:
        host: 127.0.0.1
        port: 6379
        password: pass1234
        pool:
          max-active: 100
          max-idle: 10
          max-wait: 100000
        timeout: 0
springboot中redis相关类
- 项目操作redis是使用的RedisTemplate方式,另外还可以完全使用JedisPool和Jedis来操作redis。整合的内容也是从网上收集整合而来,网上整合的方式和方法非常的多,有使用注解形式的,有使用Jackson2JsonRedisSerializer来序列化和反序列化key value的值等等,很多很多。这里使用的是我认为比较容易理解和掌握的,基于JedisPool配置,使用RedisTemplate来操作redis的方式。
redis单独放在一个包redis里,在包里先创建RedisConfig.java文件。
RedisConfig.java
@Configuration
@EnableAutoConfiguration
public class RedisConfig {

    @Bean
    @ConfigurationProperties(prefix = "spring.redis.pool")
    public JedisPoolConfig getRedisConfig(){
        JedisPoolConfig config = new JedisPoolConfig();
        return config;
    }

    @Bean
    @ConfigurationProperties(prefix = "spring.redis")
    public JedisConnectionFactory getConnectionFactory() {
        JedisConnectionFactory factory = new JedisConnectionFactory();
        factory.setUsePool(true);
        JedisPoolConfig config = getRedisConfig();
        factory.setPoolConfig(config);
        return factory;
    }

    @Bean
    public RedisTemplate getRedisTemplate() {
        JedisConnectionFactory factory = getConnectionFactory();
        RedisTemplate template = new StringRedisTemplate(factory);
        return template;
    }

}
- 在包里创建RedisService接口的实现类RedisServiceImpl,这个类实现了接口的所有方法。
RedisServiceImpl.java
@Service("redisService")
public class RedisServiceImpl implements RedisService {

    @Resource
    private RedisTemplate redisTemplate;

    @Override
    public boolean set(final String key, final String value) {
        boolean result = redisTemplate.execute(new RedisCallback() {
            @Override
            public Boolean doInRedis(RedisConnection connection) throws DataAccessException {
                RedisSerializer serializer = redisTemplate.getStringSerializer();
                connection.set(serializer.serialize(key), serializer.serialize(value));
                return true;
            }
        });
        return result;
    }

    @Override
    public String get(final String key) {
        String result = redisTemplate.execute(new RedisCallback() {
            @Override
            public String doInRedis(RedisConnection connection) throws DataAccessException {
                RedisSerializer serializer = redisTemplate.getStringSerializer();
                byte[] value = connection.get(serializer.serialize(key));
                return serializer.deserialize(value);
            }
        });
        return result;
    }

    @Override
    public boolean expire(final String key, long expire) {
        return redisTemplate.expire(key, expire, TimeUnit.SECONDS);
    }

    @Override
    public boolean remove(final String key) {
        boolean result = redisTemplate.execute(new RedisCallback() {
            @Override
            public Boolean doInRedis(RedisConnection connection) throws DataAccessException {
                RedisSerializer serializer = redisTemplate.getStringSerializer();
                connection.del(key.getBytes());
                return true;
            }
        });
        return result;
    }
}
在这里execute()方法具体的底层没有去研究,只知道这样能实现对于redis数据的操作。
redis保存的数据会在内存和硬盘上存储,所以需要做序列化;这个里面使用的StringRedisSerializer来做序列化,不过这个方式的泛型指定的是String,只能传String进来。所以项目中采用json字符串做redis的交互。
到此,redis在springboot中的整合已经完毕,下面就来测试使用一下。
5. springboot项目中使用redis
在这里就直接使用springboot项目中自带的单元测试类SpringbootApplicationTests进行测试。
@RunWith(SpringRunner.class)
@SpringBootTest
public class SpringbootApplicationTests {
private JSONObject json = new JSONObject();
@Autowired
private RedisService redisService;
@Test
public void contextLoads() throws Exception {
}
/**
* 插入字符串
*/
@Test
public void setString() {
redisService.set("redis_string_test", "springboot redis test");
}
/**
* 获取字符串
*/
@Test
public void getString() {
String result = redisService.get("redis_string_test");
System.out.println(result);
}
/**
* 插入对象
*/
@Test
public void setObject() {
Person person = new Person("person", "male");
redisService.set("redis_obj_test", json.toJSONString(person));
}
/**
* 获取对象
*/
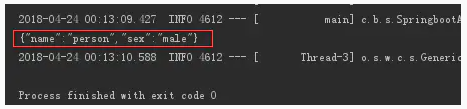
@Test
public void getObject() {
String result = redisService.get("redis_obj_test");
Person person = json.parseObject(result, Person.class);
System.out.println(json.toJSONString(person));
}
/**
* 插入对象List
*/
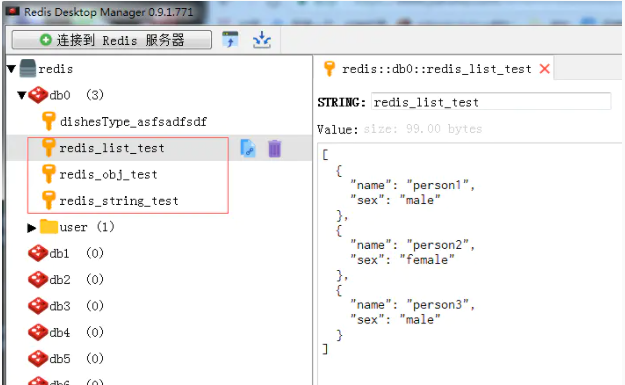
@Test
public void setList() {
Person person1 = new Person("person1", "male");
Person person2 = new Person("person2", "female");
Person person3 = new Person("person3", "male");
List list = new ArrayList();
list.add(person1);
list.add(person2);
list.add(person3);
redisService.set("redis_list_test", json.toJSONString(list));
}
/**
* 获取list
*/
@Test
public void getList() {
String result = redisService.get("redis_list_test");
List list = json.parseArray(result, String.class);
System.out.println(list);
}
@Test
public void remove() {
redisService.remove("redis_test");
}
}
class Person {
private String name;
private String sex;
public Person() {
}
public Person(String name, String sex) {
this.name = name;
this.sex = sex;
}
public String getName() {
return name;
}
public void setName(String name) {
this.name = name;
}
public String getSex() {
return sex;
}
public void setSex(String sex) {
this.sex = sex;
}
}
在这里先是用@Autowired注解把redisService注入进来,然后由于是使用json字符串进行交互,所以引入fastjson的JSONObject类。然后为了方便,直接在这个测试类里面加了一个Person的内部类。
一共测试了:对于string类型的存取,对于object类型的存取,对于list类型的存取,其实本质都是转成了json字符串。还有就是根据key来执行remove操作。
获取字符串:

获取对象:
获取list:

redis管理客户端数据:
到此,测试完成,对于常用的一些数据类型的转换存取操作也基本调试通过。所以本文对于springboot整合redis到此结束。
以上就是《Redis在项目中的使用(JedisPool方式)》的详细内容,更多关于redis的资料请关注golang学习网公众号!
-
250 收藏
-
300 收藏
-
498 收藏
-
185 收藏
-
269 收藏
-
280 收藏
-
数据库 · Redis | 6天前 | Redis · 缓存治理 · Keyspace Notifications · 过期事件 · redis Pub/Sub Keyspace Notifications 过期事件 缓存监听 补偿任务181 收藏
-
501 收藏
-
400 收藏
-
313 收藏
-
235 收藏
-
464 收藏
-
436 收藏
-
407 收藏
-
数据库 · Redis | 2星期前 | Redis · Streams · 消费者组 · Pending · XACK · 消息堆积 消费者组 XACK XPENDING XAUTOCLAIM Redis Streams385 收藏
-
194 收藏
-
368 收藏
-

- 前端进阶之JavaScript设计模式
- 设计模式是开发人员在软件开发过程中面临一般问题时的解决方案,代表了最佳的实践。本课程的主打内容包括JS常见设计模式以及具体应用场景,打造一站式知识长龙服务,适合有JS基础的同学学习。
- 立即学习 543次学习
-

- GO语言核心编程课程
- 本课程采用真实案例,全面具体可落地,从理论到实践,一步一步将GO核心编程技术、编程思想、底层实现融会贯通,使学习者贴近时代脉搏,做IT互联网时代的弄潮儿。
- 立即学习 516次学习
-

- 简单聊聊mysql8与网络通信
- 如有问题加微信:Le-studyg;在课程中,我们将首先介绍MySQL8的新特性,包括性能优化、安全增强、新数据类型等,帮助学生快速熟悉MySQL8的最新功能。接着,我们将深入解析MySQL的网络通信机制,包括协议、连接管理、数据传输等,让
- 立即学习 500次学习
-

- JavaScript正则表达式基础与实战
- 在任何一门编程语言中,正则表达式,都是一项重要的知识,它提供了高效的字符串匹配与捕获机制,可以极大的简化程序设计。
- 立即学习 487次学习
-

- 从零制作响应式网站—Grid布局
- 本系列教程将展示从零制作一个假想的网络科技公司官网,分为导航,轮播,关于我们,成功案例,服务流程,团队介绍,数据部分,公司动态,底部信息等内容区块。网站整体采用CSSGrid布局,支持响应式,有流畅过渡和展现动画。
- 立即学习 485次学习
-

- 干净的香氛
- 写的不错,一直没懂这个问题,但其实工作中常常有遇到...不过今天到这,帮助很大,总算是懂了,感谢师傅分享技术贴!
- 2023-03-18 17:24:07
-
- 柔弱的钥匙
- 这篇文章内容太及时了,很详细,感谢大佬分享,码起来,关注楼主了!希望楼主能多写数据库相关的文章。
- 2023-01-25 18:23:56