酸+肉桂:和完美的二人组
来源:dev.to
时间:2024-12-26 15:37:09 476浏览 收藏
哈喽!大家好,很高兴又见面了,我是golang学习网的一名作者,今天由我给大家带来一篇《酸+肉桂:和完美的二人组》,本文主要会讲到等等知识点,希望大家一起学习进步,也欢迎大家关注、点赞、收藏、转发! 下面就一起来看看吧!
自从我开始开发我的第一个项目(我的 ot pokémon 和 habbo 的第一个网站)以来,我一直选择 raw sql。老实说,我仍然非常喜欢编写自己的查询并更精确地控制这个“低级”层。 orm 并不让我完全放心,因为我已经花了几天时间分析日志来识别和优化低效查询。
但是,在我使用 raw sql 的许多代码库中,绝大多数没有迁移控制,并且数据库也没有受到监控。一切都在即兴创作的基础上进行:“您需要一个新字段吗?运行 alter table 并添加一个新列。”这种方法在所有场景下都是极其有害的,出现了几个问题,例如:“我们应该在生产环境中上哪些列?”,“创建了哪些新实体?”,“环境是否同步?” - 以及许多其他类似的问题。
我的问题的解决方案
面对所有这些问题,我决定采用新的工具来让我和与我一起工作的团队的日常工作变得更健康。我不想放弃我所拥有的灵活性,但我也想更好地控制应用程序的自由度。经过大量研究,我找到了一个我认为最完整的解决这些问题的工具:kysely,它是 typescript 的查询构建器,除了实用之外,还是完全类型安全的 —对我来说非常重要的一点。这个库引起了我的注意,以至于我开始直接和间接地积极为社区做出贡献,为与 kysely 集成的其他开源库创建插件。
然而,使用 kysely 时最大的困难之一是,与 orm 不同,它没有实体或自动生成类型/接口。所有这些工作都需要手动完成,这可能有点累人。在研究解决方案的过程中,我发现了一个最终在涉及 postgresql 的所有项目中采用的工具:kanel。 kanel 自动生成数据库类型,完美补充了 kysely。
此外,kanel 还有一个可以直接与 kysely 一起使用的附加功能:kanel-kysely。我一直在积极为这个存储库做出贡献,帮助开发新功能,例如迁移表的类型过滤器以及 zod 对象到驼峰命名法的转换。
配置 kysely
我将使用 nestjs 来说明以下示例。因此,如果您不理解某些语法或代码中的某些内容,我建议您阅读 nestjs 文档。在我看来,它是最好的 javascript 框架——特别是如果你想“逃避”javascript。但这是我另一篇文章的主题。
如果您想严格遵循示例,您需要先初始化一个带有 nestjs 的存储库。不过,您也可以开发自己的代码。
首先,我们需要安装 kysely 本身、它的 cli 和 node.js 的 postgresql 模块。
npm i kysely pg && npm i kysely-ctl --save-dev
接下来,我们需要在项目的根目录中为 kysely 创建一个配置文件。我还将为我们的迁移和种子文件使用 knex 前缀。
// kysely.config.ts

import "dotenv/config";

import { defineconfig, getknextimestampprefix } from "kysely-ctl";
import { pool } from "pg";

export default defineconfig({
  dialect: "pg",
  dialectconfig: {
    pool: new pool({ connectionstring: process.env.database_url }),
  },
  migrations: {
    migrationfolder: "src/database/migrations",
    getmigrationprefix: getknextimestampprefix,
  },
  seeds: {
    seedfolder: "src/database/seeds",
    getseedprefix: getknextimestampprefix,
  },
});
接下来,我们将在终端中运行命令 npx kysely migrate make create_user_table。它将负责创建我们的第一个迁移。接下来,我们将创建一个新的用户表,完成后,我们将使用命令 npx kysely migratelatest.
在数据库中运行此迁移
// 20241225222128_create_user_table.ts

import { sql, type kysely } from 'kysely'


export async function up(db: kysely<any>): promise<void> {
  await db.schema
  .createtable("user")
  .addcolumn("id", "serial", (col) => col.primarykey())
  .addcolumn("name", "text", (col) => col.notnull())
  .addcolumn("email", "text", (col) => col.unique().notnull())
  .addcolumn("password", "text", (col) => col.notnull())
  .addcolumn("created_at", "timestamp", (col) =>
    col.defaultto(sql`now()`).notnull(),
  )
  .execute();
}

export async function down(db: kysely<any>): promise<void> {
  await db.schema.droptable("user").execute();
}
完成所有这些步骤后,让我们为我们的数据库创建一个模块。另请注意,我正在使用 kysely 插件将我们的列转换为驼峰命名法。
// src/database/database.module.ts

import { envservice } from "@/env/env.service";
import { global, logger, module } from "@nestjs/common";
import { camelcaseplugin, kysely, postgresdialect } from "kysely";
import { pool } from "pg";

export const database_connection = "database_connection";

@global()
@module({
  providers: [
    {
      provide: database_connection,
      usefactory: async (envservice: envservice) => {
        const dialect = new postgresdialect({
          pool: new pool({
            connectionstring: envservice.get("database_url"),
          }),
        });

        const nodeenv = envservice.get("node_env");

        const db = new kysely({
          dialect,
          plugins: [new camelcaseplugin()],
          log: nodeenv === "dev" ? ["query", "error"] : ["error"],
        });

        const logger = new logger("databasemodule");

        logger.log("successfully connected to database");

        return db;
      },
      inject: [envservice],
    },
  ],
  exports: [database_connection],
})
export class databasemodule {}
配置 kanel
让我们从安装依赖项开始。
npm i kanel kanel-kysely --save-dev
接下来,让我们为 kanel 创建配置文件以开始工作。请注意,我将使用一些插件,例如camelcasehook(将我们的接口转换为camelcase)和kyselytypefilter(以排除kysely的迁移表),我很高兴能够贡献这些功能之一,并使我们的工作甚至更容易。
// .kanelrc.js

require("dotenv/config");

const { kyselycamelcasehook, makekyselyhook, kyselytypefilter } = require("kanel-kysely");

/** @type {import('kanel').config} */
module.exports = {
  connection: {
    connectionstring: process.env.database_url,
  },
  typefilter: kyselytypefilter,
  predeleteoutputfolder: true,
  outputpath: "./src/database/schema",
  prerenderhooks: [makekyselyhook(), kyselycamelcasehook],
};
创建文件后,我们将在终端中运行命令 npx kanel。请注意,在配置文件中指定的路径中创建了一个目录。此目录对应于您的架构的名称,在我们的示例中为 public,其中我们有两个新文件:publicschema.ts 和 user.ts 。您的 user.ts 可能看起来完全像这样:
// @generated
// this file is automatically generated by kanel. do not modify manually.

import type { columntype, selectable, insertable, updateable } from 'kysely';

/** identifier type for public.user */
export type userid = number & { __brand: 'userid' };

/** represents the table public.user */
export default interface usertable {
  id: columntype<userid, userid | undefined, userid>;

  name: columntype<string, string, string>;

  email: columntype<string, string, string>;

  password: columntype<string, string, string>;

  createdat: columntype<date, date | string | undefined, date | string>;
}

export type user = selectable<usertable>;

export type newuser = insertable<usertable>;

export type userupdate = updateable<usertable>;
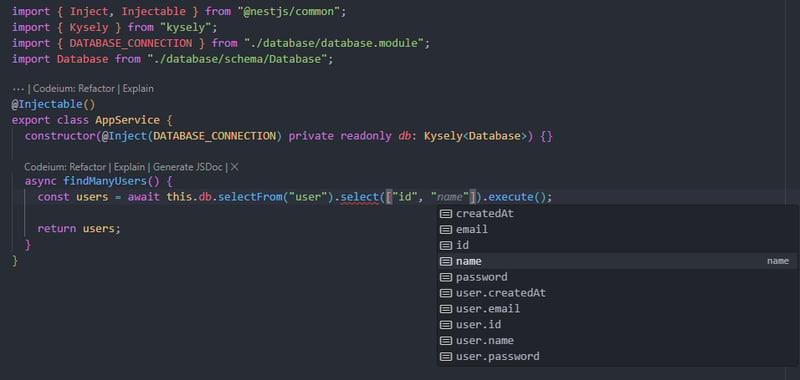
不过,最重要的是这个目录之外的文件public,文件database.ts,因为我们要传递的正是这个,以便kysely能够理解我们数据库的整个结构。在我们的文件 app.service.ts 中,我们将注入 databasemodule 提供程序并将我们的类型 database.
传递给 kysely
// src/app.service.ts

import { Inject, Injectable } from "@nestjs/common";
import { Kysely } from "kysely";
import { DATABASE_CONNECTION } from "./database/database.module";
import Database from "./database/schema/Database";

@Injectable()
export class AppService {
  constructor(@Inject(DATABASE_CONNECTION) private readonly db: Kysely<Database>) {}

  async findManyUsers() {
    const users = await this.db.selectFrom("user").select(["id", "name"]).execute();

    return users;
  }
}
请注意,kanel 生成的类型工作正常,因为我们的代码编辑器将准确建议我们在第一次迁移中创建的列。

最后的考虑因素
这是我非常喜欢在我的个人项目甚至工作中使用的组合(当我有自由这样做时)。对于喜欢原始 sql 提供的灵活性但也选择“更安全”路径的每个人来说,查询生成器都是必不可少的工具。 kanel 还为我节省了许多时间的调试和创建新类型的时间。我强烈建议你用这两个创建一个项目,你绝对不会后悔的。
存储库链接: frankenstein-nodejs
终于介绍完啦!小伙伴们,这篇关于《酸+肉桂:和完美的二人组》的介绍应该让你收获多多了吧!欢迎大家收藏或分享给更多需要学习的朋友吧~golang学习网公众号也会发布文章相关知识,快来关注吧!
-
502 收藏
-
501 收藏
-
501 收藏
-
501 收藏
-
501 收藏
-
463 收藏
-
114 收藏
-
278 收藏
-
111 收藏
-
251 收藏
-
199 收藏
-
409 收藏
-
330 收藏
-
392 收藏
-
241 收藏
-
123 收藏
-
211 收藏
-

- 前端进阶之JavaScript设计模式
- 设计模式是开发人员在软件开发过程中面临一般问题时的解决方案,代表了最佳的实践。本课程的主打内容包括JS常见设计模式以及具体应用场景,打造一站式知识长龙服务,适合有JS基础的同学学习。
- 立即学习 543次学习
-

- GO语言核心编程课程
- 本课程采用真实案例,全面具体可落地,从理论到实践,一步一步将GO核心编程技术、编程思想、底层实现融会贯通,使学习者贴近时代脉搏,做IT互联网时代的弄潮儿。
- 立即学习 516次学习
-

- 简单聊聊mysql8与网络通信
- 如有问题加微信:Le-studyg;在课程中,我们将首先介绍MySQL8的新特性,包括性能优化、安全增强、新数据类型等,帮助学生快速熟悉MySQL8的最新功能。接着,我们将深入解析MySQL的网络通信机制,包括协议、连接管理、数据传输等,让
- 立即学习 500次学习
-

- JavaScript正则表达式基础与实战
- 在任何一门编程语言中,正则表达式,都是一项重要的知识,它提供了高效的字符串匹配与捕获机制,可以极大的简化程序设计。
- 立即学习 487次学习
-

- 从零制作响应式网站—Grid布局
- 本系列教程将展示从零制作一个假想的网络科技公司官网,分为导航,轮播,关于我们,成功案例,服务流程,团队介绍,数据部分,公司动态,底部信息等内容区块。网站整体采用CSSGrid布局,支持响应式,有流畅过渡和展现动画。
- 立即学习 485次学习

