PyTorch 中的加州理工学院
来源:dev.to
时间:2024-12-27 16:15:27 332浏览 收藏
知识点掌握了,还需要不断练习才能熟练运用。下面golang学习网给大家带来一个文章开发实战,手把手教大家学习《PyTorch 中的加州理工学院》,在实现功能的过程中也带大家重新温习相关知识点,温故而知新,回头看看说不定又有不一样的感悟!
请我喝杯咖啡☕
*我的帖子解释了加州理工学院 101。
caltech101()可以使用caltech 101数据集,如下所示:
*备忘录:
- 第一个参数是 root(必需类型:str 或 pathlib.path)。 *绝对或相对路径都是可能的。
- 第二个参数是 target_type(可选-默认:“category”-类型:str 或元组或 str 列表)。 *可以为其设置“类别”和/或“注释”。
- 第三个参数是transform(optional-default:none-type:callable)。
- 第四个参数是 target_transform(optional-default:none-type:callable)。
- 第五个参数是 download(optional-default:false-type:bool):
*备注:
- 如果为 true,则从互联网下载数据集并解压(解压)到根目录。
- 如果为 true 并且数据集已下载,则将其提取。
- 如果为 true 并且数据集已下载并提取,则不会发生任何事情。
- 如果数据集已经下载并提取,则应该为 false,因为它速度更快。
- 您可以从此处手动下载并提取数据集(101_objectcategories.tar.gz 和 annotations.tar)到 data/caltech101/。
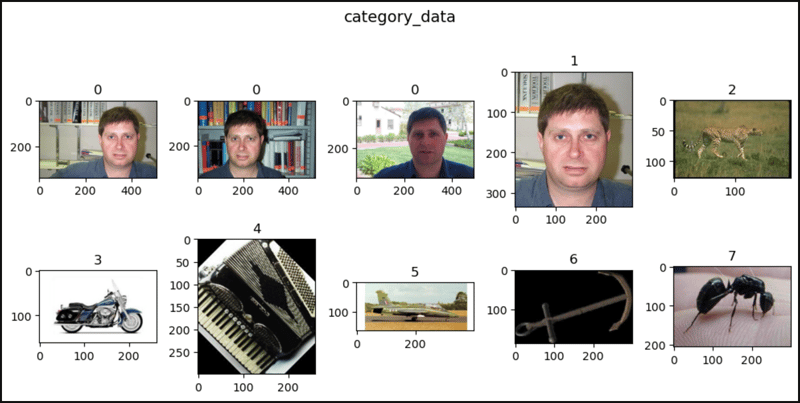
- 关于图像索引的类别,faces(0) 为 0~434,faces_easy(1) 为 435~869,豹子(2 )为870~1069, 摩托车(3)是1070~1867,手风琴(4)是1868~1922,飞机(5)是1923~2722,锚(6) 是2723~2764,蚂蚁(7)为2765~2806,桶(8)为2807~2853,低音(9)为2854~2907等。
from torchvision.datasets import Caltech101

category_data = Caltech101(
    root="data"
)

category_data = Caltech101(
    root="data",
    target_type="category",
    transform=None,
    target_transform=None,
    download=False
)

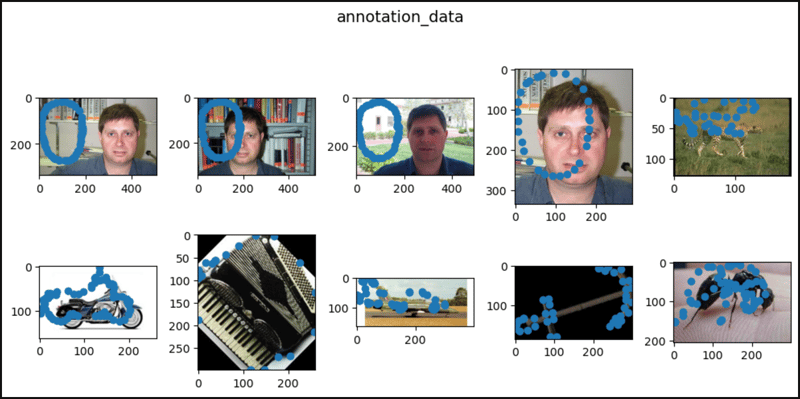
annotation_data = Caltech101(
    root="data",
    target_type="annotation"
)

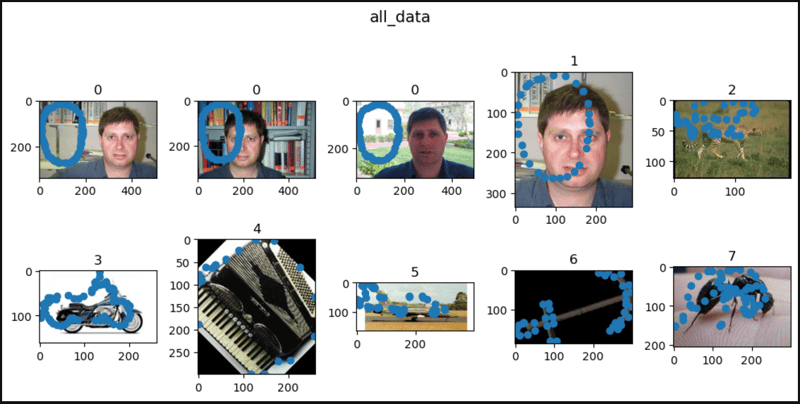
all_data = Caltech101(
    root="data",
    target_type=["category", "annotation"]
)

len(category_data), len(annotation_data), len(all_data)
# (8677, 8677, 8677)

category_data
# Dataset Caltech101
#     Number of datapoints: 8677
#     Root location: data\caltech101
#     Target type: ['category']

category_data.root
# 'data/caltech101'

category_data.target_type
# ['category']

print(category_data.transform)
# None

print(category_data.target_transform)
# None

category_data.download
# <bound method Caltech101.download of Dataset Caltech101
#     Number of datapoints: 8677
#     Root location: data\caltech101
#     Target type: ['category']>

len(category_data.categories)
# 101

category_data.categories
# ['Faces', 'Faces_easy', 'Leopards', 'Motorbikes', 'accordion',
#  'airplanes', 'anchor', 'ant', 'barrel', 'bass', 'beaver',
#  'binocular', 'bonsai', 'brain', 'brontosaurus', 'buddha',
#  'butterfly', 'camera', 'cannon', 'car_side', 'ceiling_fan',
#  'cellphone', 'chair', 'chandelier', 'cougar_body', 'cougar_face', ...]

len(category_data.annotation_categories)
# 101

category_data.annotation_categories
# ['Faces_2', 'Faces_3', 'Leopards', 'Motorbikes_16', 'accordion',
#  'Airplanes_Side_2', 'anchor', 'ant', 'barrel', 'bass',
#  'beaver', 'binocular', 'bonsai', 'brain', 'brontosaurus',
#  'buddha', 'butterfly', 'camera', 'cannon', 'car_side',
#  'ceiling_fan', 'cellphone', 'chair', 'chandelier', 'cougar_body', ...]

category_data[0]
# (<PIL.JpegImagePlugin.JpegImageFile image mode=RGB size=510x337>, 0)

category_data[1]
# (<PIL.JpegImagePlugin.JpegImageFile image mode=RGB size=519x343>, 0)

category_data[2]
# (<PIL.JpegImagePlugin.JpegImageFile image mode=RGB size=492x325>, 0)

category_data[435]
# (<PIL.JpegImagePlugin.JpegImageFile image mode=RGB size=290x334>, 1)

category_data[870]
# (<PIL.JpegImagePlugin.JpegImageFile image mode=RGB size=192x128>, 2)

annotation_data[0]
# (<PIL.JpegImagePlugin.JpegImageFile image mode=RGB size=510x337>,
#  array([[10.00958466, 8.18210863, 8.18210863, 10.92332268, ...],
#         [132.30670927, 120.42811502, 103.52396166, 90.73162939, ...]]))

annotation_data[1]
# (<PIL.JpegImagePlugin.JpegImageFile image mode=RGB size=519x343>,
#  array([[15.19298246, 13.71929825, 15.19298246, 19.61403509, ...],
#         [121.5877193, 103.90350877, 80.81578947, 64.11403509, ...]]))

annotation_data[2]
# (<PIL.JpegImagePlugin.JpegImageFile image mode=RGB size=492x325>,
#  array([[10.40789474, 7.17807018, 5.79385965, 9.02368421, ...],
#         [131.30789474, 120.69561404, 102.23947368, 86.09035088, ...]]))

annotation_data[435]
# (<PIL.JpegImagePlugin.JpegImageFile image mode=RGB size=290x334>,
#  array([[64.52631579, 95.31578947, 123.26315789, 149.31578947, ...],
#         [15.42105263, 8.31578947, 10.21052632, 28.21052632, ...]]))

annotation_data[870]
# (<PIL.JpegImagePlugin.JpegImageFile image mode=RGB size=192x128>,
#  array([[2.96536524, 7.55604534, 19.45780856, 33.73992443, ...],
#         [23.63413098, 32.13539043, 33.83564232, 8.84193955, ...]]))

all_data[0]
# (<PIL.JpegImagePlugin.JpegImageFile image mode=RGB size=510x337>,
#  (0, array([[10.00958466, 8.18210863, 8.18210863, 10.92332268, ...],
#             [132.30670927, 120.42811502, 103.52396166, 90.73162939, ...]]))

all_data[1]
# (<PIL.JpegImagePlugin.JpegImageFile image mode=RGB size=519x343>,
#  (0, array([[15.19298246, 13.71929825, 15.19298246, 19.61403509, ...],
#             [121.5877193, 103.90350877, 80.81578947, 64.11403509, ...]]))

all_data[2]
# (<PIL.JpegImagePlugin.JpegImageFile image mode=RGB size=492x325>,
#  (0, array([[10.40789474, 7.17807018, 5.79385965, 9.02368421, ...],
#             [131.30789474, 120.69561404, 102.23947368, 86.09035088, ...]]))

all_data[3]
# (<PIL.JpegImagePlugin.JpegImageFile image mode=RGB size=538x355>,
#  (0, array([[19.54035088, 18.57894737, 26.27017544, 38.2877193, ...],
#             [131.49122807, 100.24561404, 74.2877193, 49.29122807, ...]]))

all_data[4]
# (<PIL.JpegImagePlugin.JpegImageFile image mode=RGB size=528x349>,
#  (0, array([[11.87982456, 11.87982456, 13.86578947, 15.35526316, ...],
#             [128.34649123, 105.50789474, 91.60614035, 76.71140351, ...]]))

import matplotlib.pyplot as plt

def show_images(data, main_title=None):
    plt.figure(figsize=(10, 5))
    plt.suptitle(t=main_title, y=1.0, fontsize=14)
    ims = (0, 1, 2, 435, 870, 1070, 1868, 1923, 2723, 2765, 2807, 2854)
    for i, j in enumerate(ims, start=1):
        plt.subplot(2, 5, i)
        if len(data.target_type) == 1:
            if data.target_type[0] == "category":
                im, lab = data[j]
                plt.title(label=lab)
            elif data.target_type[0] == "annotation":
                im, (px, py) = data[j]
                plt.scatter(x=px, y=py)
            plt.imshow(X=im)
        elif len(data.target_type) == 2:
            if data.target_type[0] == "category":
                im, (lab, (px, py)) = data[j]
            elif data.target_type[0] == "annotation":
                im, ((px, py), lab) = data[j]
            plt.title(label=lab)
            plt.imshow(X=im)
            plt.scatter(x=px, y=py)
        if i == 10:
            break
    plt.tight_layout()
    plt.show()

show_images(data=category_data, main_title="category_data")
show_images(data=annotation_data, main_title="annotation_data")
show_images(data=all_data, main_title="all_data")


到这里,我们也就讲完了《PyTorch 中的加州理工学院》的内容了。个人认为,基础知识的学习和巩固,是为了更好的将其运用到项目中,欢迎关注golang学习网公众号,带你了解更多关于的知识点!
声明:本文转载于:dev.to 如有侵犯,请联系study_golang@163.com删除
相关阅读
更多>
-
501 收藏
-
501 收藏
-
501 收藏
-
501 收藏
-
501 收藏
最新阅读
更多>
-
458 收藏
-
347 收藏
-
284 收藏
-
297 收藏
-
160 收藏
-
398 收藏
-
156 收藏
-
485 收藏
-
176 收藏
-
264 收藏
-
417 收藏
-
495 收藏
课程推荐
更多>
-

- 前端进阶之JavaScript设计模式
- 设计模式是开发人员在软件开发过程中面临一般问题时的解决方案,代表了最佳的实践。本课程的主打内容包括JS常见设计模式以及具体应用场景,打造一站式知识长龙服务,适合有JS基础的同学学习。
- 立即学习 543次学习
-

- GO语言核心编程课程
- 本课程采用真实案例,全面具体可落地,从理论到实践,一步一步将GO核心编程技术、编程思想、底层实现融会贯通,使学习者贴近时代脉搏,做IT互联网时代的弄潮儿。
- 立即学习 516次学习
-

- 简单聊聊mysql8与网络通信
- 如有问题加微信:Le-studyg;在课程中,我们将首先介绍MySQL8的新特性,包括性能优化、安全增强、新数据类型等,帮助学生快速熟悉MySQL8的最新功能。接着,我们将深入解析MySQL的网络通信机制,包括协议、连接管理、数据传输等,让
- 立即学习 500次学习
-

- JavaScript正则表达式基础与实战
- 在任何一门编程语言中,正则表达式,都是一项重要的知识,它提供了高效的字符串匹配与捕获机制,可以极大的简化程序设计。
- 立即学习 487次学习
-

- 从零制作响应式网站—Grid布局
- 本系列教程将展示从零制作一个假想的网络科技公司官网,分为导航,轮播,关于我们,成功案例,服务流程,团队介绍,数据部分,公司动态,底部信息等内容区块。网站整体采用CSSGrid布局,支持响应式,有流畅过渡和展现动画。
- 立即学习 485次学习
