CelebA 是 PyTorch
来源:dev.to
时间:2025-01-09 15:14:58 473浏览 收藏
积累知识,胜过积蓄金银!毕竟在文章开发的过程中,会遇到各种各样的问题,往往都是一些细节知识点还没有掌握好而导致的,因此基础知识点的积累是很重要的。下面本文《CelebA 是 PyTorch》,就带大家讲解一下知识点,若是你对本文感兴趣,或者是想搞懂其中某个知识点,就请你继续往下看吧~
请我喝杯咖啡☕
*我的帖子解释了 celeba。
celeba() 可以使用 celeba 数据集,如下所示:
*备忘录:
- 第一个参数是 root(必需类型:str 或 pathlib.path)。 *绝对或相对路径都是可能的。
- 第二个参数是 split(可选-默认:"train"-类型:str)。 *可以设置“train”(162,770张图片)、“valid”(19,867张图片)、“test”(19,962张图片)或“all”(202,599张图片)。
- 第三个参数是target_type(可选-默认:“attr”-类型:str或str列表):
*备注:
- 可以为其设置“attr”、“identity”、“bbox”和/或“landmark”。
- 也可以设置空列表。
- 可以设置多个相同的值。
- 如果值的顺序不同,则其元素的顺序也会不同。
- 第四个参数是transform(optional-default:none-type:callable)。
- 第 5 个参数是 target_transform(optional-default:none-type:callable)。
- 第 6 个参数是 download(可选-默认:false-类型:bool):
*备注:
- 如果为 true,则从互联网下载数据集并解压(解压)到根目录。
- 如果为 true 并且数据集已下载,则将其提取。
- 如果为 true 并且数据集已下载并提取,则不会发生任何事情。
- 如果数据集已经下载并提取,则应该为 false,因为它速度更快。
- 下载数据集需要 gdown。
- 您可以从这里手动下载并解压数据集(img_align_celeba.zip with identity_celeba.txt、list_attr_celeba.txt、list_bbox_celeba.txt、list_eval_partition.txt 和 list_landmarks_align_celeba.txt)到 data/celeba/。
from torchvision.datasets import CelebA
train_attr_data = CelebA(
root="data"
)
train_attr_data = CelebA(
root="data",
split="train",
target_type="attr",
transform=None,
target_transform=None,
download=False
)
valid_identity_data = CelebA(
root="data",
split="valid",
target_type="identity"
)
test_bbox_data = CelebA(
root="data",
split="test",
target_type="bbox"
)
all_landmarks_data = CelebA(
root="data",
split="all",
target_type="landmarks"
)
all_empty_data = CelebA(
root="data",
split="all",
target_type=[]
)
all_all_data = CelebA(
root="data",
split="all",
target_type=["attr", "identity", "bbox", "landmarks"]
)
len(train_attr_data), len(valid_identity_data), len(test_bbox_data)
# (162770, 19867, 19962)
len(all_landmarks_data), len(all_empty_data), len(all_all_data)
# (202599, 202599, 202599)
train_attr_data
# Dataset CelebA
# Number of datapoints: 162770
# Root location: data
# Target type: ['attr']
# Split: train
train_attr_data.root
# 'data'
train_attr_data.split
# 'train'
train_attr_data.target_type
# ['attr']
print(train_attr_data.transform)
# None
print(train_attr_data.target_transform)
# None
train_attr_data.download
#
len(train_attr_data.attr), train_attr_data.attr
# (162770, tensor([[0, 1, 1, ..., 0, 0, 1],
# [0, 0, 0, ..., 0, 0, 1],
# [0, 0, 0, ..., 0, 0, 1],
# ...,
# [1, 0, 1, ..., 0, 1, 1],
# [0, 0, 0, ..., 0, 0, 1],
# [0, 1, 1, ..., 1, 0, 1]]))
len(train_attr_data.attr_names), train_attr_data.attr_names
# (41, ['5_o_Clock_Shadow', 'Arched_Eyebrows', 'Attractive',
# 'Bags_Under_Eyes', 'Bald', 'Bangs', 'Big_Lips', 'Big_Nose',
# 'Black_Hair', 'Blond_Hair', 'Blurry', 'Brown_Hair',
# ...
# 'Wearing_Necklace', 'Wearing_Necktie', 'Young', ''])
len(train_attr_data.identity), train_attr_data.identity
# (162770, tensor([[2880], [2937], [8692], ..., [7391], [8610], [2304]]))
len(train_attr_data.bbox), train_attr_data.bbox
# (162770, tensor([[95, 71, 226, 313],
# [72, 94, 221, 306],
# [216, 59, 91, 126],
# ...,
# [103, 103, 143, 198],
# [30, 59, 216, 280],
# [376, 4, 372, 515]]))
len(train_attr_data.landmarks_align), train_attr_data.landmarks_align
# (162770, tensor([[69, 109, 106, ..., 152, 108, 154],
# [69, 110, 107, ..., 151, 108, 153],
# [76, 112, 104, ..., 156, 98, 158],
# ...,
# [69, 113, 109, ..., 151, 110, 151],
# [68, 112, 109, ..., 150, 108, 151],
# [70, 111, 107, ..., 153, 102, 152]]))
train_attr_data[0]
# (,
# tensor([0, 1, 1, 0, 0, 0, 0, 0, 0, 0,
# 0, 1, 0, 0, 0, 0, 0, 0, 1, 1,
# 0, 1, 0, 0, 1, 0, 0, 1, 0, 0,
# 0, 1, 1, 0, 1, 0, 1, 0, 0, 1]))
train_attr_data[1]
# (,
# tensor([0, 0, 0, 1, 0, 0, 0, 1, 0, 0,
# 0, 1, 0, 0, 0, 0, 0, 0, 0, 1,
# 0, 1, 0, 0, 1, 0, 0, 0, 0, 0,
# 0, 1, 0, 0, 0, 0, 0, 0, 0, 1]))
train_attr_data[2]
# (,
# tensor([0, 0, 0, 0, 0, 0, 1, 0, 0, 0,
# 1, 0, 0, 0, 0, 0, 0, 0, 0, 0,
# 1, 0, 0, 1, 1, 0, 0, 1, 0, 0,
# 0, 0, 0, 1, 0, 0, 0, 0, 0, 1]))
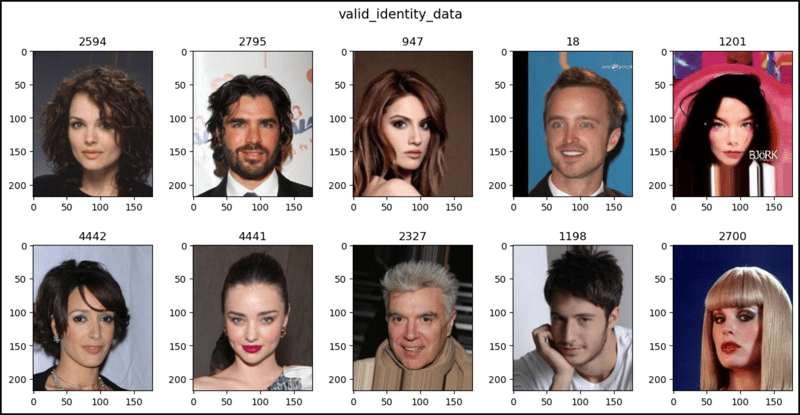
valid_identity_data[0]
# (,
# tensor(2594))
valid_identity_data[1]
# (,
# tensor(2795))
valid_identity_data[2]
# (,
# tensor(947))
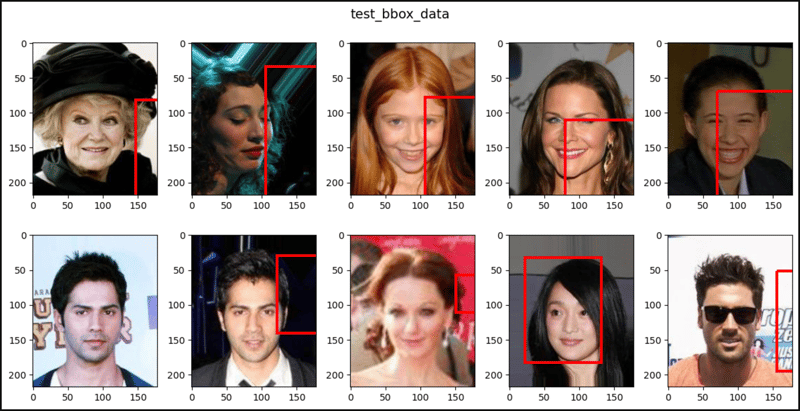
test_bbox_data[0]
# (,
# tensor([147, 82, 120, 166]))
test_bbox_data[1]
# (,
# tensor([106, 34, 140, 194]))
test_bbox_data[2]
# (,
# tensor([107, 78, 109, 151]))
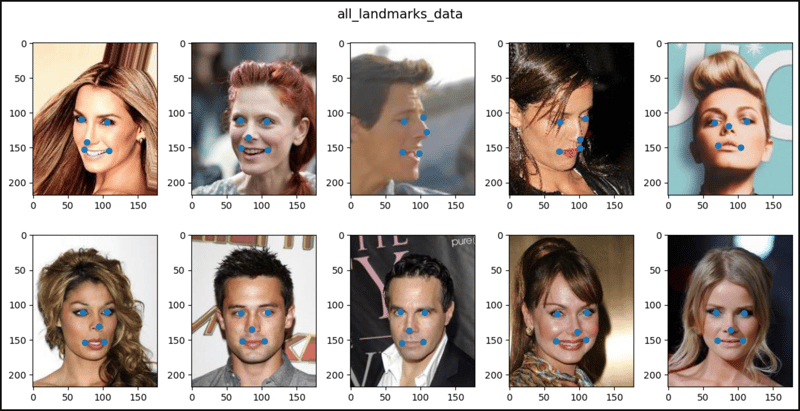
all_landmarks_data[0]
# (,
# tensor([69, 109, 106, 113, 77, 142, 73, 152, 108, 154]))
all_landmarks_data[1]
# (,
# tensor([69, 110, 107, 112, 81, 135, 70, 151, 108, 153]))
all_landmarks_data[2]
# (,
# tensor([76, 112, 104, 106, 108, 128, 74, 156, 98, 158]))
all_empty_data[0]
# (, None)
all_empty_data[1]
# (, None)
all_empty_data[2]
# (, None)
all_all_data[0]
# (,
# (tensor([0, 1, 1, 0, 0, 0, 0, 0, 0, 0,
# 0, 1, 0, 0, 0, 0, 0, 0, 1, 1,
# 0, 1, 0, 0, 1, 0, 0, 1, 0, 0,
# 0, 1, 1, 0, 1, 0, 1, 0, 0, 1]),
# tensor(2880),
# tensor([95, 71, 226, 313]),
# tensor([69, 109, 106, 113, 77, 142, 73, 152, 108, 154])))
all_all_data[1]
# (,
# (tensor([0, 0, 0, 1, 0, 0, 0, 1, 0, 0,
# 0, 1, 0, 0, 0, 0, 0, 0, 0, 1,
# 0, 1, 0, 0, 1, 0, 0, 0, 0, 0,
# 0, 1, 0, 0, 0, 0, 0, 0, 0, 1]),
# tensor(2937),
# tensor([72, 94, 221, 306]),
# tensor([69, 110, 107, 112, 81, 135, 70, 151, 108, 153])))
all_all_data[2]
# (,
# (tensor([0, 0, 0, 0, 0, 0, 1, 0, 0, 0,
# 1, 0, 0, 0, 0, 0, 0, 0, 0, 0,
# 1, 0, 0, 1, 1, 0, 0, 1, 0, 0,
# 0, 0, 0, 1, 0, 0, 0, 0, 0, 1]),
# tensor(8692),
# tensor([216, 59, 91, 126]),
# tensor([76, 112, 104, 106, 108, 128, 74, 156, 98, 158])))
import matplotlib.pyplot as plt
from matplotlib.patches import Rectangle
from matplotlib.patches import Circle
def show_images(data, main_title=None):
if "attr" in data.target_type and len(data.target_type) == 1 \
or not data.target_type:
plt.figure(figsize=(12, 6))
plt.suptitle(t=main_title, y=1.0, fontsize=14)
for i, (im, _) in enumerate(data, start=1):
plt.subplot(2, 5, i)
plt.imshow(X=im)
if i == 10:
break
plt.tight_layout(h_pad=3.0)
plt.show()
elif "identity" in data.target_type and len(data.target_type) == 1:
plt.figure(figsize=(12, 6))
plt.suptitle(t=main_title, y=1.0, fontsize=14)
for i, (im, lab) in enumerate(data, start=1):
plt.subplot(2, 5, i)
plt.title(label=lab.item())
plt.imshow(X=im)
if i == 10:
break
plt.tight_layout(h_pad=3.0)
plt.show()
elif "bbox" in data.target_type and len(data.target_type) == 1:
fig, axes = plt.subplots(nrows=2, ncols=5, figsize=(12, 6))
fig.suptitle(t=main_title, y=1.0, fontsize=14)
for (i, (im, (x, y, w, h))), axis \
in zip(enumerate(data, start=1), axes.ravel()):
axis.imshow(X=im)
rect = Rectangle(xy=(x, y), width=w, height=h,
linewidth=3, edgecolor='r',
facecolor='none')
axis.add_patch(p=rect)
if i == 10:
break
fig.tight_layout(h_pad=3.0)
plt.show()
elif "landmarks" in data.target_type and len(data.target_type) == 1:
plt.figure(figsize=(12, 6))
plt.suptitle(t=main_title, y=1.0, fontsize=14)
for i, (im, lm) in enumerate(data, start=1):
px = []
py = []
for j, v in enumerate(lm):
if j%2 == 0:
px.append(v)
else:
py.append(v)
plt.subplot(2, 5, i)
plt.imshow(X=im)
plt.scatter(x=px, y=py)
if i == 10:
break
plt.tight_layout(h_pad=3.0)
plt.show()
elif len(data.target_type) == 4:
fig, axes = plt.subplots(nrows=2, ncols=5, figsize=(12, 6))
fig.suptitle(t=main_title, y=1.0, fontsize=14)
for (i, (im, (_, lab, (x, y, w, h), lm))), axis \
in zip(enumerate(data, start=1), axes.ravel()):
axis.set_title(label=lab.item())
axis.imshow(X=im)
rect = Rectangle(xy=(x, y), width=w, height=h,
linewidth=3, edgecolor='r',
facecolor='none', clip_on=True)
axis.add_patch(p=rect)
for j, (px, py) in enumerate(lm.split(2)):
axis.add_patch(p=Circle(xy=(px, py)))
# for j, v in enumerate(lm):
# if j%2 == 0:
# px.append(v)
# else:
# py.append(v)
# axis.scatter(x=px, y=py)
# axis.plot(px, py)
# `axis.scatter()` and `axis.plot()` of `plt.subplots()` don't work
# properly. They shrink images so use `axis.add_patch()` instead.
if i == 10:
break
fig.tight_layout(h_pad=3.0)
plt.show()
show_images(data=train_attr_data, main_title="train_attr_data")
show_images(data=valid_identity_data, main_title="valid_identity_data")
show_images(data=test_bbox_data, main_title="test_bbox_data")
show_images(data=all_landmarks_data, main_title="all_landmarks_data")
show_images(data=all_empty_data, main_title="all_empty_data")
show_images(data=all_all_data, main_title="all_all_data")


终于介绍完啦!小伙伴们,这篇关于《CelebA 是 PyTorch》的介绍应该让你收获多多了吧!欢迎大家收藏或分享给更多需要学习的朋友吧~golang学习网公众号也会发布文章相关知识,快来关注吧!
声明:本文转载于:dev.to 如有侵犯,请联系study_golang@163.com删除
相关阅读
更多>
-
501 收藏
-
501 收藏
-
501 收藏
-
501 收藏
-
501 收藏
最新阅读
更多>
-
321 收藏
-
365 收藏
-
文章 · python教程 | 3天前 | 默认值 · python · 数据建模 · dataclass · default_factory · field · Python 数据类 Field 可变默认值 dataclass default_factory228 收藏
-
文章 · python教程 | 3天前 | 重试机制 · timeout · requests · Python教程 · 接口调试 · Python Http请求 Requests timeout retry 接口排查330 收藏
-
299 收藏
-
308 收藏
-
209 收藏
-
329 收藏
-
437 收藏
-
299 收藏
-
241 收藏
-
204 收藏
课程推荐
更多>
-

- 前端进阶之JavaScript设计模式
- 设计模式是开发人员在软件开发过程中面临一般问题时的解决方案,代表了最佳的实践。本课程的主打内容包括JS常见设计模式以及具体应用场景,打造一站式知识长龙服务,适合有JS基础的同学学习。
- 立即学习 543次学习
-

- GO语言核心编程课程
- 本课程采用真实案例,全面具体可落地,从理论到实践,一步一步将GO核心编程技术、编程思想、底层实现融会贯通,使学习者贴近时代脉搏,做IT互联网时代的弄潮儿。
- 立即学习 516次学习
-

- 简单聊聊mysql8与网络通信
- 如有问题加微信:Le-studyg;在课程中,我们将首先介绍MySQL8的新特性,包括性能优化、安全增强、新数据类型等,帮助学生快速熟悉MySQL8的最新功能。接着,我们将深入解析MySQL的网络通信机制,包括协议、连接管理、数据传输等,让
- 立即学习 500次学习
-

- JavaScript正则表达式基础与实战
- 在任何一门编程语言中,正则表达式,都是一项重要的知识,它提供了高效的字符串匹配与捕获机制,可以极大的简化程序设计。
- 立即学习 487次学习
-

- 从零制作响应式网站—Grid布局
- 本系列教程将展示从零制作一个假想的网络科技公司官网,分为导航,轮播,关于我们,成功案例,服务流程,团队介绍,数据部分,公司动态,底部信息等内容区块。网站整体采用CSSGrid布局,支持响应式,有流畅过渡和展现动画。
- 立即学习 485次学习