Linux 设备树 devicetree(DTS)入门
来源:良许Linux教程网
时间:2025-01-10 12:33:38 354浏览 收藏
文章小白一枚,正在不断学习积累知识,现将学习到的知识记录一下,也是将我的所得分享给大家!而今天这篇文章《Linux 设备树 devicetree(DTS)入门》带大家来了解一下##content_title##,希望对大家的知识积累有所帮助,从而弥补自己的不足,助力实战开发!
ARM devicetree的来源
在过去的ARM Linux中,存在大量的冗余代码。这些设备代码与特定公司的单板启动或运行细节紧密耦合,无法被重用或移植。同时,内核缺乏引导标准,导致代码不断膨胀。最终,由于Tony Lindgren向Linus发送了一封邮件,请求提交OMAP平台代码的修改,并附上了修改内容以及如何解决合并冲突的方法,使得Linus怒不可遏地抱怨道:“该死。伙计们,这整个ARM的事情真是个讨厌的麻烦。”(Linus对ARM的代码肯定已经忍耐了很久了)。
经过讨论后,对ARM平台相关代码做出了一些规范:
- ARM的核心代码仍然存放在arch/arm目录下;
- ARM SoC核心架构代码存放在arch/arm目录下;
- ARM SoC周边外设模块的驱动存放在drivers目录下;
- ARM SoC特定的代码存放在arch/arm/mach-xxx目录下;
- ARM SoC板级特定的代码被移除,由Device Tree机制来传递硬件拓扑和硬件资源信息。
从本质上讲,Device Tree改变了以前将硬件设备配置信息硬编码到内核代码中的方式,改为使用引导加载程序传递一个描述性的数据结构。
DTS知识介绍
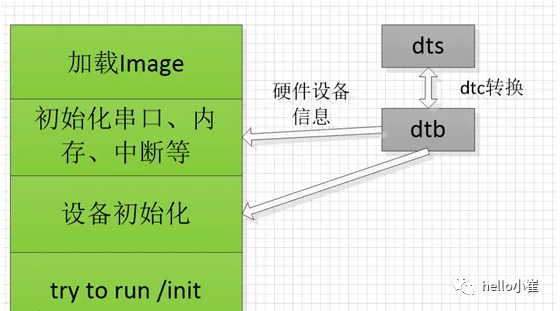
Arm系统启动,硬件设备可以通过DTS(devicetree)或ACPI引导初始化,这里只讲DTS方式,ACPI是由BIOS配置。

如上图,一般来说,arm内核通过dts引导启动,需要内核Image、dtb和filesystem,其中dtb是由dts通过dtc工具生成,里面包括初始化设备的硬件信息。内核Image启动过程中会解析dtb中内容,并根据信息初始化设备平台。这里提一句,dts由虽然由用户配置,但是配置必须与硬件信息相匹配,否则会出现初始化失败或设备部分功能不正常的问题。
DTS描述
Device Tree由一系列被命名的结点(node)和属性(property)组成,而结点本身可包含子结点。所谓属性,其实就是成对出现的name和value。在Device Tree中,可描述的信息包括(原先这些信息大多被hard code到kernel中),CPU的数量和类别、内存基地址和大、timer时钟、外设连接、中断配置、串口等。内核在启动过程中会解析每个node的硬件配置信息,根据这些信息初始化设备。
举例,如下是arm gicv3中断控制器的节点配置信息(来源Documentation/devicetree/bindings/interrupt-controller/arm,gic-v3.txt):
gic: interrupt-controller@2cf00000 {
 compatible = "arm,gic-v3";
 #interrupt-cells = ;
 #address-cells = ;
 #size-cells = ;
 ranges;
 interrupt-controller;
 reg = ,  // GICD
 , // GICR
 , // GICC
 , // GICH
 ;  // GICV
 interrupts = ;

 msi-controller;
 mbi-ranges = ;

 gic-its@2c200000 {
 compatible = "arm,gic-v3-its";
 msi-controller;
 #msi-cells = ;
 reg = ;
 };
 };
gic: interrupt-controller@2cf00000:表示node节点信息,interrupt-controller@2cf00000是node节点的名称,一般命名规范是 设备名@基地址或设备名,其中冒号前面gic可以看过node的“小名”,后续关联node节点可以直接”&gic”;
{}中内容:interrupt-controller的属性,包括:
1)compatible = “arm,gic-v3”; compatible名称,gicv3驱动代码匹配”arm,gic-v3”后才会执行初始化probe代码;
2)#interrupt-cells = ; 表示interrupt由3部分组成,对应interrupts = ,分别是中断类型(1表示PPI),中断号9和中断触发方式(4表示上升沿触发);
3)#address-cells = ;
#size-cells = ; 表示地址信息用64位表示,比如reg = 表示GICD的基地址是0x02f000000(其中0x是高32bit,0x2f000000是低32bit),size是0x10000;
4)msi-controller; 表示msi,此字符串含义可以具体查看驱动代码,驱动会get到这个字符串,然后做判断,有会走A,没有就跳过。
5)gic-its@2c200000 表示its节点的配置,gic-v3引入了its来接收SPI中断;
如上,便是dts的基本配置,更加详细的介绍可以参考linux内核源码:Documentation/devicetree/,每个硬件设备配置格式和属性都有描述。
重要点
一般来说,linux菜鸟级别只要会看dts即可,linux驱动开发才需要掌握dts的每行含义,因为任一行出错,都可能导致驱动某项功能失效。下面我列一些经常遇到的问题:
1.dts和dtb如何转换
内核源码下scripts/dtc/dtc,dtc工具只有内核编译时才会编译,所以如果希望得到,先编译一遍内核即可。
转换命令:
dts转dtb:dtc –I dts –O dtb test.dts –o test.dtb
dtb转dts: dtc –I dtb –O dts test.dtb –o test.dts
2.dts中node节点如何查看,每行又是什么意义
这个问题经常遇到,不知道设备节点配置的意义,其实每个配置都可以根据compatible在Documentation/devicetree/中查到说明,只是不搞内核不知道这个方法,比如dts中看到:
v2m_serial0: uart@090000 {
  compatible = "arm,pl011", "arm,primecell";
 reg = ;
 interrupts = ;
 clocks = , ;
 clock-names = "uartclk", "apb_pclk";
 };
到linux内核源码运行:
cuibixuan@ubuntu:~/git/linux/Documentation/devicetree/bindings$ cd Documentation/devicetree/bindings/
cuibixuan@ubuntu:~/git/linux/Documentation/devicetree/bindings$ grep "arm,pl011" -rn *
clock/hi3660-clock.txt:41: compatible = "arm,pl011", "arm,primecell";
clock/hi3670-clock.txt:37: compatible = "arm,pl011", "arm,primecell";
clock/lsi,axm5516-clks.txt:22: compatible = "arm,pl011", "arm,primecell";
clock/hix5hd2-clock.txt:25: compatible = "arm,pl011", "arm,primecell";
dma/ste-dma40.txt:130: compatible = "arm,pl011", "arm,primecell";
dma/snps-dma.txt:65: compatible = "arm,pl011", "arm,primecell";
pinctrl/axis,artpec6-pinctrl.txt:71: compatible = "arm,pl011", "arm,primecell";
pinctrl/axis,artpec6-pinctrl.txt:80: compatible = "arm,pl011", "arm,primecell";
pinctrl/ste,nomadik.txt:141: compatible = "arm,pl011", "arm,primecell";
serial/pl011.txt:4:- compatible: must be "arm,primecell", "arm,pl011", "zte,zx296702-uart"
serial/pl011.txt:44: compatible = "arm,pl011", "arm,primecell";
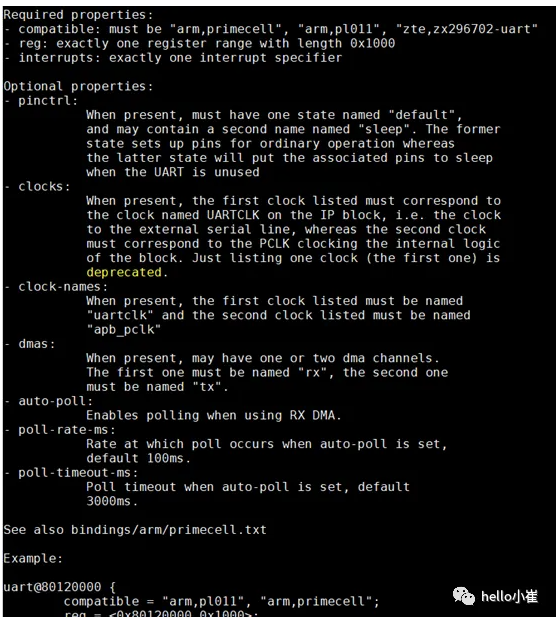
vim serial/pl011.txt
如下图,有说明,有举例,很清晰

如果还不懂,或者找不到,那么恭喜你,你要看驱动代码了
cuibixuan@ubuntu:~/git/linux$ cd drivers/tty/serial/
cuibixuan@ubuntu:~/git/linux/drivers/tty/serial$ grep "arm,pl011" -rn *
amba-pl011.c:2473:OF_EARLYCON_DECLARE(pl011, "arm,pl011", pl011_early_console_setup);
3.内核初始化设备驱动,根据compatible来决定是否初始化
compatible的字符串,是驱动匹配的关键,如果匹配不到,那么就不会初始化。这点设计非常棒,在编译Image完毕后,用户还可以根据dts选配启动哪些硬件。
一直有人有疑问,既然内核都有config选项来决定了,为什么还要dts来再加一道门禁呢。你可以设想下,如果内核启动配置了哪些config就初始化哪些功能,那么启动要多么繁琐呀,大部分都是你不知道的功能都在启动,万一失败了,还得查看哪里问题,至少编译一次内核。尤其是嵌入式设备,要精简,更要达到“我只关心我配置的设备”的目的。
好了扯远了,以上面串口驱动代码举例(提示:驱动代码的开头是probe函数,一般翻到代码底部即可,上面都是功能的实现),
static const struct of_device_id sbsa_uart_of_match[] = {
 { .compatible = "arm,sbsa-uart", },
 {},
};
MODULE_DEVICE_TABLE(of, sbsa_uart_of_match);

static struct platform_driver arm_sbsa_uart_platform_driver = {
 .probe = sbsa_uart_probe,
 .remove  = sbsa_uart_remove,
 .driver = {
 .name = "sbsa-uart",
 .of_match_table = of_match_ptr(sbsa_uart_of_match),
 .acpi_match_table = ACPI_PTR(sbsa_uart_acpi_match),
 .suppress_bind_attrs = IS_BUILTIN(CONFIG_SERIAL_AMBA_PL011),
 },
};

…

static int __init pl011_init(void)
{
 printk(KERN_INFO "Serial: AMBA PL011 UART driver\n");

 if (platform_driver_register(&arm_sbsa_uart_platform_driver))
 pr_warn("could not register SBSA UART platform driver\n");
 return amba_driver_register(&pl011_driver);
}
内核通过platform_driver_register()来注册设备,arm_sbsa_uart_platform_driver是初始化成struct platform_driver的结构体,结构体指定了设备的probe,remove等钩子函数,.driver记录设备的name,.compatible = “arm,sbsa-uart”(of_match_table来匹配),这里多提一句,.of_match_table是dts启动匹配字符串”arm,sbsa-uart”,.acpi_match_table是ACPI启动匹配PTR。
如上,如果dts中node节点有compatible带”arm,sbsa-uart”,那么就会执行指定的钩子函数.probe = sbsa_uart_probe,函数再进行node节点其他参数的解析(说是解析,就是get字符串或数值,在进行对应初始化或读写寄存器)。
4.reg=和interrupts=里面数值代表什么?
reg和interrupt数值都有具体的含义,上文提到:
#interrupt-cells = ; 表示interrupt由3部分组成,对应interrupts = ,分别是中断类型(1表示PPI),中断号9和中断触发方式(4表示高电平触发);
这里再补充一下:
interrupts = ,分别是
中断类型:0表示SPI,1表示PPI
中断号9,其中PPI是[0-15],SPI范围[32-1019]
中断触发方式:
1 = low-to-high edge triggered
2 = high-to-low edge triggered
4 = active high edge triggered
8 = active low edge triggered
恩,翻译一下就时上升沿触发、下降沿触发、高电平触发、低电平触发。
#address-cells = ;
#size-cells = ; 表示地址信息用64位表示,比如reg = 表示GICD的基地址是0x02f000000(其中0x是高32bit,0x2f000000是第32bit),size是0x10000;
举例, = 0x12f000000,= 0x100000001
5.dts支持include
对于可复用的描述节点,支持以include方式被多个dts包含,可放在dtsi文件,在dts中以
#include “uart.dtsi”包含使用。
dts文件:foundation-platform.dts
默认变量
一般dts首个{}前面的信息表示全局默认变量,意思即node无特殊配置,则默认采用这里的配置
        #address-cells = ; //地址长度64bit
        #size-cells = ;  //size长度32bit
        model = "V2P-AARCH64"; //model名称
        compatible = "arm,vexpress,v2p-aarch64", "arm,vexpress";
        interrupt-parent = ; //中断parent是gic
CPU配置
        cpus {
                #address-cells = ;
                #size-cells = ;

// 配置cpu0-cpu3的信息,最终启动4核
                cpu@0 {
                        device_type = "cpu";  //设备类型:cpu
                        compatible = "arm,armv8"; //表示armv8的cpu
                        reg = ; //cpu信息
                        enable-method = "spin-table"; //采用spintable方式拉起从核
                        cpu-release-addr = ; //cpu初启动的pc指针存放位置
                };
                cpu@1 {
                        device_type = "cpu";
                        compatible = "arm,armv8";
                        reg = ;
                        enable-method = "spin-table";
                        cpu-release-addr = ;
                };
                cpu@2 {
                        device_type = "cpu";
                        compatible = "arm,armv8";
                        reg = ;
                        enable-method = "spin-table";
                        cpu-release-addr = ;
                };
                cpu@3 {
                        device_type = "cpu";
                        compatible = "arm,armv8";
                        reg = ;
                        enable-method = "spin-table";
                        cpu-release-addr = ;
                };
        };
内存配置
        memory@80000000 {
                device_type = "memory";
//此节点配置内存,内存2块:
//起始地址:0x80000000, 长度0x80000000;
//起始地址:0x880000000, 长度0x80000000;
                reg = ;
        };
中断控制器
        gic: interrupt-controller@2c001000 {
// 中断控制器使用 cortex a15,gic
                compatible = "arm,cortex-a15-gic";
                #interrupt-cells = ;
                #address-cells = ;
                interrupt-controller;
// GICD,GICH等信息,具体参考Documentation/devicetree/bindings/interrupt-controller/arm,gic.txt
//- reg : Specifies base physical address(s) and size of the GIC registers. The
  first region is the GIC distributor register base and size. The 2nd region is
  the GIC cpu interface register base and size.
                reg = ,
                      ,
                      ,
                      ;
// 虚拟化使用,- interrupts : VGIC maintenance interrupt.
//* GIC virtualization extensions (VGIC)
                interrupts = ;
        };
PMU
        pmu {
// 使用armv8 pmuv3
                compatible = "arm,armv8-pmuv3";
// pmu的中断配置,这段配置完毕,即可以使用arm cpu的pmu功能
                interrupts = ;
        };
Timer:
        timer {
//定时器配置
                compatible = "arm,armv8-timer";
                interrupts = ,
                             ,
                             ,
                             ;
                clock-frequency = ;
        };
串口配置
                iofpga@3,00000000 {
                        compatible = "arm,amba-bus", "simple-bus";
                        #address-cells = ;
                        #size-cells = ;
                        ranges = ;

                        sysreg@010000 {
                                compatible = "arm,vexpress-sysreg";
                                reg = ;
                        };

                        v2m_serial0: uart@090000 {
                                compatible = "arm,pl011", "arm,primecell"; //串口驱动
                                reg = ; //串口基地址和长度
                                interrupts = ;  //串口中断号
                                clocks = , ; //串口波特率
                                clock-names = "uartclk", "apb_pclk";
                        };

                        v2m_serial1: uart@0a0000 {
                                compatible = "arm,pl011", "arm,primecell";
                                reg = ;
                                interrupts = ;
                                clocks = , ;
                                clock-names = "uartclk", "apb_pclk";
                        };

                        v2m_serial2: uart@0b0000 {
                                compatible = "arm,pl011", "arm,primecell";
                                reg = ;
                                interrupts = ;
                                clocks = , ;
                                clock-names = "uartclk", "apb_pclk";
                        };

                        v2m_serial3: uart@0c0000 {
                                compatible = "arm,pl011", "arm,primecell";
                                reg = ;
                                interrupts = ;
                                clocks = , ;
                                clock-names = "uartclk", "apb_pclk";
                        };

                        virtio_block@0130000 {
                                compatible = "virtio,mmio";
                                reg = ;
                                interrupts = ;
                        };
                };
        };

        /* chosen */
};
从device_node中获取信息:
int of_property_read_u8_array(const struct device_node *np, const char *propname,u8 *out_values, size_t sz);
int of_property_read_u16_array(const struct device_node *np, const char *propname,u16 *out_values, size_t sz);
int of_property_read_u32_array(const struct device_node *np, const char *propname,u32 *out_values, size_t sz);
从设备结点np中读取属性名为propname,类型为8、16、32、位整型数组的属性值,并放入out_values,sz指明了要读取的个数。
static inline int of_property_read_u8(const struct device_node *np,const char *propname,u8 *out_value)
static inline int of_property_read_u16(const struct device_node *np,const char *propname,u8 *out_value)
static inline int of_property_read_u32(const struct device_node *np,const char *propname,u8 *out_value)
从设备结点np中读取属性名为propname,类型为8、16、32位的属性值,并放入out_values。实际上这里调用的就是sz为1的XXX_array函数。
int of_property_read_u32_index(const struct device_node *np,const char*propname,u32 index, u32 *out_value)
从设备结点np中读取属性名为propname的属性值中第index个u32数值给out_value
int of_property_read_u64(conststruct device_node *np, const char *propname,u64 *out_value)
从设备结点np中读取属性名为propname,类型为64位的属性值,并放入out_values
int of_property_read_string(struct device_node *np, const char *propname,const char**out_string)
从设备结点np中读取属性名为propname的字符串型属性值
int of_property_read_string_index(struct device_node *np, const char *propname,intindex, const char **output)
从设备结点np中读取属性名为propname的字符串型属性值数组中的第index个字符串
int of_property_count_strings(struct device_node *np, const char *propname)
从设备结点np中读取属性名为propname的字符串型属性值的个数
unsigned int irq_of_parse_and_map(struct device_node *dev, int index)
从设备节点dev中读取第index个irq号
int of_irq_to_resource(struct device_node *dev, int index, struct resource *r)
从设备节点dev中读取第index个irq号,并填充一个irq资源结构体
int of_irq_count(struct device_node *dev)
获取设备节点dev的irq个数
static inline bool of_property_read_bool(const struct device_node *np,const char *propname);
如果设备结点np含有propname属性,则返回true,否则返回false。一般用于检查空属性是否存在。
struct property* of_find_property(const struct device_node *np,const char *name,int *lenp)
根据name参数,在指定的设备结点np中查找匹配的property,并返回这个property
const void * of_get_property(const struct device_node *np, const char *name,int *lenp)
根据name参数,在指定的设备结点np中查找匹配的property,并返回这个property的属性值
struct device_node* of_get_parent(const struct device_node *node)
获得node节点的父节点的device node
int of_device_is_compatible(const struct device_node *device,const char *compat);
判断设备结点device的compatible属性是否包含compat指定的字符串
从of_allnodes中查找信息:
struct device_node* of_find_node_by_path(const char *path)
根据路径参数,在全局链表of_allnodes中,查找匹配的device_node
struct device_node* of_find_node_by_name(struct device_node *from,const char *name)
则根据name在全局链表of_allnodes中查找匹配的device_node,若from=NULL表示从头开始查找
struct device_node* of_find_node_by_type(struct device_node *from,const char *type)
根据设备类型在全局链表of_allnodes中查找匹配的device_node
struct device_node * of_find_compatible_node(struct device_node *from, const char*type, const char,*compatible);
根据compatible的属性值在全局链表of_allnodes中查找匹配的device_node,大多数情况下,from、type为NULL。
struct device_node* of_find_node_with_property(struct device_node *from,const char *prop_name)
根据节点属性的name在全局链表of_allnodes中查找匹配的device_node
struct device_node* of_find_node_by_phandle(phandle handle)
根据phandle在全局链表of_allnodes中查找匹配的device_node
杂:
void __iomem* of_iomap(struct device_node *node, int index);
通过设备结点直接进行设备内存区间的 ioremap(),index是内存段的索引。若设备结点的reg属性有多段,可通过index标示要ioremap的是哪一段,只有1段的情况,index为0
unsigned long __init of_get_flat_dt_root(void)
用来查找在dtb中的根节点,好像返回的都是0
int of_alias_get_id(struct device_node *np, const char *stem)
获取节点np对应的aliasid号
struct device_node* of_node_get(struct device_node *node)
void of_node_put(struct device_node *node)
device node计数增加/减少
const struct of_device_id* of_match_node(const struct of_device_id *matches,const struct device_node*node)
将matches数组中of_device_id结构的name和type与device node的compatible和type匹配,返回匹配度最高的of_device_id结构
platform_device和resource相关:
int of_address_to_resource(struct device_node *dev, int index,struct resource *r)
根据设备节点dev的reg属性值,填充资源结构体r。Index参数指明了使用reg属性中第几个属性值,一般设置为0,表示第一个。
struct platform_device* of_device_alloc(struct device_node *np,const char *bus_id,struct device *parent)
根据device node,bus_id以及父节点创建该设备的platform_device结构,同时会初始化它的resource成员。
int of_platform_bus_probe(struct device_node *root,const struct of_device_id *matches,struct device *parent)
遍历of_allnodes中的节点挂接到of_platform_bus_type总线上,由于此时of_platform_bus_type总线上还没有驱动,所以此时不进行匹配
int of_platform_populate(struct device_node *root,const struct of_device_id *matches,const struct of_dev_auxdata *lookup,struct device *parent)
遍历of_allnodes中的所有节点,生成并初始化所以节点的platform_device结构
struct platform_device* of_find_device_by_node(struct device_node *np)
根据device_node查找返回该设备对应的platform_device结构
今天关于《Linux 设备树 devicetree(DTS)入门》的内容介绍就到此结束,如果有什么疑问或者建议,可以在golang学习网公众号下多多回复交流;文中若有不正之处,也希望回复留言以告知!
-
501 收藏
-
501 收藏
-
501 收藏
-
501 收藏
-
501 收藏
-
379 收藏
-
264 收藏
-
134 收藏
-
496 收藏
-
112 收藏
-
482 收藏
-
141 收藏
-
498 收藏
-
120 收藏
-
182 收藏
-
155 收藏
-
145 收藏
-

- 前端进阶之JavaScript设计模式
- 设计模式是开发人员在软件开发过程中面临一般问题时的解决方案,代表了最佳的实践。本课程的主打内容包括JS常见设计模式以及具体应用场景,打造一站式知识长龙服务,适合有JS基础的同学学习。
- 立即学习 543次学习
-

- GO语言核心编程课程
- 本课程采用真实案例,全面具体可落地,从理论到实践,一步一步将GO核心编程技术、编程思想、底层实现融会贯通,使学习者贴近时代脉搏,做IT互联网时代的弄潮儿。
- 立即学习 516次学习
-

- 简单聊聊mysql8与网络通信
- 如有问题加微信:Le-studyg;在课程中,我们将首先介绍MySQL8的新特性,包括性能优化、安全增强、新数据类型等,帮助学生快速熟悉MySQL8的最新功能。接着,我们将深入解析MySQL的网络通信机制,包括协议、连接管理、数据传输等,让
- 立即学习 500次学习
-

- JavaScript正则表达式基础与实战
- 在任何一门编程语言中,正则表达式,都是一项重要的知识,它提供了高效的字符串匹配与捕获机制,可以极大的简化程序设计。
- 立即学习 487次学习
-

- 从零制作响应式网站—Grid布局
- 本系列教程将展示从零制作一个假想的网络科技公司官网,分为导航,轮播,关于我们,成功案例,服务流程,团队介绍,数据部分,公司动态,底部信息等内容区块。网站整体采用CSSGrid布局,支持响应式,有流畅过渡和展现动画。
- 立即学习 485次学习
