详解Linux多线程中互斥锁、读写锁、自旋锁、条件变量、信号量
来源:良许Linux教程网
时间:2025-01-16 10:51:22 277浏览 收藏
哈喽!今天心血来潮给大家带来了《详解Linux多线程中互斥锁、读写锁、自旋锁、条件变量、信号量》,想必大家应该对文章都不陌生吧,那么阅读本文就都不会很困难,以下内容主要涉及到,若是你正在学习文章,千万别错过这篇文章~希望能帮助到你!
大家好,我是木荣。今天我们再次探讨Linux多线程编程中的重要概念,特别是同步和互斥机制。
同步和互斥
- 互斥:在多线程环境中,互斥是指多个线程访问同一资源时,仅允许一个线程对其进行访问的特性。这种特性具有唯一性和排他性,但并不能保证访问资源的顺序,因此访问可能是无序的。
- 同步:多线程同步建立在互斥的基础上,通过其他机制实现对资源的有序访问。通常情况下,同步已经实现了互斥,尤其是对于所有写入资源的情况而言,必然是互斥的。少数情况下,允许多个访问者同时访问资源。
互斥锁
在多任务操作系统中,同时运行的多个任务可能需要共享同一资源。为了确保同一时刻只有一个任务能够访问该资源,需要使用互斥锁来对其进行保护。互斥锁是一种简单的加锁机制,用于控制对共享资源的访问。它只有两种状态,即锁定(lock)和解锁(unlock)。
互斥锁操作基本流程
- 访问共享资源前,对互斥锁进行加锁
- 完成加锁后访问共享资源
- 对共享资源完成访问后,对互斥锁进行解锁
对互斥锁进行加锁后,任何其他试图再次对互斥锁加锁的线程将会被阻塞,直到锁被释放
互斥锁特性
-
原子性:互斥锁是一个原子操作,操作系统保证如果一个线程锁定了一个互斥锁,那么其他线程在同一时间不会成功锁定这个互斥锁 -
唯一性:如果一个线程锁定了一个互斥锁,在它解除锁之前,其他线程不可以锁定这个互斥锁 -
非忙等待:如果一个线程已经锁定了一个互斥锁,第二个线程又试图去锁定这个互斥锁,则第二个线程将被挂起且不占用任何CPU资源,直到第一个线程解除对这个互斥锁的锁定为止,第二个线程则被唤醒并继续执行,同时锁定这个互斥锁
示例
#include
#include
#include
#include
#include

 char *pTestBuf = nullptr; // 全局变量

 /* 定义互斥锁 */
pthread_mutex_t mutex;

void *ThrTestMutex(void *p)
{
    pthread_mutex_lock(&mutex);     // 加锁
    {
        pTestBuf = (char*)p;
        sleep(1);
    }
    pthread_mutex_unlock(&mutex);   // 解锁
}

int main()
{
    /* 初始化互斥量, 默认属性 */
    pthread_mutex_init(&mutex, NULL);

    /* 创建两个线程对共享资源访问 */
    pthread_t tid1, tid2;
    pthread_create(&tid1, NULL, ThrTestMutex, (void *)"Thread1");
    pthread_create(&tid2, NULL, ThrTestMutex, (void *)"Thread2");

    /* 等待线程结束 */
    pthread_join(tid1, NULL);
    pthread_join(tid2, NULL);

    /* 销毁互斥锁 */
    pthread_mutex_destroy(&mutex);

    return 0;
}
读写锁
-
读写锁允许更高的并行性,也叫共享互斥锁。互斥量要么是加锁状态,要么就是解锁状态,而且一次只有一个线程可以对其加锁。读写锁可以有3种状态:
读模式下加锁状态、写模式加锁状态、不加锁状态。一次只有一个线程可以占有写模式的读写锁,但是多个线程可以同时占有读模式的读写锁,即允许多个线程读但只允许一个线程写。 - 当读操作较多,写操作较少时,可用读写锁提高线程读并发性
读写锁特性
- 如果有线程读数据,则允许其它线程执行读操作,但不允许写操作
- 如果有线程写数据,则其它线程都不允许读、写操作
- 如果某线程申请了读锁,其它线程可以再申请读锁,但不能申请写锁
- 如果某线程申请了写锁,其它线程不能申请读锁,也不能申请写锁
- 读写锁适合于对数据的读次数比写次数多得多的情况
读写锁创建和销毁
    #include
    int phtread_rwlock_init(pthread_rwlock_t *restrict rwlock, const pthread_rwlockattr_t *restrict attr);
    int pthread_rwlock_destroy(pthread_rwlock_t *rwlock);
- 参数:rwlock:读写锁,attr:读写锁属性
- 返回值:成功返回0,出错返回错误码
读写锁加锁解锁
    #include
    /** 加读锁 */
    int pthread_rwlock_rdlock(pthread_rwlock_t *rwlock);
    /** 加写锁 */
    int pthread_rwlock_wrlock(pthread_rwlock_t *rwlock);
    /** 释放锁 */
    int pthread_rwlock_unlock(pthread_rwlock_t *rwlock);
- 参数:rwlock:读写锁
- 返回值:成功返回 0;出错,返回错误码
示例
#include
#include
#include
#include
#include

/* 定义读写锁 */
pthread_rwlock_t rwlock;

/* 定义共享资源变量 */
int g_nNum = 0;

/* 读操作 其他线程允许读操作 不允许写操作 */
void *fun1(void *arg)
{
    while(1)
    {
        pthread_rwlock_rdlock(&rwlock);
        {
            printf("read thread 1 == %d\n", g_nNum);
        }
        pthread_rwlock_unlock(&rwlock);

        sleep(1);
    }
}

/* 读操作,其他线程允许读操作,不允许写操作 */
void *fun2(void *arg)
{
    while(1)
    {
        pthread_rwlock_rdlock(&rwlock);
        {
            printf("read thread 2 == %d\n", g_nNum);
        }
        pthread_rwlock_unlock(&rwlock);

        sleep(1);
    }
}

/* 写操作,其它线程都不允许读或写操作 */
void *fun3(void *arg)
{
    while(1)
    {
        pthread_rwlock_wrlock(&rwlock);
        {
            g_nNum++;
            printf("write thread 1\n");
        }
        pthread_rwlock_unlock(&rwlock);
        sleep(1);
    }
}
/* 写操作,其它线程都不允许读或写操作 */
void *fun4(void *arg)
{
    while(1)
    {
        pthread_rwlock_wrlock(&rwlock);
        {
            g_nNum++;
            printf("write thread 2\n");
        }
        pthread_rwlock_unlock(&rwlock);

        sleep(1);
    }
}

int main(int arc, char *argv[])
{
    pthread_t ThrId1, ThrId2, ThrId3, ThrId4;

    pthread_rwlock_init(&rwlock, NULL);  // 初始化一个读写锁

    /* 创建测试线程 */
    pthread_create(&ThrId1, NULL, fun1, NULL);
    pthread_create(&ThrId2, NULL, fun2, NULL);
    pthread_create(&ThrId3, NULL, fun3, NULL);
    pthread_create(&ThrId4, NULL, fun4, NULL);

    /* 等待线程结束,回收其资源 */
    pthread_join(ThrId1, NULL);
    pthread_join(ThrId2, NULL);
    pthread_join(ThrId3, NULL);
    pthread_join(ThrId4, NULL);

    pthread_rwlock_destroy(&rwlock);      // 销毁读写锁

    return 0;
}
-
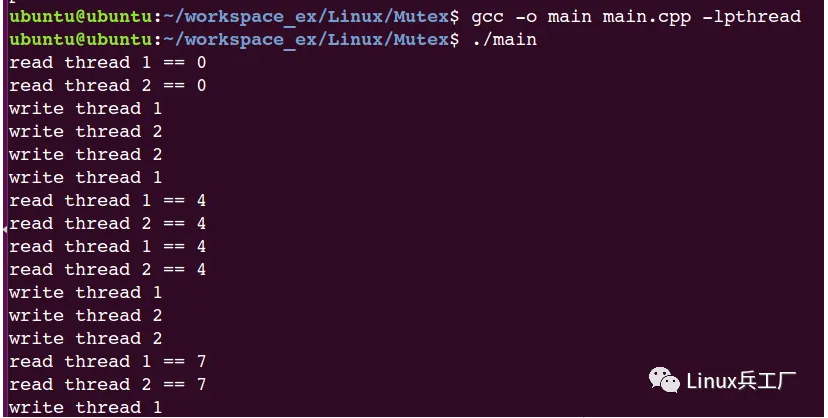
结果
-

自旋锁
- 自旋锁与互斥锁功能相同,唯一不同的就是互斥锁阻塞后休眠不占用CPU,而自旋锁阻塞后不会让出CPU,会一直忙等待,直到得到锁
- 自旋锁在用户态较少用,而在内核态使用的比较多
- 自旋锁的使用场景:锁的持有时间比较短,或者说小于2次上下文切换的时间
-
自旋锁在用户态的函数接口和互斥量一样,把
pthread_mutex_lock()/pthread_mutex_unlock()中mutex换成spin,如:pthread_spin_init()
自旋锁函数
-
linux中的自旋锁用结构体spinlock_t 表示,定义在
include/linux/spinlock_type.h。自旋锁的接口函数全部定义在include/linux/spinlock.h头文件中,实际使用时只需include即可
示例
    include
    spinlock_t lock;      //定义自旋锁
    spin_lock_init(&lock);   //初始化自旋锁
    spin_lock(&lock);      //获得锁,如果没获得成功则一直等待
    {
        .......         //处理临界资源
    }
    spin_unlock(&lock);     //释放自旋锁
条件变量
- 条件变量用来阻塞一个线程,直到条件发生。通常条件变量和互斥锁同时使用。条件变量使线程可以睡眠等待某种条件满足。条件变量是利用线程间共享的全局变量进行同步的一种机制。
- 条件变量的逻辑:一个线程挂起去等待条件变量的条件成立,而另一个线程使条件成立。
基本原理
线程在改变条件状态之前先锁住互斥量。如果条件为假,线程自动阻塞,并释放等待状态改变的互斥锁。如果另一个线程改变了条件,它发信号给关联的条件变量,唤醒一个或多个等待它的线程。如果两进程共享可读写的内存,条件变量可以被用来实现这两进程间的线程同步
示例
#include
#include
#include
#include

pthread_cond_t taxicond = PTHREAD_COND_INITIALIZER;
pthread_mutex_t taximutex = PTHREAD_MUTEX_INITIALIZER;

void *ThrFun1(void *name)
{
    char *p = (char *)name;

    // 加锁,把信号量加入队列,释放信号量
    pthread_mutex_lock(&taximutex);
    {
        pthread_cond_wait(&taxicond, &taximutex);
    }
    pthread_mutex_unlock(&taximutex);

    printf ("ThrFun1: %s now got a signal!\n", p);
    pthread_exit(NULL);
}

void *ThrFun2(void *name)
{
    char *p = (char *)name;
    printf ("ThrFun2: %s cond signal.\n", p);    // 发信号
    pthread_cond_signal(&taxicond);
    pthread_exit(NULL);
}

int main (int argc, char **argv)
{
    pthread_t Thread1, Thread2;
    pthread_attr_t threadattr;
    pthread_attr_init(&threadattr);  // 线程属性初始化

    // 创建三个线程
    pthread_create(&Thread1, &threadattr, ThrFun1, (void *)"Thread1");
    sleep(1);

    pthread_create(&Thread2, &threadattr, ThrFun2, (void *)"Thread2");
    sleep(1);

    pthread_join(Thread1, NULL);
    pthread_join(Thread2, NULL);

    return 0;
}
-
结果
-

虚假唤醒
- 当线程从等待已发出信号的条件变量中醒来,却发现它等待的条件不满足时,就会发生虚假唤醒。之所以称为虚假,是因为该线程似乎无缘无故地被唤醒了。但是虚假唤醒不会无缘无故发生:它们通常是因为在发出条件变量信号和等待线程最终运行之间,另一个线程运行并更改了条件
避免虚假唤醒
- 在wait端,我们必须把判断条件和wait()放到while循环中
    pthread_mutex_lock(&taximutex);
    {
        while(value != wantValue)
        {
            pthread_cond_wait(&taxicond, &taximutex);
        }
    }
    pthread_mutex_unlock(&taximutex);
信号量
- 信号量用于进程或线程间的同步和互斥,信号量本质上是一个非负的整数计数器,它被用来控制对公共资源的访问。编程时可根据操作信号量值的结果判断是否对公共资源具有访问的权限,当信号量值大于0时,则可以访问,否则将阻塞
#include

// 初始化信号量
int sem_init(sem_t *sem, int pshared, unsigned int value);

// 信号量P操作(减 1)
int sem_wait(sem_t *sem);

// 以非阻塞的方式来对信号量进行减1操作
int sem_trywait(sem_t *sem);

// 信号量V操作(加 1)
int sem_post(sem_t *sem);

// 获取信号量的值
int sem_getvalue(sem_t *sem, int *sval);

// 销毁信号量
int sem_destroy(sem_t *sem);
示例
// 信号量用于同步实例
#include
#include
#include
#include

sem_t sem_g,sem_p;   //定义两个信号量
char s8Test = 'a';

void *pthread_g(void *arg)  //此线程改变字符的值
{
    while(1)
    {
        sem_wait(&sem_g);
        s8Test++;
        sleep(2);
        sem_post(&sem_p);
    }
}
void *pthread_p(void *arg)  //此线程打印字符的值
{
    while(1)
    {
        sem_wait(&sem_p);
        printf("%c",s8Test);
        fflush(stdout);
        sem_post(&sem_g);
    }
}
int main(int argc, char *argv[])
{
    pthread_t tid1,tid2;
    sem_init(&sem_g, 0, 0); // 初始化信号量为0
    sem_init(&sem_p, 0, 1); // 初始化信号量为1

    pthread_create(&tid1, NULL, pthread_g, NULL);
    pthread_create(&tid2, NULL, pthread_p, NULL);

    pthread_join(tid1, NULL);
    pthread_join(tid2, NULL);
    return 0;
}
-
结果
-

结束语
- 好了,通过这篇文章希望对小伙伴们有所帮助,希望能更深刻的理解多线程编程中的知识。喜欢的小伙伴记得点赞、再看支持一下木荣哦!
到这里,我们也就讲完了《详解Linux多线程中互斥锁、读写锁、自旋锁、条件变量、信号量》的内容了。个人认为,基础知识的学习和巩固,是为了更好的将其运用到项目中,欢迎关注golang学习网公众号,带你了解更多关于Linux,Linux系统,Shell脚本,Linux命令,linux入门,linux教程,linux学习,嵌入式Linux的知识点!
声明:本文转载于:良许Linux教程网 如有侵犯,请联系study_golang@163.com删除
相关阅读
更多>
-
501 收藏
-
501 收藏
-
501 收藏
-
501 收藏
-
501 收藏
最新阅读
更多>
-
341 收藏
-
145 收藏
-
117 收藏
-
465 收藏
-
238 收藏
-
161 收藏
-
298 收藏
-
159 收藏
-
477 收藏
-
291 收藏
-
117 收藏
-
378 收藏
课程推荐
更多>
-

- 前端进阶之JavaScript设计模式
- 设计模式是开发人员在软件开发过程中面临一般问题时的解决方案,代表了最佳的实践。本课程的主打内容包括JS常见设计模式以及具体应用场景,打造一站式知识长龙服务,适合有JS基础的同学学习。
- 立即学习 543次学习
-

- GO语言核心编程课程
- 本课程采用真实案例,全面具体可落地,从理论到实践,一步一步将GO核心编程技术、编程思想、底层实现融会贯通,使学习者贴近时代脉搏,做IT互联网时代的弄潮儿。
- 立即学习 516次学习
-

- 简单聊聊mysql8与网络通信
- 如有问题加微信:Le-studyg;在课程中,我们将首先介绍MySQL8的新特性,包括性能优化、安全增强、新数据类型等,帮助学生快速熟悉MySQL8的最新功能。接着,我们将深入解析MySQL的网络通信机制,包括协议、连接管理、数据传输等,让
- 立即学习 500次学习
-

- JavaScript正则表达式基础与实战
- 在任何一门编程语言中,正则表达式,都是一项重要的知识,它提供了高效的字符串匹配与捕获机制,可以极大的简化程序设计。
- 立即学习 487次学习
-

- 从零制作响应式网站—Grid布局
- 本系列教程将展示从零制作一个假想的网络科技公司官网,分为导航,轮播,关于我们,成功案例,服务流程,团队介绍,数据部分,公司动态,底部信息等内容区块。网站整体采用CSSGrid布局,支持响应式,有流畅过渡和展现动画。
- 立即学习 485次学习
