腾讯云TDSQL再获金融双冠
时间:2025-08-01 10:39:27 180浏览 收藏
本篇文章给大家分享《腾讯云TDSQL蝉联金融数据库双料冠军》,覆盖了科技周边的常见基础知识,其实一个语言的全部知识点一篇文章是不可能说完的,但希望通过这些问题,让读者对自己的掌握程度有一定的认识(B 数),从而弥补自己的不足,更好的掌握它。
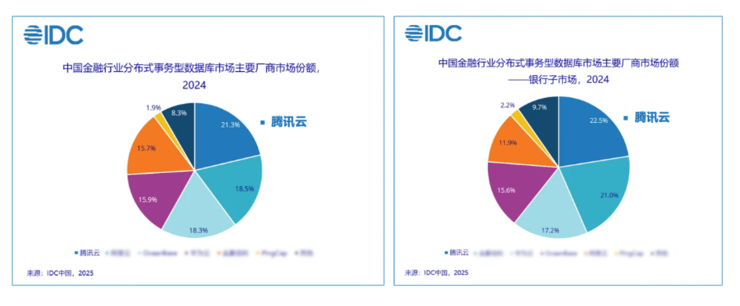
近日,根据IDC最新发布的《中国金融行业分布式事务型数据库市场份额,2024》报告,腾讯云数据库TDSQL以21.32%的市场占有率稳居金融行业榜首,并在银行细分市场以22.48%的份额持续领跑,实现金融与银行子市场“双第一”的佳绩。这也是TDSQL连续两年斩获该领域的“双料冠军”。
金融行业长期被视为国产数据库落地的关键阵地。IDC预测,至2025年,国产数据库在银行、保险等核心金融场景的渗透率将显著上升,市场集中度将进一步提升。随着技术壁垒不断抬高,中小型厂商的生存空间将被压缩,行业整体将迈入以高质量竞争为主导的新周期。
据大数据技术标准推进委员会发布的《数据库发展研究报告(2025年)》数据显示,过去一年间,国内数据库厂商数量减少了64家,行业洗牌加速。
在此背景下,腾讯云TDSQL凭借领先的技术实力和持续的产品创新,在激烈竞争中脱颖而出,连续两年稳坐金融及银行分布式数据库市场头把交椅。这一成绩的背后,是深厚的技术积累与多项突破性功能的支撑。
TDSQL在国际权威TPC性能测试中屡创佳绩:2023年,其事务处理能力达到每分钟8.14亿笔交易,刷新世界纪录;2024年,又在决策支持类测试中将原有纪录提升2.8倍。其高并发处理相关核心技术专利更荣获中国专利金奖,成为数据库领域首个获此殊荣的技术成果,标志着我国在数据库底层技术上的重大突破。
为应对金融机构在系统迁移过程中的挑战,TDSQL全面支持MySQL、PostgreSQL、Oracle等多种数据库协议的平滑迁移,大幅降低核心系统改造难度,代码改动率控制在5%以内,显著缩短上线周期。
今年5月,TDSQL推出一体化版本,支持一次部署、多模式自由切换,实现资源统一调度与管理,成为业内首个实现多引擎统一管控的金融级分布式数据库产品。
此外,TDSQL独创的多版本快照与日志回放机制,可将因误操作引发的数据恢复时间从传统方案的小时级缩短至分钟级,极大增强业务连续性保障能力。在实际应用中,其智能索引优化功能使查询性能平均提升40%,运维成本降低50%。
腾讯云还融合AI能力,依托“扁鹊”智能运维平台,赋予TDSQL全生命周期的自治特性。该平台结合机器学习与知识图谱技术,可对200余项性能指标进行毫秒级监控,故障定位效率提升80%。
目前,TDSQL已深度接入中国农业银行、中国银行、平安银行、广发证券、太平保险等超100家金融机构的核心系统,覆盖银行、证券、保险等全金融业态。
在银行业,TDSQL已完成对四大国有银行主力数据库的全面覆盖,中国十大银行中已有七家采用TDSQL作为其核心数据库解决方案。某大型国有银行核心系统中,TDSQL支撑的日交易峰值已达19.6亿笔,展现出强大的高负载处理能力。
今天关于《腾讯云TDSQL再获金融双冠》的内容介绍就到此结束,如果有什么疑问或者建议,可以在golang学习网公众号下多多回复交流;文中若有不正之处,也希望回复留言以告知!
-
501 收藏
-
501 收藏
-
501 收藏
-
501 收藏
-
501 收藏
-
科技周边 · 业界新闻 | 13小时前 | 云原生 · kubernetes · devops · 业界新闻 · 集群升级 · 云原生 Kubernetes 灰度升级 v1.36 集群升级 弃用项审计414 收藏
-
375 收藏
-
134 收藏
-
430 收藏
-
科技周边 · 业界新闻 | 2天前 | 业界新闻 · Cloudflare · AI Gateway · Spend Limits · AI成本 · Cloudflare AI Gateway Spend Limits AI成本治理 AI预算 模型降级495 收藏
-
科技周边 · 业界新闻 | 2天前 | Node.js · javascript · 安全版本 · 运行时 · 升级排查 · 业界新闻 Node.js安全版本 Node.js 26.3.0 运行时升级 JavaScript安全308 收藏
-
科技周边 · 业界新闻 | 4天前 | devops · CI/CD · gitHub actions · 业界新闻 · 自托管Runner · DevOps CI/CD GitHub Actions self-hosted runner Runner升级431 收藏
-
科技周边 · 业界新闻 | 4天前 | github · gitHub actions · 业界新闻 · AI代理 · GitHub AI代理 GitHub Actions Agentic Workflows CI分析 Issue分流 工程自动化354 收藏
-
科技周边 · 业界新闻 | 5天前 | 安全 · CI/CD · gitHub actions · 业界新闻 · 开发者工具 · 代码审查 供应链安全 业界新闻 GitHub Actions 机器人PR CI安全473 收藏
-
214 收藏
-
345 收藏
-
356 收藏
-

- 前端进阶之JavaScript设计模式
- 设计模式是开发人员在软件开发过程中面临一般问题时的解决方案,代表了最佳的实践。本课程的主打内容包括JS常见设计模式以及具体应用场景,打造一站式知识长龙服务,适合有JS基础的同学学习。
- 立即学习 543次学习
-

- GO语言核心编程课程
- 本课程采用真实案例,全面具体可落地,从理论到实践,一步一步将GO核心编程技术、编程思想、底层实现融会贯通,使学习者贴近时代脉搏,做IT互联网时代的弄潮儿。
- 立即学习 516次学习
-

- 简单聊聊mysql8与网络通信
- 如有问题加微信:Le-studyg;在课程中,我们将首先介绍MySQL8的新特性,包括性能优化、安全增强、新数据类型等,帮助学生快速熟悉MySQL8的最新功能。接着,我们将深入解析MySQL的网络通信机制,包括协议、连接管理、数据传输等,让
- 立即学习 500次学习
-

- JavaScript正则表达式基础与实战
- 在任何一门编程语言中,正则表达式,都是一项重要的知识,它提供了高效的字符串匹配与捕获机制,可以极大的简化程序设计。
- 立即学习 487次学习
-

- 从零制作响应式网站—Grid布局
- 本系列教程将展示从零制作一个假想的网络科技公司官网,分为导航,轮播,关于我们,成功案例,服务流程,团队介绍,数据部分,公司动态,底部信息等内容区块。网站整体采用CSSGrid布局,支持响应式,有流畅过渡和展现动画。
- 立即学习 485次学习