SpringBoot整合Redis实现序列化存储Java对象的操作方法
来源:脚本之家
时间:2023-05-13 17:16:29 377浏览 收藏
哈喽!大家好,很高兴又见面了,我是golang学习网的一名作者,今天由我给大家带来一篇《SpringBoot整合Redis实现序列化存储Java对象的操作方法》,本文主要会讲到存储、序列化、SpringBootRedis等等知识点,希望大家一起学习进步,也欢迎大家关注、点赞、收藏、转发! 下面就一起来看看吧!
之前介绍过 https://www.jb51.net/article/223539.htm 我们可以看出,在 SpringBoot 对 Redis 做了一系列的自动装配,使用还是非常方便的
一、背景
1、思考
通过我们前面的学习,我们已经可以往 Redis 中存入字符串,那么我们要往 Redis 中存入 Java 对象该怎么办呢?
2、方案
我们可以将 Java 对象转化为 JSON 对象,然后转为 JSON 字符串,存入 Redis,那么我们从 Redis 中取出该数据的时候,我们也只能取出字符串,并转为 Java 对象,这一系列的操作是不是显得有些麻烦呢?
二、源码分析
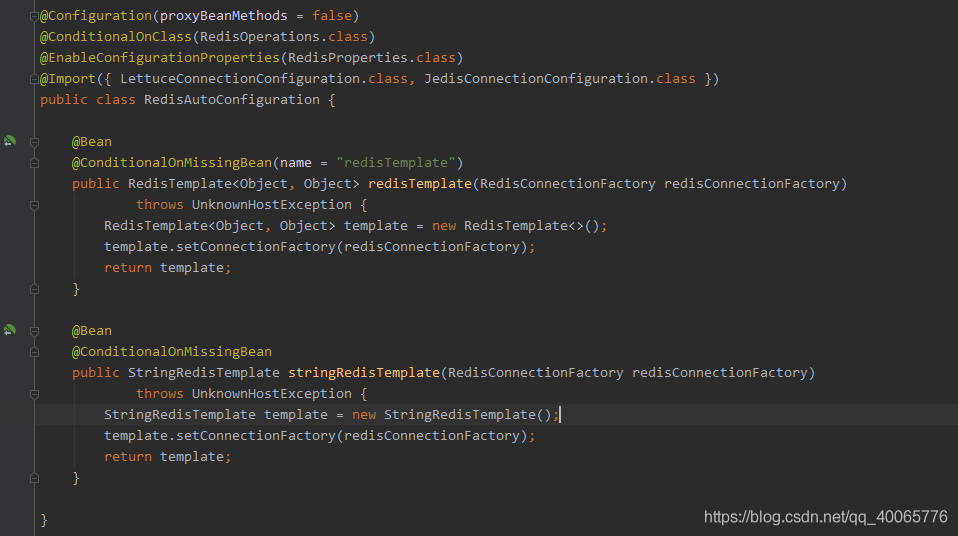
- 以上是 RedisAutoConfiguration 类中的源码片段,可以看出 SpringBoot 对 Redis 做自动化配置的时候,在容器中注入了 redisTemplate 和 stringRedisTemplate
- 其中,RedisTemplate
- 看到这个@ConditionalOnMissingBean注解后,就知道如果Spring容器中有了RedisTemplate对象了,这个自动配置的RedisTemplate不会实例化。因此我们可以直接自己写个配置类,配置RedisTemplate。
三、注入RedisTemplate
1、引入依赖
org.springframework.boot spring-boot-starter-data-redis
以上引入了 redis 的依赖,其余依赖请自行添加
2、Redis 连接信息
spring:
  # Redis配置
  redis:
    host: 127.0.0.1
    port: 6379
    database: 10
    jedis:
      pool:
        # 连接池最大连接数(使用负值表示没有限制)
        max-active: 50
        # 连接池最大阻塞等待时间(使用负值表示没有限制)
        max-wait: 3000ms
        # 连接池中的最大空闲连接数
        max-idle: 20
        # 连接池中的最小空闲连接数
        min-idle: 5
    # 连接超时时间(毫秒)
    timeout: 5000ms
3、Redis 核心配置类
Redis 的核心配置我们放在 RedisConfig.java 文件中
package com.zyxx.redistest.common;
import com.fasterxml.jackson.annotation.JsonAutoDetect;
import com.fasterxml.jackson.annotation.PropertyAccessor;
import com.fasterxml.jackson.databind.ObjectMapper;
import org.springframework.context.annotation.Bean;
import org.springframework.context.annotation.Configuration;
import org.springframework.data.redis.core.RedisTemplate;
import org.springframework.data.redis.serializer.Jackson2JsonRedisSerializer;
import org.springframework.data.redis.serializer.RedisSerializer;
import org.springframework.data.redis.serializer.StringRedisSerializer;
/**
* @ClassName RedisConfig
* @Description
* @Author Lizhou
* @Date 2020-10-22 9:48:48
**/
@Configuration
public class RedisConfig {
/**
* RedisTemplate配置
*/
@Bean
public RedisTemplate
我们注入了一个名称为 redisTemplate,类型为 RedisTemplate
4、Redis工具类
我们将对 Redis 进行的一系列操作放在 RedisUtils.java 文件中
package com.zyxx.redistest.common;

import lombok.extern.slf4j.Slf4j;
import org.apache.commons.lang3.StringUtils;
import org.springframework.beans.factory.annotation.Autowired;
import org.springframework.data.redis.core.RedisTemplate;
import org.springframework.stereotype.Component;

/**
 * @ClassName RedisUtils
 * @Description
 * @Author Lizhou
 * @Date 2020-10-22 10:10:10
 **/
@Slf4j
@Component
public class RedisUtils {

    @Autowired
    private RedisTemplate redisTemplate;

    /**
     * 根据key读取数据
     */
    public Object get(final String key) {
        if (StringUtils.isBlank(key)) {
            return null;
        }
        try {
            return redisTemplate.opsForValue().get(key);
        } catch (Exception e) {
            e.printStackTrace();
        }
        return null;
    }

    /**
     * 写入数据
     */
    public boolean set(final String key, Object value) {
        if (StringUtils.isBlank(key)) {
            return false;
        }
        try {
            redisTemplate.opsForValue().set(key, value);
            log.info("存入redis成功,key:{},value:{}", key, value);
            return true;
        } catch (Exception e) {
            log.error("存入redis失败,key:{},value:{}", key, value);
            e.printStackTrace();
        }
        return false;
    }
}
我们写入了 get,set 两个方法用于测试
四、测试
1、创建 Java 实体类 UserInfo
package com.zyxx.redistest.common;

import lombok.Data;

import java.io.Serializable;
import java.util.Date;

/**
 * @ClassName UserInfo
 * @Description
 * @Author Lizhou
 * @Date 2020-10-22 10:12:12
 **/
@Data
public class UserInfo implements Serializable {
    /**
     * id
     */
    private Integer id;
    /**
     * 姓名
     */
    private String name;
    /**
     * 创建时间
     */
    private Date createTime;
}
2、测试用例
package com.zyxx.redistest;

import com.zyxx.redistest.common.RedisUtils;
import com.zyxx.redistest.common.UserInfo;
import org.junit.jupiter.api.Test;
import org.springframework.beans.factory.annotation.Autowired;
import org.springframework.boot.test.context.SpringBootTest;

import java.util.Date;

@SpringBootTest
class RedisTestApplicationTests {

    @Autowired
    private RedisUtils redisUtil;

    @Test
    void contextLoads() {
        UserInfo userInfo = new UserInfo();
        userInfo.setId(1);
        userInfo.setName("jack");
        userInfo.setCreateTime(new Date());
        // 放入redis
        redisUtil.set("user", userInfo);
        // 从redis中获取
		System.out.println("获取到数据:" + redisUtil.get("user"));
    }
}
我们向 Redis 中存入了一个 key 为 ”user“,value 为 UserInfo 对象的数据,然后再根据 key 获取该数据
3、测试结果

可以看出,我们往 Redis 中成功存入 Java 对象数据,并成功获取到了该对象
今天关于《SpringBoot整合Redis实现序列化存储Java对象的操作方法》的内容就介绍到这里了,是不是学起来一目了然!想要了解更多关于redis的内容请关注golang学习网公众号!
-
331 收藏
-
487 收藏
-
369 收藏
-
313 收藏
-
135 收藏
-
数据库 · Redis | 9小时前 | Redis · go · Pipeline · 批处理 · 重试 · 幂等性 · 重试 go-redis 幂等键 批量写入 Redis Pipeline 逐条结果391 收藏
-
154 收藏
-
386 收藏
-
127 收藏
-
422 收藏
-
326 收藏
-
494 收藏
-
数据库 · Redis | 3天前 | Redis · 缓存 · 限流 · Redis 8.8 · INCREX · Redis 8.8 INCREX Redis窗口限流 Redis计数器 ENX UBOUND123 收藏
-
数据库 · Redis | 5天前 | Redis · 缓存 · go · Redis Cluster · 排错 · Redis Cluster CROSSSLOT Hash Tag MGET CLUSTER KEYSLOT259 收藏
-
183 收藏
-
413 收藏
-
数据库 · Redis | 1星期前 | Redis · 安全配置 · 数据库运维 · ACL · 网络隔离 · Redis公网暴露 Redis protected-mode Redis ACL Redis安全配置 Redis审计364 收藏
-

- 前端进阶之JavaScript设计模式
- 设计模式是开发人员在软件开发过程中面临一般问题时的解决方案,代表了最佳的实践。本课程的主打内容包括JS常见设计模式以及具体应用场景,打造一站式知识长龙服务,适合有JS基础的同学学习。
- 立即学习 543次学习
-

- GO语言核心编程课程
- 本课程采用真实案例,全面具体可落地,从理论到实践,一步一步将GO核心编程技术、编程思想、底层实现融会贯通,使学习者贴近时代脉搏,做IT互联网时代的弄潮儿。
- 立即学习 516次学习
-

- 简单聊聊mysql8与网络通信
- 如有问题加微信:Le-studyg;在课程中,我们将首先介绍MySQL8的新特性,包括性能优化、安全增强、新数据类型等,帮助学生快速熟悉MySQL8的最新功能。接着,我们将深入解析MySQL的网络通信机制,包括协议、连接管理、数据传输等,让
- 立即学习 500次学习
-

- JavaScript正则表达式基础与实战
- 在任何一门编程语言中,正则表达式,都是一项重要的知识,它提供了高效的字符串匹配与捕获机制,可以极大的简化程序设计。
- 立即学习 487次学习
-

- 从零制作响应式网站—Grid布局
- 本系列教程将展示从零制作一个假想的网络科技公司官网,分为导航,轮播,关于我们,成功案例,服务流程,团队介绍,数据部分,公司动态,底部信息等内容区块。网站整体采用CSSGrid布局,支持响应式,有流畅过渡和展现动画。
- 立即学习 485次学习