Go 语言结构体链表的基本操作
来源:脚本之家
时间:2023-01-01 12:20:29 206浏览 收藏
亲爱的编程学习爱好者,如果你点开了这篇文章,说明你对《Go 语言结构体链表的基本操作》很感兴趣。本篇文章就来给大家详细解析一下,主要介绍一下结构体、链表,希望所有认真读完的童鞋们,都有实质性的提高。
1. 什么是链表
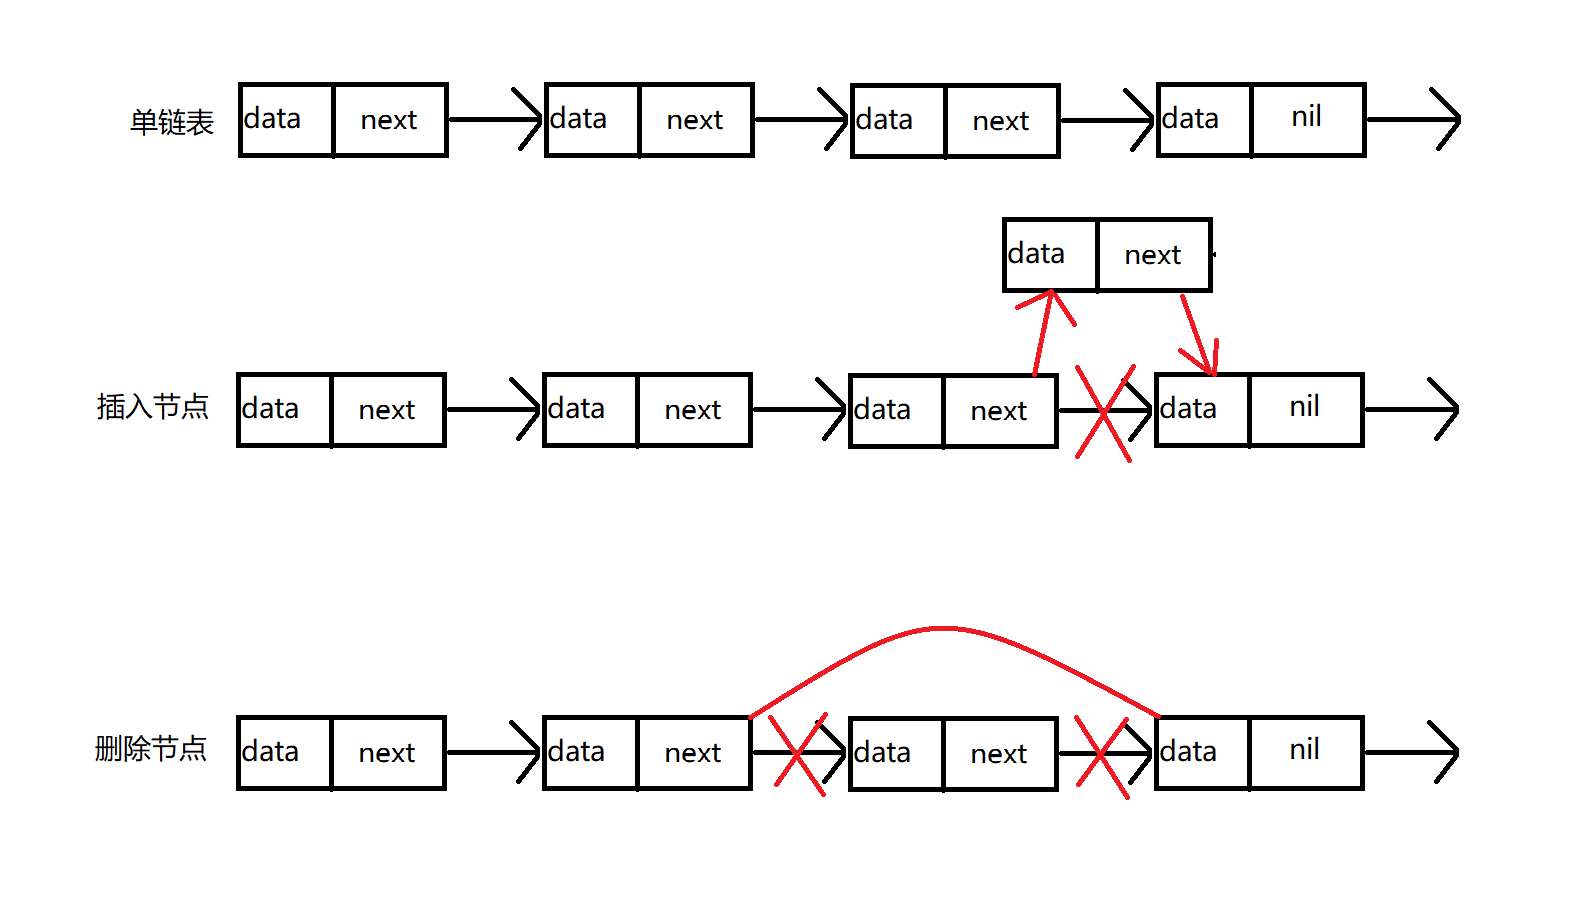
- 链表是一种物理存储单元上非连续、非顺序的存储结构,数据元素的逻辑顺序是通过链表中的指针链接次序实现的。
- 链表由一系列结点(链表中每一个元素称为结点)组成,结点可以在运行时动态生成。每个结点包括两个部分:一个是存储数据元素的数据域,另一个是存储下一个结点地址的指针域。
- 使用链表结构可以避免在使用数组时需要预先知道数据大小的缺点,链表结构可以充分利用计算机内存空间,实现灵活的内存动态管理。但是链表失去了数组随机读取的优点,同时链表由于增加了结点的指针域,空间开销比较大。
- 链表允许插入和移除表上任意位置上的结点,但是不允许随机存取。
- 链表有三种类型:
单向链表、双向链表、循环链表。
2. 单项链表的基本操作
- 单向链表中每个结点包含两部分,分别是
数据域和指针域,上一个结点的指针指向下一结点,依次相连,形成链表。 - 链表通过指针将一组零散的内存块串联在一起,这里的内存块称为链表的结点。为了将这些节点给串起来,每个链表的结点除了存储数据之外,还会记录下一个结点的指针(即下一个结点的地址),这个指针称为:后继指针

3. 使用 struct 定义单链表
- 利用 Struct 可以包容多种数据类型的特性
- 一个结构体内可以包含若干成员,这些成员可以是基本类型、自定义类型、数组类型,也可以是指针类型。
struct 定义的三种形式,其中2和3都是返回结构体的指针
//定义
var stu Student

var stu *Student = new(Student)

var stu *Student = &Student {}

//调用
stu.Name   stu.Age    stu.Score
或
(*stu).Name	   (*stu).Age   (*stu).Score
定义一个单项链表next 是指针类型的属性,指向 Student struct 类型数据,也就是下一个节点的数据类型
type Student struct {
	Name  string
	Age   int
	Score float32
	next  *Student
}
为链表赋值,并遍历链表中的每个节点
package main
import "fmt"
type Student struct {
	Name  string
	Age   int
	Score float32
	next  *Student		//存放下一个结构体的地址,用*直接指向下一个结构体
}
func main() {
	//头部结构体
	var head Student
	head.Name = "张三"
	head.Age = 28
	head.Score = 88
	//第二个结构体节点
	var stu1 Student
	stu1.Name = "李四"
	stu1.Age = 25
	stu1.Score = 100
	head.next = &stu1
	//第三个结构体节点
	var stu2 Student
	stu2.Name = "王五"
	stu2.Age = 18
	stu2.Score = 60
	stu1.next = &stu2
	Req(&head)
}
func Req(tmp *Student) {		//tmp指针是指向下一个结构体的地址,加*就是下一个结构体
	for tmp != nil {			//遍历输出链表中每个结构体,判断是否为空
		fmt.Println(*tmp)
		tmp = tmp.next			//tmp变更为下一个结构体地址
	}
}
//输出结果如下
{张三 28 88 0xc000114480}
{李四 25 100 0xc0001144b0}
{王五 18 60}
4. 尾部添加节点方法一
package main
import (
	"fmt"
	"math/rand"
)
type Student struct {
	Name  string
	Age   int
	Score float32
	next  *Student
}
func main() {
	//头部结构体
	var head Student
	head.Name = "head"
	head.Age = 28
	head.Score = 88
	//第二个结构体节点
	var stu1 Student
	stu1.Name = "stu1"
	stu1.Age = 25
	stu1.Score = 100
	head.next = &stu1 //头部指向第一个结构体
	//第三个结构体节点
	var stu2 Student
	stu2.Name = "stu2"
	stu2.Age = 18
	stu2.Score = 60
	stu1.next = &stu2 //第一个结构体指向第二个结构体
	//第四个结构体节点
	var stu3 Student
	stu3.Name = "stu3"
	stu3.Age = 18
	stu3.Score = 80
	stu2.next = &stu3 //第二个结构体指向第三个结构体
	//声明变量
	var tail = &stu3
	for i := 4; i
<blockquote><p>//输出结果如下<br>{head 28 88 0xc0001144b0}<br>{stu1 25 100 0xc0001144e0}<br>{stu2 18 60 0xc000114510}<br>{stu3 18 80 0xc000114540}<br>{stu4 81 94.05091 0xc000114570}<br>{stu5 47 43.77142 0xc0001145a0}<br>{stu6 81 68.682304 0xc0001145d0}<br>{stu7 25 15.651925 0xc000114600}<br>{stu8 56 30.091187 0xc000114630}<br>{stu9 94 81.36399 <nil>}</nil></p></blockquote>
<p>方法二,使用函数进行优化</p>
<pre class="brush:go;">package main
import (
	"fmt"
	"math/rand"
)
type Student struct {
	Name  string
	Age   int
	Score float32
	next  *Student
}
func main() {
	//头部结构体
	var head Student
	head.Name = "head"
	head.Age = 28
	head.Score = 88
	TailInsert(&head)
	Req(&head)
}
//循环遍历
func Req(tmp *Student) {
	for tmp != nil {
		fmt.Println(*tmp)
		tmp = tmp.next
	}
}
//添加结构体节点
func TailInsert(tail *Student) {
	for i := 0; i
<blockquote><p>//输出结果如下<br>{head 28 88 0xc0001144b0}<br>{stu0 81 94.05091 0xc0001144e0}<br>{stu1 47 43.77142 0xc000114510}<br>{stu2 81 68.682304 0xc000114540}<br>{stu3 25 15.651925 0xc000114570}<br>{stu4 56 30.091187 0xc0001145a0}<br>{stu5 94 81.36399 0xc0001145d0}<br>{stu6 62 38.06572 0xc000114600}<br>{stu7 28 46.888985 0xc000114630}<br>{stu8 11 29.310184 0xc000114660}<br>{stu9 37 21.855305 <nil>}</nil></p></blockquote>
<h2>5. 头部插入节点方法一</h2>
<pre class="brush:go;">package main

import (
	"fmt"
	"math/rand"
)
type Student struct {
	Name  string
	Age   int
	Score float32
	next  *Student
}
func main() {
	//头部结构体
	var head Student
	head.Name = "head"
	head.Age = 28
	head.Score = 88
	//调用头部插入函数
	HeadInsert(&head)
	Req(HeadInsert(&head))
func Req(tmp *Student) {
	for tmp != nil {
		fmt.Println(*tmp)
		tmp = tmp.next
	}
func HeadInsert(p *Student) *Student {
	for i := 0; i
<blockquote><p>//输出结果如下<br>{stu9 85 30.152267 0xc000094840}<br>{stu8 37 5.912065 0xc000094810}<br>{stu7 29 7.9453626 0xc0000947e0}<br>{stu6 87 60.72534 0xc0000947b0}<br>{stu5 41 2.8303082 0xc000094780}<br>{stu4 90 69.67192 0xc000094750}<br>{stu3 87 20.658266 0xc000094720}<br>{stu2 47 29.708258 0xc0000946f0}<br>{stu1 28 86.249146 0xc0000946c0}<br>{stu0 95 36.08714 0xc0000944b0}<br>{head 28 88 <nil>}</nil></p></blockquote>
<p style="text-align:center"><img alt="" src="/uploads/20230101/167254740863b10c503ca2f.png"></p>
<p>方法二</p>
<p>使用指针的指针</p>
<pre class="brush:go;">package main

import (
	"fmt"
	"math/rand"
)
type Student struct {
	Name  string
	Age   int
	Score float32
	next  *Student
}
func main() {
	//头部结构体
	var head *Student = &Student{}
	head.Name = "head"
	head.Age = 28
	head.Score = 88
	//调用头部插入函数
	HeadInsert(&head)
	Req(head)
func Req(tmp *Student) {
	for tmp != nil {
		fmt.Println(*tmp)
		tmp = tmp.next
	}
func HeadInsert(p **Student) {
	for i := 0; i
<blockquote><p>//输出结果如下<br>{stu9 37 21.855305 0xc000114660}<br>{stu8 11 29.310184 0xc000114630}<br>{stu7 28 46.888985 0xc000114600}<br>{stu6 62 38.06572 0xc0001145d0}<br>{stu5 94 81.36399 0xc0001145a0}<br>{stu4 56 30.091187 0xc000114570}<br>{stu3 25 15.651925 0xc000114540}<br>{stu2 81 68.682304 0xc000114510}<br>{stu1 47 43.77142 0xc0001144e0}<br>{stu0 81 94.05091 0xc0001144b0}<br>{head 28 88 <nil>}</nil></p></blockquote>
<p>总结<br>如果想要外部的数据和函数处理结果进行同步,两种方法:<br>① 传参,传递指针<br>② return 进行值的返回</p>
<h2>6. 指定节点后添加新节点</h2>
<pre class="brush:go;">package main

import (
	"fmt"
	"math/rand"
)
type Student struct {
	Name  string
	Age   int
	Score float32
	next  *Student
}
func main() {
	//头部结构体
	var head *Student = &Student{} //定义指针类型
	head.Name = "head"
	head.Age = 28
	head.Score = 88
	//定义新的节点
	var newNode *Student = &Student{} //定义指针类型
	newNode.Name = "newNode"
	newNode.Age = 19
	newNode.Score = 78
	HeadInsert(&head)
	//指定位置插入函数
	Add(head, newNode)
	Req(head)
func Req(tmp *Student) {
	for tmp != nil {
		fmt.Println(*tmp)
		tmp = tmp.next
	}
func HeadInsert(p **Student) { //传入指针的指针
	for i := 0; i
<blockquote><p>//输出结果如下<br>{stu9 37 21.855305 0xc0000c0660}<br>{stu8 11 29.310184 0xc0000c0630}<br>{stu7 28 46.888985 0xc0000c0600}<br>{stu6 62 38.06572 0xc0000c04b0}<br>{newNode 19 78 0xc0000c05d0}<br>{stu5 94 81.36399 0xc0000c05a0}<br>{stu4 56 30.091187 0xc0000c0570}<br>{stu3 25 15.651925 0xc0000c0540}<br>{stu2 81 68.682304 0xc0000c0510}<br>{stu1 47 43.77142 0xc0000c04e0}<br>{stu0 81 94.05091 0xc0000c0480}<br>{head 28 88 <nil>}</nil></p></blockquote>
<h2>7. 删除节点</h2>
<pre class="brush:go;">package main

import (
	"fmt"
	"math/rand"
)
type Student struct {
	Name  string
	Age   int
	Score float32
	next  *Student
}
func main() {
	//头部结构体
	var head *Student = &Student{} //定义指针类型
	head.Name = "head"
	head.Age = 28
	head.Score = 88
	//定义新的节点
	var newNode *Student = &Student{} //定义指针类型
	newNode.Name = "newNode"
	newNode.Age = 19
	newNode.Score = 78
	HeadInsert(&head)
	//指定位置插入函数
	Add(head, newNode)
	//删除节点
	del(head)
	Req(head)
func Req(tmp *Student) {
	for tmp != nil {
		fmt.Println(*tmp)
		tmp = tmp.next
	}
func HeadInsert(p **Student) { //传入指针的指针
	for i := 0; i
<blockquote><p> //输出结果如下<br> {stu9 37 21.855305 0xc0000c0660}<br>{stu8 11 29.310184 0xc0000c0630}<br>{stu7 28 46.888985 0xc0000c0600}<br>{stu6 62 38.06572 0xc0000c05d0}<br>{stu5 94 81.36399 0xc0000c05a0}<br>{stu4 56 30.091187 0xc0000c0570}<br>{stu3 25 15.651925 0xc0000c0540}<br>{stu2 81 68.682304 0xc0000c0510}<br>{stu1 47 43.77142 0xc0000c04e0}<br>{stu0 81 94.05091 0xc0000c0480}<br>{head 28 88 <nil>}</nil></p></blockquote>
<p>到这里,我们也就讲完了《Go 语言结构体链表的基本操作》的内容了。个人认为,基础知识的学习和巩固,是为了更好的将其运用到项目中,欢迎关注golang学习网公众号,带你了解更多关于golang的知识点!</p>
声明:本文转载于:脚本之家 如有侵犯,请联系study_golang@163.com删除
相关阅读
更多>
-
377 收藏
-
125 收藏
-
201 收藏
-
183 收藏
-
440 收藏
最新阅读
更多>
-
452 收藏
-
206 收藏
-
483 收藏
-
305 收藏
-
467 收藏
-
328 收藏
-
148 收藏
-
488 收藏
-
370 收藏
-
112 收藏
-
313 收藏
-
158 收藏
课程推荐
更多>
-

- 前端进阶之JavaScript设计模式
- 设计模式是开发人员在软件开发过程中面临一般问题时的解决方案,代表了最佳的实践。本课程的主打内容包括JS常见设计模式以及具体应用场景,打造一站式知识长龙服务,适合有JS基础的同学学习。
- 立即学习 543次学习
-

- GO语言核心编程课程
- 本课程采用真实案例,全面具体可落地,从理论到实践,一步一步将GO核心编程技术、编程思想、底层实现融会贯通,使学习者贴近时代脉搏,做IT互联网时代的弄潮儿。
- 立即学习 516次学习
-

- 简单聊聊mysql8与网络通信
- 如有问题加微信:Le-studyg;在课程中,我们将首先介绍MySQL8的新特性,包括性能优化、安全增强、新数据类型等,帮助学生快速熟悉MySQL8的最新功能。接着,我们将深入解析MySQL的网络通信机制,包括协议、连接管理、数据传输等,让
- 立即学习 500次学习
-

- JavaScript正则表达式基础与实战
- 在任何一门编程语言中,正则表达式,都是一项重要的知识,它提供了高效的字符串匹配与捕获机制,可以极大的简化程序设计。
- 立即学习 487次学习
-

- 从零制作响应式网站—Grid布局
- 本系列教程将展示从零制作一个假想的网络科技公司官网,分为导航,轮播,关于我们,成功案例,服务流程,团队介绍,数据部分,公司动态,底部信息等内容区块。网站整体采用CSSGrid布局,支持响应式,有流畅过渡和展现动画。
- 立即学习 485次学习

