AI作画原理与代码实现解析
来源:https://blog.csdn.net/myTomorrow_better/article/details/138259744
时间:2025-06-30 15:48:33 136浏览 收藏
本文深入解析了AI作画的原理,揭示了其如何借助深度学习技术,特别是卷积神经网络(CNN),模拟人脑视觉系统,从大量艺术作品中学习风格与内容,进而创作出具有特定风格的新作品。文章详细阐述了AI作画的数据处理、模型训练、风格迁移以及后处理优化等关键步骤,并着重介绍了风格迁移理论和生成对抗网络(GAN)这两大核心理论。此外,本文还提供了基于TensorFlow和Keras的代码示例,演示了如何实现风格迁移,为读者提供了理论与实践相结合的AI作画全方位解读。无论是对AI艺术感兴趣的初学者,还是希望深入研究算法原理的专业人士,都能从中获益。
随着人工智能技术的迅猛发展,AI作画逐渐成为了艺术领域的一股新兴力量。AI作画不仅突破了传统绘画的局限,还为我们带来了全新的艺术体验。本文将详细解析AI作画的原理及相关理论,并通过代码示例展示其实现过程。
一、AI作画原理
AI作画主要依赖于深度学习技术,特别是卷积神经网络(CNN)。CNN通过模拟人脑视觉系统的层次结构,从原始图像中提取出多层次、多尺度的特征信息。在AI作画中,CNN被用于学习大量艺术作品的风格和内容,从而生成具有特定风格的新作品。
具体来说,AI作画的过程可以分为以下几个步骤:
- 数据收集与处理:收集大量艺术作品作为训练数据,对图像进行预处理,如缩放、裁剪、归一化等,以便模型能够更好地学习。
- 模型训练:构建CNN模型,利用训练数据对模型进行训练。训练过程中,模型会学习如何从输入图像中提取特征,并根据目标风格进行转换。
- 风格迁移:将训练好的模型应用于新的图像,实现风格迁移。通过调整模型的参数,可以控制生成图像的风格强度和内容保持度。
- 后处理与优化:对生成的图像进行后处理,如色彩校正、细节增强等,以提高图像质量。此外,还可以通过优化算法对模型进行微调,进一步提高生成图像的效果。
二、相关理论
1. 风格迁移理论
风格迁移是AI作画的核心理论之一。它基于神经网络的特征表示能力,将一幅图像的内容和另一幅图像的风格进行融合。具体来说,风格迁移算法通过计算内容损失和风格损失来优化生成图像。内容损失衡量生成图像与原始图像在内容上的相似度,而风格损失则衡量生成图像与目标风格在风格上的相似度。通过调整这两个损失的权重,可以实现不同风格强度的迁移。
2. 生成对抗网络(GAN)
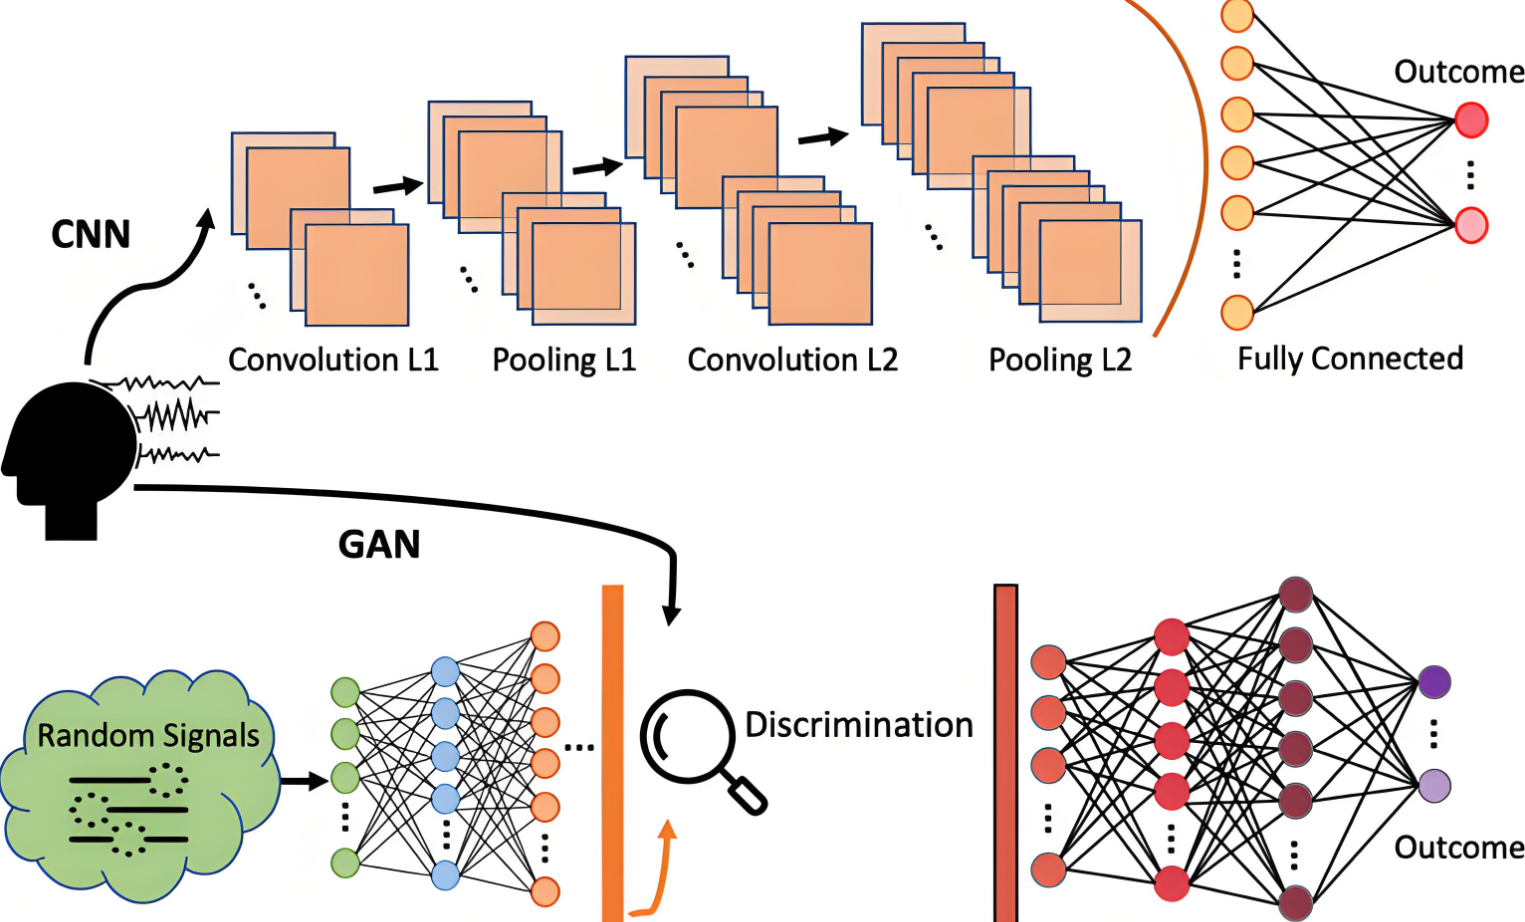
GAN是另一种重要的AI作画理论。它由生成器和判别器两个神经网络组成,通过相互对抗的方式进行训练。生成器的任务是生成尽可能真实的图像,而判别器的任务则是判断输入的图像是来自真实数据集还是由生成器生成的。通过不断优化这两个网络,GAN可以生成高质量、多样化的艺术作品。
三、代码示例
下面是一个简单的AI作画代码示例,使用TensorFlow和Keras库实现风格迁移。
首先,安装必要的库:
pip install tensorflow keras opencv-python numpy matplotlib |
然后,编写风格迁移的代码:
<code>import tensorflow as tf
from tensorflow.keras.applications import vgg19
from tensorflow.keras.preprocessing import image
from tensorflow.keras.applications.vgg19 import preprocess_input, decode_predictions
import numpy as np
import matplotlib.pyplot as plt
# 加载预训练模型
model = vgg19.VGG19(include_top=False, weights='imagenet')
# 加载内容图像和风格图像
content_image_path = 'path_to_content_image.jpg'
style_image_path = 'path_to_style_image.jpg'
# 加载并预处理图像
def load_and_process_image(image_path):    img = image.load_img(image_path, target_size=(512, 512))    img_tensor = image.img_to_array(img)    img_tensor = np.expand_dims(img_tensor, axis=0)    img_tensor = preprocess_input(img_tensor)    return img_tensor
content_image = load_and_process_image(content_image_path)
style_image = load_and_process_image(style_image_path)
# 定义内容损失和风格损失函数
def content_loss(base_content, target):    return tf.reduce_mean(tf.square(base_content - target))
def gram_matrix(input_tensor):    channels = int(input_tensor.shape[-1])    a = tf.reshape(input_tensor, [-1, channels])    n = tf.shape(a)[0]    gram = tf.matmul(a, a, transpose_a=True)    return gram / tf.cast(n, tf.float32)
def style_loss(style, combination):    S = gram_matrix(style)    C = gram_matrix(combination)    channels = 3    size = img_height * img_width    return tf.reduce_sum(tf.square(S - C)) / (4. * (channels ** 2) * (size ** 2))

# 提取特征图
def extract_features(tensor, model):  layers_dict = dict([(layer.name, layer.output) for layer in model.layers])  feature_layers = ['block1_conv1',                    'block2_conv1',                    'block3_conv1',                    'block4_conv1',                    'block5_conv1']  features = [layers_dict[layer].name for layer in feature_layers]  model_outputs = [model.get_layer(name).output for name in features]  feature_extractor = tf.keras.models.Model(inputs=model.input, outputs=model_outputs)  return feature_extractor(tensor)

# 提取内容图像和风格图像的特征
content_outputs = extract_features(content_image, model)
style_outputs = extract_features(style_image, model)

# 定义损失函数
def compute_loss(model, base_input, gram_style_features, content_weight, style_weight, total_variation_weight):  model_outputs = model(base_input)  style_output_features = model_outputs[:len(gram_style_features)]  content_output_features = [model_outputs[len(gram_style_features)]]  style_score = 0  content_score = 0 # 计算风格损失  weight_per_style_layer = 1.0 / float(len(style_layers))  for target_style, comb_style in zip(gram_style_features, style_output_features):      style_score += weight_per_style_layer * style_loss(target_style[0], comb_style[0]) # 计算内容损失  content_score += content_weight * content_loss(content_output_features[0][0], content_outputs[0]) # 计算总变差损失(可选)  if total_variation_weight:      x_rows = base_input.get_shape().as_list()      x_cols = base_input.get_shape().as_list()      a = tf.square(base_input[:, :x_rows-1, :x_cols-1, :] - base_input[:, 1:, :x_cols-1, :])      b = tf.square(base_input[:, :x_rows-1, :x_cols-1, :] - base_input[:, :x_rows-1, 1:, :])      total_variation = tf.reduce_sum(tf.pow(a + b, 1.25))      total_variation_loss = total_variation_weight * total_variation      return content_score + style_score + total_variation_loss  else:      return content_score + style_score

# 梯度下降过程
import tensorflow.keras.backend as K

def eval_loss_and_grads(model, x, y, gram_style_features, content_weight, style_weight, total_variation_weight):  x = tf.constant(x)  y = tf.constant(y)  with tf.GradientTape() as tape:      loss_value = compute_loss(model, x, gram_style_features, content_weight, style_weight, total_variation_weight)  grad = tape.gradient(loss_value, x)  return loss_value, grad

# 风格迁移过程
num_iterations = 1000
content_weight = 1e3
style_weight = 1e-2
total_variation_weight = 1e-4

x = tf.Variable(content_image)
gram_style_features = extract_features(style_image, model)

# 运行风格迁移
optimizer = tf.optimizers.Adam(learning_rate=5, beta_1=0.99, epsilon=1e-1)

for i in range(num_iterations):  loss_value, grads = eval_loss_and_grads(model, x, y, gram_style_features, content_weight, style_weight, total_variation_weight)  optimizer.apply_gradients([(grads, x)])  if i % 100 == 0:      print('Iteration %d: %d, Loss: %.2f' % (i, loss_value))

# 获取最终的迁移图像
output_image = x.numpy()
output_image = output_image.reshape((img_height, img_width, 3))
output_image = output_image * 255.0
output_image = np.clip(output_image, 0, 255).astype('uint8')

# 保存迁移图像
imsave('style_transferred_image.png', output_image)

# 显示迁移图像
plt.imshow(output_image)
plt.show()

</code>
代码是一个简化版的风格迁移过程,可能需要根据实际使用的模型和图像进行适当调整。同时,由于计算量较大,运行风格迁移可能需要一定的时间。
进一步的优化和改进可能包括:
1. 使用更高效的优化器。
2. 调整权重参数以平衡内容损失和风格损失。
3. 尝试不同的预训练模型以获得不同的风格效果。
4. 使用更复杂的图像预处理和后处理技术来提升迁移图像的质量。
总结:
风格迁移是一种将一幅图像的风格迁移到另一幅图像内容上的技术。通过构建计算内容损失和风格损失的函数,并使用梯度下降法优化损失函数,我们可以实现风格迁移。上述代码提供了一个基本的实现框架,但具体的实现方式可能因使用的模型和图像而有所不同。
本篇关于《AI作画原理与代码实现解析》的介绍就到此结束啦,但是学无止境,想要了解学习更多关于科技周边的相关知识,请关注golang学习网公众号!

-
501 收藏
-
501 收藏
-
501 收藏
-
501 收藏
-
501 收藏
-
419 收藏
-
227 收藏
-
178 收藏
-
272 收藏
-
118 收藏
-
101 收藏
-
190 收藏
-
404 收藏
-
173 收藏
-
289 收藏
-
158 收藏
-
183 收藏
-

- 前端进阶之JavaScript设计模式
- 设计模式是开发人员在软件开发过程中面临一般问题时的解决方案,代表了最佳的实践。本课程的主打内容包括JS常见设计模式以及具体应用场景,打造一站式知识长龙服务,适合有JS基础的同学学习。
- 立即学习 543次学习
-

- GO语言核心编程课程
- 本课程采用真实案例,全面具体可落地,从理论到实践,一步一步将GO核心编程技术、编程思想、底层实现融会贯通,使学习者贴近时代脉搏,做IT互联网时代的弄潮儿。
- 立即学习 516次学习
-

- 简单聊聊mysql8与网络通信
- 如有问题加微信:Le-studyg;在课程中,我们将首先介绍MySQL8的新特性,包括性能优化、安全增强、新数据类型等,帮助学生快速熟悉MySQL8的最新功能。接着,我们将深入解析MySQL的网络通信机制,包括协议、连接管理、数据传输等,让
- 立即学习 500次学习
-

- JavaScript正则表达式基础与实战
- 在任何一门编程语言中,正则表达式,都是一项重要的知识,它提供了高效的字符串匹配与捕获机制,可以极大的简化程序设计。
- 立即学习 487次学习
-

- 从零制作响应式网站—Grid布局
- 本系列教程将展示从零制作一个假想的网络科技公司官网,分为导航,轮播,关于我们,成功案例,服务流程,团队介绍,数据部分,公司动态,底部信息等内容区块。网站整体采用CSSGrid布局,支持响应式,有流畅过渡和展现动画。
- 立即学习 485次学习