深度学习中高斯噪声:为什么以及如何使用
来源:51CTO.COM
时间:2023-04-17 17:04:34 167浏览 收藏
知识点掌握了,还需要不断练习才能熟练运用。下面golang学习网给大家带来一个科技周边开发实战,手把手教大家学习《深度学习中高斯噪声:为什么以及如何使用》,在实现功能的过程中也带大家重新温习相关知识点,温故而知新,回头看看说不定又有不一样的感悟!
在数学上,高斯噪声是一种通过向输入数据添加均值为零和标准差(σ)的正态分布随机值而产生的噪声。 正态分布,也称为高斯分布,是一种连续概率分布,由其概率密度函数 (PDF) 定义:
pdf(x) = (1 / (σ * sqrt(2 * π))) * e^(- (x — μ)² / (2 * σ²))

其中 x 是随机变量,μ 是均值,σ 是标准差。
通过生成具有正态分布的随机值并将它们添加到输入数据。例如如果对图像添加高斯噪声,可以将图像表示为像素值的二维矩阵,然后使用 numpy 库 np.random.randn(rows,cols) 生成具有正态分布的随机值, 并将它们添加到图像的像素值中。 这就会得到添加了高斯噪声的新图像。
高斯噪声也称为白噪声,是一种服从正态分布的随机噪声。 在深度学习中,训练时往往会在输入数据中加入高斯噪声,以提高模型的鲁棒性和泛化能力。 这称为数据扩充。 通过向输入数据添加噪声,模型被迫学习对输入中的微小变化具有鲁棒性的特征,这可以帮助它在新的、看不见的数据上表现更好。 高斯噪声也可以在训练过程中添加到神经网络的权重中以提高其性能,这种技术称为 Dropout。
让我们先从一个简单的例子开始:
噪声的标准偏差 (noise_std) 被设置为较大的值 50,这将导致更多的噪声被添加到图像中。 可以看到噪声更加明显,并且原始图像的特征不太明显。
值得注意的是,在添加更多噪声时,需要确保噪声不超过像素值的有效范围(即 0 到 255 之间)。 在这个例子中,np.clip() 函数用于确保噪声图像的像素值落在有效范围内。
虽然更多的噪声可能更容易看出原始图像和噪声图像之间的差异,但它也可能使模型更难以从数据中学习有用的特征,并可能导致过度拟合或欠拟合。 所以最好从少量噪声开始,然后在监控模型性能的同时逐渐增加噪声。
import cv2
 import numpy as np

 # Load the image
 image = cv2.imread('dog.jpg')

 # Add Gaussian noise to the image
 noise_std = 50
 noise = np.random.randn(*image.shape) * noise_std
 noisy_image = np.clip(image + noise, 0, 255).astype(np.uint8)

 # Display the original and noisy images
 cv2.imshow('Original Image', image)
 cv2.imshow('Noisy Image', noisy_image)
 cv2.waitKey(0)
 cv2.destroyAllWindows()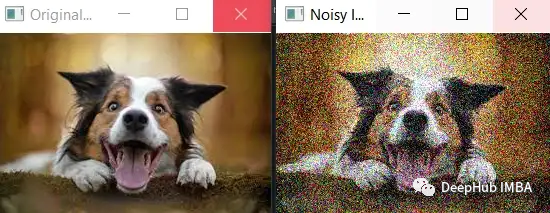
高斯噪声如何用于深度学习的一些示例。
- 数据增强:高斯噪声在深度学习中的一种常见用途是在训练期间将其添加到输入数据中。 例如可以在每个图像通过模型之前添加高斯噪声。 这将迫使模型学习对输入中的微小变化具有鲁棒性的特征,这些噪声可以代表图像上的污迹或轻微的缺失。 因此即使图像与训练数据略有不同,模型也更有可能正确识别图像。
- Dropout:高斯噪声在深度学习中的另一个用途是在训练期间将其添加到神经网络的权重中。 这被称为Dropout。 在训练过程中,dropout 以一定的概率(例如 0.5)随机将网络中的一些权重设置为零。 这迫使网络学习数据的多个冗余表示,使模型更健壮且不易过度拟合。
- 正则化:将高斯噪声添加到模型的参数中也可以看作是一种正则化技术。 它迫使模型具有更小的权重值,这反过来又使模型更通用并且更不容易过度拟合。
- 对抗训练:对抗性示例是专门为欺骗模型而设计的输入,在对抗训练中,模型是在用小的、有针对性的扰动增强的例子上训练的,比如高斯噪声。 这使得模型对对抗性示例更加稳健。
- 半监督学习:训练时可以在输入数据中加入高斯噪声,提高半监督模型的性能。 这可以帮助模型更好地利用有限的标记数据并学习更多的一般特征。
- 迁移学习:微调时可以在输入数据中加入高斯噪声,以提高迁移学习模型的性能。 这可以帮助模型更好地适应新任务并更好地泛化到看不见的数据。
- 生成对抗网络 (GAN):可以将高斯噪声添加到生成器输入中,以提高生成样本的多样性。
- 贝叶斯深度学习:训练时可以在模型的权重中加入高斯噪声,使其对过拟合具有更强的鲁棒性,提高模型的泛化能力。
- 强化学习:在训练过程中,可以在代理的输入或动作空间中加入高斯噪声,使其对环境变化具有更强的鲁棒性,提高智能体的泛化能力。
在上述所有示例中,高斯噪声通过特定的均值和标准差,以受控方式添加到输入或权重。 目标是提高模型的性能和鲁棒性,同时又不会让模型很难从数据中学习。
下面我们介绍如何在使用 Python 和 Keras在训练期间将高斯噪声添加到输入数据,说明如何在训练期间将高斯噪声添加到输入数据,然后再将其传递给模型:
from keras.preprocessing.image import ImageDataGenerator

 # Define the data generator
 datagen = ImageDataGenerator(
 featurewise_center=False,# set input mean to 0 over the dataset
 samplewise_center=False,# set each sample mean to 0
 featurewise_std_normalization=False,# divide inputs by std of the dataset
 samplewise_std_normalization=False,# divide each input by its std
 zca_whitening=False,# apply ZCA whitening
 rotation_range=0,# randomly rotate images in the range (degrees, 0 to 180)
 width_shift_range=0.1,# randomly shift images horizontally (fraction of total width)
 height_shift_range=0.1,# randomly shift images vertically (fraction of total height)
 horizontal_flip=False,# randomly flip images
 vertical_flip=False,# randomly flip images
 noise_std=0.5# add gaussian noise to the data with std of 0.5
 )

 # Use the generator to transform the data during training
 model.fit_generator(datagen.flow(x_train, y_train, batch_size=32),
 steps_per_epoch=len(x_train) / 32, epochs=epochs)
Keras 的 ImageDataGenerator 类用于定义一个数据生成器,该数据生成器将指定的数据增强技术应用于输入数据。 我们将 noise_std 设置为 0.5,这意味着标准偏差为 0.5 的高斯噪声将添加到输入数据中。 然后在调用 model.fit_generator 期间使用生成器在训练期间将数据扩充应用于输入数据。
至于Dropout,可以使用Keras中的Dropout层,设置dropout的rate,如果设置rate为0.5,那么dropout层会drop掉50%的权重。 以下是如何向模型添加 dropout 层的示例:
from keras.layers import Dropout

 model = Sequential()
 model.add(Dense(64, input_dim=64, activation='relu'))
 model.add(Dropout(0.5))
 model.add(Dense(64, activation='relu'))
 model.add(Dense(10, activation='softmax'))
需要注意的是,标准差、Dropout的实际值将取决于具体问题和数据的特征。使用不同的值进行试验并监视模型的性能通常是一个好主意。
下面我们介绍使用Keras 在训练期间将高斯噪声添加到输入数据和权重。为了向输入数据添加噪声,我们可以使用 numpy 库生成随机噪声并将其添加到输入数据中。 这是如何执行此操作的示例:
import numpy as np

 # Generate some random input data
 x_train = np.random.rand(1000, 64)
 y_train = np.random.rand(1000, 10)

 # Add Gaussian noise to the input data
 noise_std = 0.5
 x_train_noisy = x_train + noise_std * np.random.randn(*x_train.shape)

 # Train the model
 model.fit(x_train_noisy, y_train, epochs=10)
我们输入数据 x_train 是形状为 (1000, 64) 的二维数组,噪声是使用 np.random.randn(*x_train.shape) 生成的,它将返回具有相同形状的正态分布均值为 0,标准差为 1的随机值数组。然后将生成的噪声与噪声的标准差 (0.5) 相乘,并将其添加到输入数据中,从而将其添加到输入数据中。
为了给权重添加噪声,我们可以使用 Keras 中的 Dropout 层,它会在训练过程中随机丢弃一些权重。 高斯噪声是深度学习中广泛使用的技术,在图像分类训练时可以在图像中加入高斯噪声,提高图像分类模型的鲁棒性。 这在训练数据有限或具有很大可变性时特别有用,因为模型被迫学习对输入中的小变化具有鲁棒性的特征。
以下是如何在训练期间向图像添加高斯噪声以提高图像分类模型的鲁棒性的示例:
from keras.preprocessing.image import ImageDataGenerator

 # Define the data generator
 datagen = ImageDataGenerator(
 featurewise_center=False,# set input mean to 0 over the dataset
 samplewise_center=False,# set each sample mean to 0
 featurewise_std_normalization=False,# divide inputs by std of the dataset
 samplewise_std_normalization=False,# divide each input by its std
 zca_whitening=False,# apply ZCA whitening
 rotation_range=0,# randomly rotate images in the range (degrees, 0 to 180)
 width_shift_range=0,# randomly shift images horizontally (fraction of total width)
 height_shift_range=0,# randomly shift images vertically (fraction of total height)
 horizontal_flip=False,# randomly flip images
 vertical_flip=False,# randomly flip images
 noise_std=0.5# add gaussian noise to the data with std of 0.5
 )

 # Use the generator to transform the data during training
 model.fit_generator(datagen.flow(x_train, y_train, batch_size=32),
 steps_per_epoch=len(x_train) / 32, epochs=epochs)
目标检测:在目标检测模型的训练过程中,可以将高斯噪声添加到输入数据中,以使其对图像中的微小变化(例如光照条件、遮挡和摄像机角度)更加鲁棒。
def add_noise(image, std):
 """Add Gaussian noise to an image."""
 noise = np.random.randn(*image.shape) * std
 return np.clip(image + noise, 0, 1)

 # Add noise to the training images
 x_train_noisy = np.array([add_noise(img, 0.1) for img in x_train])

 # Train the model
 model.fit(x_train_noisy, y_train, epochs=10)
语音识别:在训练过程中,可以在音频数据中加入高斯噪声,这可以帮助模型更好地处理音频信号中的背景噪声和其他干扰,提高语音识别模型的鲁棒性。
def add_noise(audio, std):
 """Add Gaussian noise to an audio signal."""
 noise = np.random.randn(*audio.shape) * std
 return audio + noise

 # Add noise to the training audio
 x_train_noisy = np.array([add_noise(audio, 0.1) for audio in x_train])

 # Train the model
 model.fit(x_train_noisy, y_train, epochs=10)
生成模型:在 GAN、Generative Pre-training Transformer (GPT) 和 VAE 等生成模型中,可以在训练期间将高斯噪声添加到输入数据中,以提高模型生成新的、看不见的数据的能力。
# Generate random noise
 noise = np.random.randn(batch_size, 100)

 # Generate fake images
 fake_images = generator.predict(noise)

 # Add Gaussian noise to the fake images
 fake_images_noisy = fake_images + 0.1 * np.random.randn(*fake_images.shape)

 # Train the discriminator
 discriminator.train_on_batch(fake_images_noisy, np.zeros((batch_size, 1)))
在这个例子中,生成器被训练为基于随机噪声作为输入生成新的图像,并且在生成的图像传递给鉴别器之前,将高斯噪声添加到生成的图像中。这提高了生成器生成新的、看不见的数据的能力。
对抗训练:在对抗训练时,可以在输入数据中加入高斯噪声,使模型对对抗样本更加鲁棒。
下面的对抗训练使用快速梯度符号法(FGSM)生成对抗样本,高斯噪声为 在训练期间将它们传递给模型之前添加到对抗性示例中。 这提高了模型对对抗性示例的鲁棒性。
# Generate adversarial examples
 x_adv = fgsm(model, x_train, y_train, eps=0.01)

 # Add Gaussian noise to the adversarial examples
 noise_std = 0.05
 x_adv_noisy = x_adv + noise_std * np.random.randn(*x_adv.shape)

 # Train the model
 model.fit(x_adv_noisy, y_train, epochs=10)
去噪:可以将高斯噪声添加到图像或信号中,模型的目标是学习去除噪声并恢复原始信号。下面的例子中输入图像“x_train”首先用标准的高斯噪声破坏 0.1 的偏差,然后将损坏的图像通过去噪自动编码器以重建原始图像。 自动编码器学习去除噪声并恢复原始信号。
# Add Gaussian noise to the images
 noise_std = 0.1
 x_train_noisy = x_train + noise_std * np.random.randn(*x_train.shape)

 # Define the denoising autoencoder
 input_img = Input(shape=(28, 28, 1))
 x = Conv2D(32, (3, 3), activation='relu', padding='same')(input_img)
 x = MaxPooling2D((2, 2), padding='same')(x)
 x = Conv2D(32, (3, 3), activation='relu', padding='same')(x)
 encoded = MaxPooling2D((2, 2), padding='same')(x)

 # at this point the representation is (7, 7, 32)

 x = Conv2D(32, (3, 3), activation='relu', padding='same')(encoded)
 x = UpSampling2D((2, 2))(x)
 x = Conv2D(32, (3, 3), activation='relu', padding='same')(x)
 x = UpSampling2D((2, 2))(x)
 decoded = Conv2D(1, (3, 3), activation='sigmoid', padding='same')(x)

 autoencoder = Model(input_img, decoded)
 autoencoder.compile(optimizer='adam', loss='binary
异常检测:高斯噪声可以添加到正常数据中,模型的目标是学习将添加的噪声作为异常检测。
# Add Gaussian noise to the normal data
 noise_std = 0.1
 x_train_noisy = x_train + noise_std * np.random.randn(*x_train.shape)

 # Concatenate the normal and the noisy data
 x_train_concat = np.concatenate((x_train, x_train_noisy))
 y_train_concat = np.concatenate((np.zeros(x_train.shape[0]), np.ones(x_train_noisy.shape[0])))

 # Train the anomaly detection model
 model.fit(x_train_concat, y_train_concat, epochs=10)
稳健优化:在优化过程中,可以将高斯噪声添加到模型的参数中,使其对参数中的小扰动更加稳健。
Define the loss function
 def loss_fn(params):
model.set_weights(params)
return model.evaluate(x_test, y_test, batch_size=32)[0]

 # Define the optimizer
 optimizer = optimizers.Adam(1e-3)

 # Define the step function
 def step_fn(params):
with tf.GradientTape() as tape:
loss = loss_fn(params)
grads = tape.gradient(loss, params)
optimizer.apply_gradients(zip(grads, params))
return params + noise_std * np.random.randn(*params.shape)

 # Optimize the model
 params = model.get_weights()
高斯噪声是深度学习中用于为输入数据或权重添加随机性的一种技术。 它是一种通过将均值为零且标准差 (σ) 正态分布的随机值添加到输入数据中而生成的随机噪声。 向数据中添加噪声的目的是使模型对输入中的小变化更健壮,并且能够更好地处理看不见的数据。 高斯噪声可用于广泛的应用,例如图像分类、对象检测、语音识别、生成模型和稳健优化。
以上就是《深度学习中高斯噪声:为什么以及如何使用》的详细内容,更多关于深度学习,数据生成器,高斯噪声的资料请关注golang学习网公众号!
-
501 收藏
-
501 收藏
-
501 收藏
-
501 收藏
-
501 收藏
-
科技周边 · 人工智能 | 2天前 | 人工智能 · GenAI · opentelemetry · 可观测性 · AI工程 · 人工智能 链路追踪 GenAI OpenTelemetry AI可观测性 LLM网关 Token统计427 收藏
-
154 收藏
-
309 收藏
-
234 收藏
-
科技周边 · 人工智能 | 6天前 | 人工智能 · 前端流式输出 · AI聊天 · Fetch Stream · 前端 AI聊天 流式输出 ReadableStream TextDecoder Fetch Stream448 收藏
-
427 收藏
-
191 收藏
-
299 收藏
-
科技周边 · 人工智能 | 2星期前 | 人工智能 · mcp · ai agent · 工具接入 · 安全审计 · AI Agent MCP Model Context Protocol 工具清单 资源上下文 权限审计378 收藏
-
195 收藏
-
453 收藏
-
202 收藏
-

- 前端进阶之JavaScript设计模式
- 设计模式是开发人员在软件开发过程中面临一般问题时的解决方案,代表了最佳的实践。本课程的主打内容包括JS常见设计模式以及具体应用场景,打造一站式知识长龙服务,适合有JS基础的同学学习。
- 立即学习 543次学习
-

- GO语言核心编程课程
- 本课程采用真实案例,全面具体可落地,从理论到实践,一步一步将GO核心编程技术、编程思想、底层实现融会贯通,使学习者贴近时代脉搏,做IT互联网时代的弄潮儿。
- 立即学习 516次学习
-

- 简单聊聊mysql8与网络通信
- 如有问题加微信:Le-studyg;在课程中,我们将首先介绍MySQL8的新特性,包括性能优化、安全增强、新数据类型等,帮助学生快速熟悉MySQL8的最新功能。接着,我们将深入解析MySQL的网络通信机制,包括协议、连接管理、数据传输等,让
- 立即学习 500次学习
-

- JavaScript正则表达式基础与实战
- 在任何一门编程语言中,正则表达式,都是一项重要的知识,它提供了高效的字符串匹配与捕获机制,可以极大的简化程序设计。
- 立即学习 487次学习
-

- 从零制作响应式网站—Grid布局
- 本系列教程将展示从零制作一个假想的网络科技公司官网,分为导航,轮播,关于我们,成功案例,服务流程,团队介绍,数据部分,公司动态,底部信息等内容区块。网站整体采用CSSGrid布局,支持响应式,有流畅过渡和展现动画。
- 立即学习 485次学习