使用Sharding-JDBC进行分库分表,读写分离
来源:SegmentFault
时间:2023-01-28 08:58:43 207浏览 收藏
在数据库实战开发的过程中,我们经常会遇到一些这样那样的问题,然后要卡好半天,等问题解决了才发现原来一些细节知识点还是没有掌握好。今天golang学习网就整理分享《使用Sharding-JDBC进行分库分表,读写分离》,聊聊MySQL、读写分离、Java、分库分表、springboot,希望可以帮助到正在努力赚钱的你。
分库分表
为什么要分库分表?
数据库的数据量是不可控的,随着时间和业务发展,造成表里面数据越来越多,如果再去对数据库表curd操作时候,造成性能问题。分库分表为了解决由于数据量过大而造成数据库性能降低问题。
分库分表的方式
1.垂直切分
- 垂直分表
对表中的字段进行拆分,把表中一部分字段放到一张表中,把另一部分字段数据放到另外一张表职工
- 垂直分库
把数据库按照业务进行划分,每个库只有一张表,如商品库中的商品表,订单库中的订单表,即专库专表
2.水平切分
- 水平分表
相当于在一个数据库复制其中表,除表名不同外,新表结构与原来的一样
- 水平分库
相当于复制数据库,除库名不同外,数据库与原来的一样
Sharding-JDBC进行分库分表
Sharding-JDBC仅简化对分库分表之后数据相关操作
1.垂直分库
多个数据库情况下,对表进行操作,只会影响对应的专库
#========================垂直分库===================
#spring.shardingsphere.datasource.names=ds1,ds2,ds0
#
#spring.shardingsphere.datasource.ds1.type=com.alibaba.druid.pool.DruidDataSource
#spring.shardingsphere.datasource.ds1.driver-class-name=com.mysql.jdbc.Driver
#spring.shardingsphere.datasource.ds1.url=jdbc:mysql://localhost:3306/edu_db_1
#spring.shardingsphere.datasource.ds1.username=root
#spring.shardingsphere.datasource.ds1.password=root
#
#spring.shardingsphere.datasource.ds2.type=com.alibaba.druid.pool.DruidDataSource
#spring.shardingsphere.datasource.ds2.driver-class-name=com.mysql.jdbc.Driver
#spring.shardingsphere.datasource.ds2.url=jdbc:mysql://localhost:3306/edu_db_2
#spring.shardingsphere.datasource.ds2.username=root
#spring.shardingsphere.datasource.ds2.password=root
#
#spring.shardingsphere.datasource.ds0.type=com.alibaba.druid.pool.DruidDataSource
#spring.shardingsphere.datasource.ds0.driver-class-name=com.mysql.jdbc.Driver
#spring.shardingsphere.datasource.ds0.url=jdbc:mysql://localhost:3306/user_db
#spring.shardingsphere.datasource.ds0.username=root
#spring.shardingsphere.datasource.ds0.password=root
#
## 配置user_db数据库里面t_user 专库专表
#spring.shardingsphere.sharding.tables.t_user.actual-data-nodes=ds$->{0}.t_user
#
## 指定course表里面主键cid 生成策略  SNOWFLAKE
#spring.shardingsphere.sharding.tables.t_user.key-generator.column=user_id
#spring.shardingsphere.sharding.tables.t_user.key-generator.type=SNOWFLAKE
#========================垂直分库===================
2.水平分表
(1)创建数据库 course_db
(2)在数据库创建两张表 course_1 和 course_2
(3)约定规则:如果添加课程cid 是偶数把数据添加 course_1,如果奇数添加到 course_2
主要配置如下:
#========================水平分表===================
spring.shardingsphere.datasource.names=ds0
spring.shardingsphere.datasource.ds0.type=com.alibaba.druid.pool.DruidDataSource
spring.shardingsphere.datasource.ds0.driver-class-name=com.mysql.jdbc.Driver
spring.shardingsphere.datasource.ds0.url=jdbc:mysql://localhost:3306/course_db
spring.shardingsphere.datasource.ds0.username=root
spring.shardingsphere.datasource.ds0.password=root
#course代表逻辑表名
#指定course表的分布情况,配置表在那个数据库里面,表名称都是什么
spring.shardingsphere.sharding.tables.course.actual-data-nodes=ds0.course_$->{0..1}

#指定分片策略 约定cid值偶数添加到course_1,奇数添加到course_2
spring.shardingsphere.sharding.tables.course.table-strategy.inline.sharding-column=cid
spring.shardingsphere.sharding.tables.course.table-strategy.inline.algorithm-expression=course_$->{cid % 2 + 1}
#========================水平分表===================
3.水平分库
(1)创建两个数据库edu_db_1,edu_db_2
(2)每个数据库创建两张表 course_1 和 course_2
(3)
a:分库规则:userid为偶数,数据添加到edu_db_1数据库,奇数数据添加到edu_db_2数据库。
b:分表规则:如果添加课程cid 是偶数把数据添加 course_1,如果奇数添加到 course_2
主要配置如下:
#========================水平分库===================
#spring.shardingsphere.datasource.names=ds1,ds2
#
#spring.shardingsphere.datasource.ds1.type=com.alibaba.druid.pool.DruidDataSource
#spring.shardingsphere.datasource.ds1.driver-class-name=com.mysql.jdbc.Driver
#spring.shardingsphere.datasource.ds1.url=jdbc:mysql://localhost:3306/edu_db_1
#spring.shardingsphere.datasource.ds1.username=root
#spring.shardingsphere.datasource.ds1.password=root
#
#spring.shardingsphere.datasource.ds2.type=com.alibaba.druid.pool.DruidDataSource
#spring.shardingsphere.datasource.ds2.driver-class-name=com.mysql.jdbc.Driver
#spring.shardingsphere.datasource.ds2.url=jdbc:mysql://localhost:3306/edu_db_2
#spring.shardingsphere.datasource.ds2.username=root
#spring.shardingsphere.datasource.ds2.password=root
#
#指定数据库分布情况,数据库里面表分布情况
## d1  d2    course_1 course_2
#spring.shardingsphere.sharding.tables.course.actual-data-nodes=ds$->{1..2}.course_$->{1..2}

##指定分片策略 约定cid值偶数添加到course_1,奇数添加到course_2
#spring.shardingsphere.sharding.tables.course.table-strategy.inline.sharding-column=cid
#spring.shardingsphere.sharding.tables.course.table-strategy.inline.algorithm-expression=course_$->{cid % 2 + 1}
#指定分库策略 约定user_id值偶数添加到edu_db_1,奇数添加到edu_db_2
#spring.shardingsphere.sharding.tables.course.database-strategy.inline.sharding-column=user_id
#spring.shardingsphere.sharding.tables.course.database-strategy.inline.algorithm-expression=ds$->{user_id % 2 + 1}
#========================水平分库===================
4.公共表
公共表:
(1)存储固定数据的表,表数据很少发生变化,查询时候经常进行关联
(2)在每个数据库中创建出相同结构公共表
在多个数据库都创建相同结构公共表,对某个库的公共表进行操作,会广播到其他所有公共表
## 配置公共表
#spring.shardingsphere.sharding.broadcast-tables=t_udict
#spring.shardingsphere.sharding.tables.t_udict.key-generator.column=dictid
#spring.shardingsphere.sharding.tables.t_udict.key-generator.type=SNOWFLAKE
读写分离
为什么要读写分离?
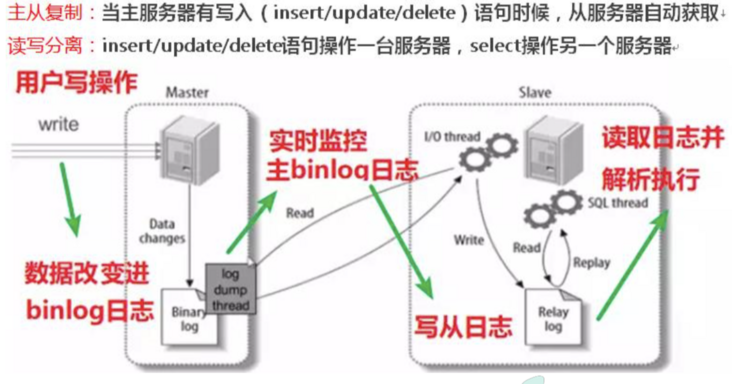
为了确保数据库产品的稳定性,很多数据库拥有双机热备功能。也就是,第一台数据库服务器,是对外提供增删改业务的生产服务器;第二台数据库服务器,主要进行读的操作。
读写分离原理

读写分离基于主从复制,Sharding-JDBC 通过sql语句语义分析,实现读写分离过程,不会做数据同步
准备工作:
因为我原来已经有一个MySql服务在运行,为了防止搞崩,用这个方法
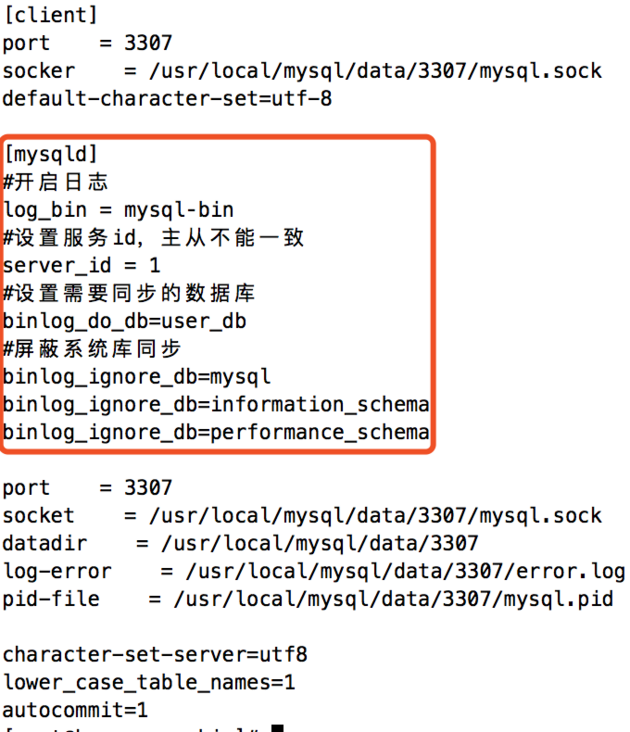
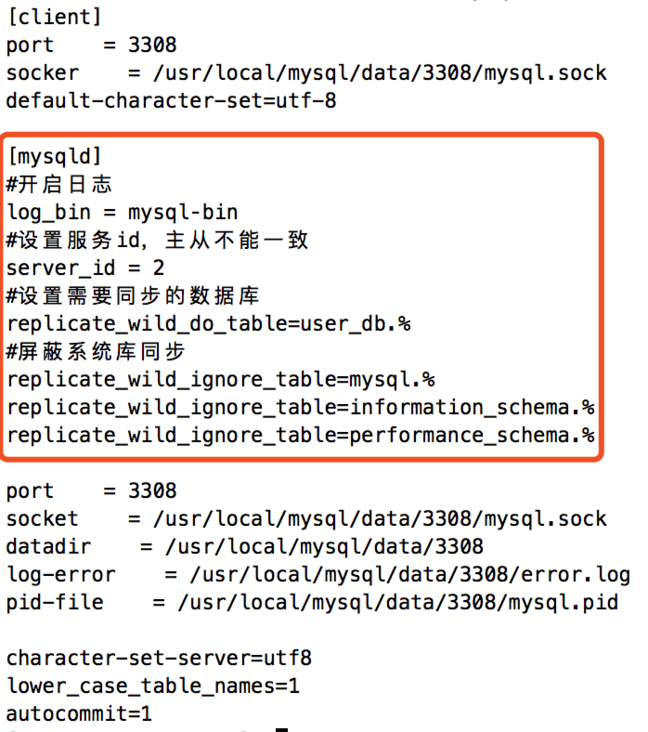
一台linux主机启动多个MySQL数据库
/usr/local/mysql/data/3307/my.cnf 主库配置:

/usr/local/mysql/data/3308/my.cnf 从库配置:

新增了3307 3308端口两个主从MySql服务:

新增账号:
1.切换至主库bin目录,登录主库
2.授权主备复制专用账号
GRANT REPLICATION SLAVE ON . TO 'root'@'192.168.1.80' IDENTIFIED BY 'root';
3.刷新权限
FLUSH PRIVILEGES;
4.确认位点 记录下文件名以及位点
show master status;

设置主从复制
1.切换至从库bin目录,登录从库
2.先停止同步
STOP SLAVE;
3.修改从库指向到主库,使用上一步记录的文件名以及位点
CHANGE MASTER TO
master_host = '192.168.1.80',
master_user = 'root',
master_password = 'root',
master_log_file = 'mysql‐bin.000003',
master_log_pos = 666;
4.启动同步
START SLAVE;
5.查看从库状态Slave_IO_Runing和Slave_SQL_Runing都为Yes说明同步成功,如果不为Yes,请检查 error_log,然后
排查相关异常。
show slave status;

Sharding-JDBC 读写分离配置
#========================读写分离====================
spring.shardingsphere.datasource.names=m1,s1

spring.shardingsphere.datasource.m1.type=com.alibaba.druid.pool.DruidDataSource
spring.shardingsphere.datasource.m1.driver-class-name=com.mysql.jdbc.Driver
spring.shardingsphere.datasource.m1.url=jdbc:mysql://192.168.1.80:3307/user_db
spring.shardingsphere.datasource.m1.username=root
spring.shardingsphere.datasource.m1.password=root

spring.shardingsphere.datasource.s1.type=com.alibaba.druid.pool.DruidDataSource
spring.shardingsphere.datasource.s1.driver-class-name=com.mysql.jdbc.Driver
spring.shardingsphere.datasource.s1.url=jdbc:mysql://192.168.1.80:3308/user_db
spring.shardingsphere.datasource.s1.username=root
spring.shardingsphere.datasource.s1.password=root

spring.shardingsphere.sharding.master‐slave‐rules.ds0.master-data-source-name=m1
spring.shardingsphere.sharding.master‐slave‐rules.ds0.slave-data-source-names=s1

#========================读写分离====================
完整github地址:
https://github.com/WillLiaowh/ShardingJdbc-Demo
https://www.bilibili.com/video/BV1LK411s7RX?p=1
今天带大家了解了MySQL、读写分离、Java、分库分表、springboot的相关知识,希望对你有所帮助;关于数据库的技术知识我们会一点点深入介绍,欢迎大家关注golang学习网公众号,一起学习编程~
-
499 收藏
-
244 收藏
-
235 收藏
-
157 收藏
-
101 收藏
-
427 收藏
-
351 收藏
-
156 收藏
-
405 收藏
-
497 收藏
-
133 收藏
-
319 收藏
-
141 收藏
-
256 收藏
-
259 收藏
-
167 收藏
-
496 收藏
-

- 前端进阶之JavaScript设计模式
- 设计模式是开发人员在软件开发过程中面临一般问题时的解决方案,代表了最佳的实践。本课程的主打内容包括JS常见设计模式以及具体应用场景,打造一站式知识长龙服务,适合有JS基础的同学学习。
- 立即学习 543次学习
-

- GO语言核心编程课程
- 本课程采用真实案例,全面具体可落地,从理论到实践,一步一步将GO核心编程技术、编程思想、底层实现融会贯通,使学习者贴近时代脉搏,做IT互联网时代的弄潮儿。
- 立即学习 516次学习
-

- 简单聊聊mysql8与网络通信
- 如有问题加微信:Le-studyg;在课程中,我们将首先介绍MySQL8的新特性,包括性能优化、安全增强、新数据类型等,帮助学生快速熟悉MySQL8的最新功能。接着,我们将深入解析MySQL的网络通信机制,包括协议、连接管理、数据传输等,让
- 立即学习 500次学习
-

- JavaScript正则表达式基础与实战
- 在任何一门编程语言中,正则表达式,都是一项重要的知识,它提供了高效的字符串匹配与捕获机制,可以极大的简化程序设计。
- 立即学习 487次学习
-

- 从零制作响应式网站—Grid布局
- 本系列教程将展示从零制作一个假想的网络科技公司官网,分为导航,轮播,关于我们,成功案例,服务流程,团队介绍,数据部分,公司动态,底部信息等内容区块。网站整体采用CSSGrid布局,支持响应式,有流畅过渡和展现动画。
- 立即学习 485次学习

