Linux系统集群架构线上项目配置实战(三)
来源:SegmentFault
时间:2023-02-25 08:14:00 470浏览 收藏
编程并不是一个机械性的工作,而是需要有思考,有创新的工作,语法是固定的,但解决问题的思路则是依靠人的思维,这就需要我们坚持学习和更新自己的知识。今天golang学习网就整理分享《Linux系统集群架构线上项目配置实战(三)》,文章讲解的知识点主要包括MySQL、Java、Linux、nginx、centos,如果你对数据库方面的知识点感兴趣,就不要错过golang学习网,在这可以对大家的知识积累有所帮助,助力开发能力的提升。
前面介绍了分发文件管理、前端反向代理与管理后台服务器的配置操作,今天介绍下前端负载与APP服务器(用户与商家)、官网、FTP服务器的配置操作
1、前端负载均衡配置
安装所需的依赖包
yum install pcre-devel zlib-devle openssl-devel gcc-c++ –y
编译安装nginx
cd /download/tools/

wget http://nginx.org/download/nginx-1.12.1.tar.gz

tar zxf nginx-1.12.1.tar.gz

cd nginx-1.12.1

./configure --prefix=/app/nginx-1.12.1

make && make install

[root@centos ~]# cd /app/

[root@centos app]# ln -s nginx-1.12.1 nginx

[root@centos ~]# cd /app/nginx/conf/

[root@centos conf]# mkdir extra

[root@centos conf]# cp nginx.conf nginx.conf.bak
在nginx.conf文件后增加下面的配置
include extra/*.conf;


[root@centos conf]# cd extra/

 [root@centos extra]# vim user.app.conf

#

# HTTPS server configuration

#

upstream userapp {

      server 10.0.0.4:8080;

      server 10.0.0.4:8081;

}

server {

    listen       80;

    server_name app.mingongge.com;

    location / {

        proxy_pass http://userapp;

        proxy_connect_timeout 600;

        proxy_read_timeout 600;

        proxy_send_timeout 600;


}
[root@centos conf]# cd extra/

[root@centos conf]# vim sj.app.conf

#

# HTTPS server configuration

#

upstream sjapp {

      server 10.0.0.5:8080;

      server 10.0.0.5:8081;

}


server {

    listen       80;

    server\_name sjapp.mingongge.com;

    location / {

        proxy_pass http://sjapp;

        proxy_connect_timeout 600;

        proxy_read_timeout 600;

        proxy_send_timeout 600;

}

}
2、后端APP服务器配置
后端APP服务器JAVA环境安装配置
[root@centos tools]# ll

total 181168

-rw-r--r-- 1 root root 185515842 Sep 20 15:52 jdk-8u144-linux-x64.tar.gz

[root@centos tools]# tar zxf jdk-8u144-linux-x64.tar.gz -C /usr/local/

[root@centos tools]# ln -s /usr/local/jdk1.8.0_144 /usr/local/jdk

[root@centos tools]# cat >>/etc/profile
后端tomcat 配置
wget http://mirrors.hust.edu.cn/apache/tomcat/tomcat-8/v8.5.20/bin/apache-tomcat-8.5.20.tar.gz [root@centos tools]# tar zxf apache-tomcat-8.5.20.tar.gz -C /usr/local/ [root@centos tools]# ln -s /usr/local/apache-tomcat-8.5.20 /usr/local/tomcat [root@centos tools]# cd /usr/local/apache-tomcat-8.5.20/conf/ [root@centos conf]# vim server.xml -------------此处省略N行--------------** **
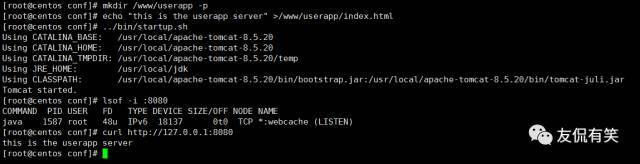
#增加上述站点目录

[root@centos conf]# mkdir /www/userapp -p

echo "this is the frist userapp server" >/www/userapp/index.html
[root@centos conf]# ../bin/startup.sh

Using CATALINA_BASE:   /usr/local/apache-tomcat-8.5.20

Using CATALINA_HOME:   /usr/local/apache-tomcat-8.5.20

Using CATALINA_TMPDIR: /usr/local/apache-tomcat-8.5.20/temp

Using JRE_HOME:  /usr/local/jdk

Using CLASSPATH: /usr/local/apache-tomcat-8.5.20/bin/bootstrap.jar:/usr/local/apache-tomcat-8.5.20/bin/tomcat-juli.jar

Tomcat started.

[root@centos conf]# lsof -i :8080

COMMAND  PID USER   FD   TYPE DEVICE SIZE/OFF NODE NAME

java 1587 root 48u IPv6 18137 0t0 TCP *:webcache (LISTEN)
另外一台用户APP 服务器按上述的配置进行
[root@centos conf]# mkdir /www/userapp -p

echo "this is the second userapp ">/www/userapp/index.html
商家APP环境配置请参考上面的配置
[root@centos conf]# mkdir /www/sjapp -p

echo "this is the frist sjapp ">/www/userapp/index.html

echo "this is the second sjapp ">/www/userapp/index.html
接下来测试下负载均衡
前端负载均衡测试
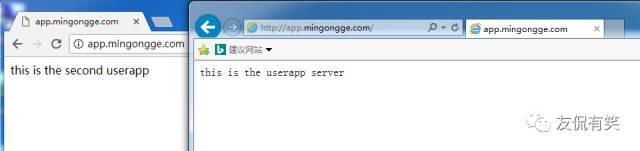
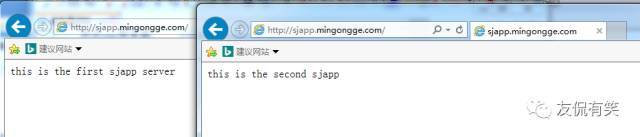
[root@centos conf]# curl http://10.0.0.1

this is the userapp server

[root@centos conf]# curl http://10.0.0.1

this is the second userapp

[root@centos conf]# curl http://app.mingongge.com

this is the userapp server

[root@centos conf]# curl http://app.mingongge.com

this is the second userapp

[root@centos extra]# curl http://sjapp.mingongge.com

this is the first sjapp server

[root@centos extra]# curl http://sjapp.mingongge.com

this is the second sjapp
浏览器访问测试
本地浏览器测试需要配置hosts文件
10.0.0.1 app.mingongge.com

10.0.0.1 sjapp.mingongge.com
3、官网与图片服务器配置
基本的架构也是一样使用反向代理,为了后期整体架构扩展
Nginx FTP的安装就不再描述了,太简单了,扯多了累
前面反向代理配置如下
[root@centos extra]# vim web.mingongge.conf
#

# HTTPS server configuration

#

server {

    listen       80;

    server_name www.mingongge.com;

    location / {

        proxy_pass http://10.0.0.8;

        proxy_connect_timeout 600;

        proxy_read_timeout 600;

        proxy_send_timeout 600;

}

}
[root@centos extra]# vim ftp.mingongge.com
#
# HTTPS server configuration
#

server {

    listen       80;

    server\_name ftp.mingongge.com;

    location / {

        proxy_pass http://10.0.0.8:88;

        proxy_connect_timeout 600;

        proxy_read_timeout 600;

        proxy_send_timeout 600;

}

}
后端WEB服务器配置
[root@centos html]# vim index.html

welcome to mingongge.s web stie!!!!!!!!!!!!!

[root@centos ~]# /usr/local/nginx/sbin/nginx -t

nginx: the configuration file /usr/local/nginx/conf/nginx.conf syntax is ok

nginx: configuration file /usr/local/nginx/conf/nginx.conf test is successful

[root@centos ~]# /usr/local/nginx/sbin/nginx

[root@centos ~]# curl 10.0.0.8

welcome to mingongge.s web stie!!!!!!!!!!!!!
FTP这块的配置其实是就是管理后台通过应用程序上传图片,前面用户通过nginx能访问到正确的页面即可,由于线下测试环境,不可能拿生产代码来做实验,因此管理后台上传图片无法模拟,过程就是后台上传图片是通过FTP的功能上传到指定的目录,然后前端通过nginx来调用这个图片去显示
因此就配置下访问图片即可
[root@centos conf]# cd extra/

[root@centos extra]# vim ftp.mingongge.conf

server {

   listen       88;

    server_name  localhost;

 location / {

    root   /www/ftp;

      }
上传图片进行测试
通过前端反向代理直接访问域名来读取图,来实现应用程序调用图片的功能在其它前台页面展示的功能
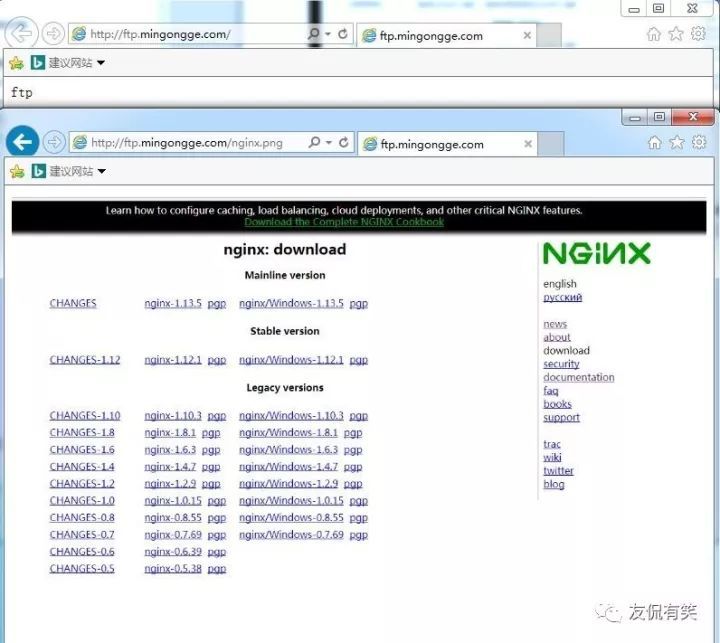
发现也是可以正常访问的
到这里,我们也就讲完了《Linux系统集群架构线上项目配置实战(三)》的内容了。个人认为,基础知识的学习和巩固,是为了更好的将其运用到项目中,欢迎关注golang学习网公众号,带你了解更多关于mysql的知识点!
-
数据库 · MySQL | 2天前 | MySQL · 权限管理 · 备份 · mysqldump · 数据库安全 · 最小权限 mysqldump备份账号 MySQL角色 partial_revokes 备份权限413 收藏
-
278 收藏
-
数据库 · MySQL | 3天前 | MySQL · JSON · 索引 · 数据库 · 查询优化 · 生成列 · json_extract 索引优化 列表筛选 生成列 MySQL JSON JSON索引351 收藏
-
数据库 · MySQL | 5天前 | MySQL · 认证 · MySQL 8.4 · 数据库升级 · caching_sha2_password mysql_native_password 账号认证 MySQL 8.4 升级迁移236 收藏
-
471 收藏
-
数据库 · MySQL | 6天前 | MySQL · 数据库 · SQL · ON DUPLICATE KEY UPDATE · VALUES · 行别名 · MySQL VALUES() 弃用 ON DUPLICATE KEY UPDATE MySQL 行别名 INSERT AS new MySQL upsert INSERT SELECT117 收藏
-
数据库 · MySQL | 1星期前 | MySQL · 索引 · limit · explain · sql优化 · ORDER BY · mysql order by explain limit 复合索引 filesort279 收藏
-
数据库 · MySQL | 1星期前 | 并发 · MySQL · InnoDB · update · 库存扣减 · innodb MySQL 库存扣减 条件 UPDATE 防超卖 affected rows470 收藏
-
421 收藏
-
189 收藏
-
412 收藏
-
378 收藏
-

- 前端进阶之JavaScript设计模式
- 设计模式是开发人员在软件开发过程中面临一般问题时的解决方案,代表了最佳的实践。本课程的主打内容包括JS常见设计模式以及具体应用场景,打造一站式知识长龙服务,适合有JS基础的同学学习。
- 立即学习 543次学习
-

- GO语言核心编程课程
- 本课程采用真实案例,全面具体可落地,从理论到实践,一步一步将GO核心编程技术、编程思想、底层实现融会贯通,使学习者贴近时代脉搏,做IT互联网时代的弄潮儿。
- 立即学习 516次学习
-

- 简单聊聊mysql8与网络通信
- 如有问题加微信:Le-studyg;在课程中,我们将首先介绍MySQL8的新特性,包括性能优化、安全增强、新数据类型等,帮助学生快速熟悉MySQL8的最新功能。接着,我们将深入解析MySQL的网络通信机制,包括协议、连接管理、数据传输等,让
- 立即学习 500次学习
-

- JavaScript正则表达式基础与实战
- 在任何一门编程语言中,正则表达式,都是一项重要的知识,它提供了高效的字符串匹配与捕获机制,可以极大的简化程序设计。
- 立即学习 487次学习
-

- 从零制作响应式网站—Grid布局
- 本系列教程将展示从零制作一个假想的网络科技公司官网,分为导航,轮播,关于我们,成功案例,服务流程,团队介绍,数据部分,公司动态,底部信息等内容区块。网站整体采用CSSGrid布局,支持响应式,有流畅过渡和展现动画。
- 立即学习 485次学习