php 学习笔记之搭建开发环境(mac版)
来源:SegmentFault
时间:2023-02-24 11:56:12 324浏览 收藏
有志者,事竟成!如果你在学习数据库,那么本文《php 学习笔记之搭建开发环境(mac版)》,就很适合你!文章讲解的知识点主要包括MySQL、PHP、MacOS、apache,若是你对本文感兴趣,或者是想搞懂其中某个知识点,就请你继续往下看吧~
$ sudo apachectl start

常用命令
- 查看
$ apachectl -v
Server version: Apache/2.4.34 (Unix)
Server built:   Feb 22 2019 19:30:04
- 启动
$ sudo apachectl start
Password:
- 停止
$ sudo apachectl stop
- 重启
$ sudo apachectl restart
安装路径
$ tree /private/etc/apache2
/private/etc/apache2
├── extra
│   ├── httpd-autoindex.conf
│   ├── httpd-autoindex.conf~previous
│   ├── httpd-dav.conf
│   ├── httpd-dav.conf~previous
│   ├── httpd-default.conf
├── httpd.conf
├── httpd.conf.pre-update
├── httpd.conf~previous
├── magic
├── mime.types
├── original
│   ├── extra
│   │   ├── httpd-autoindex.conf
│   │   ├── httpd-dav.conf
│   │   ├── httpd-default.conf
│   │   ├── httpd-vhosts.conf
│   │   └── proxy-html.conf
│   └── httpd.conf
├── other
│   └── php7.conf
└── users
    └── Guest.conf

5 directories, 43 files
如果想要修改项目部署路径以及服务器端口等自定义配置,可打开
$ vim /private/etc/apache2/httpd.conf
输入
$ tree /Library/WebServer/Documents
/Library/WebServer/Documents
├── PoweredByMacOSX.gif
├── PoweredByMacOSXLarge.gif
├── index.html.en
└── index.html.en~orig

0 directories, 4 files
当然你可以通过访达直接前往
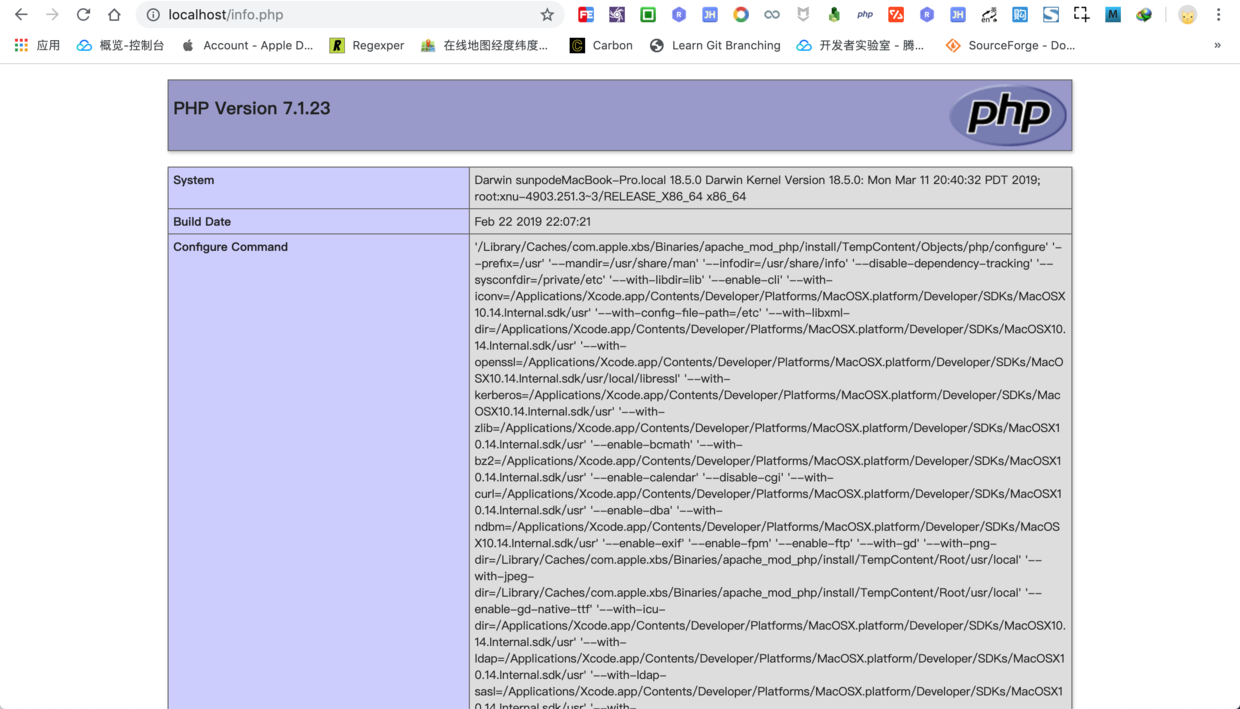
<?php phpinfo();
?>

持久化存储之
# 登录 `mysql` 服务端
$ mysql -u root -p
Enter password:
Welcome to the MySQL monitor.  Commands end with ; or \g.
Your MySQL connection id is 29
Server version: 5.7.24 MySQL Community Server (GPL)

Copyright (c) 2000, 2018, Oracle and/or its affiliates. All rights reserved.

Oracle is a registered trademark of Oracle Corporation and/or its
affiliates. Other names may be trademarks of their respective
owners.

Type 'help;' or '\h' for help. Type '\c' to clear the current input statement.

# 查看当前数据库列表
mysql> show databases;
+---------------------+
| Database            |
+---------------------+
| information_schema  |
| mysql               |
| performance_schema  |
| security-plus       |
| sys                 |
| test                |
+---------------------+
6 rows in set (0.00 sec)

# 退出当前数据库会话
mysql> exit
Bye
$
- 查看
# 仅仅显示两级文件目录
$ tree -L 2
.
├── PoweredByMacOSX.gif
├── PoweredByMacOSXLarge.gif
├── index.html.en
├── index.html.en~orig
├── info.php
└── phpMyAdmin
    ├── CODE_OF_CONDUCT.md
    ├── CONTRIBUTING.md
    ├── export.php
    ├── favicon.ico
    ├── gis_data_editor.php
    ├── import.php
    ├── import_status.php
    ├── index.php
    ├── view_operations.php
    └── yarn.lock

11 directories, 108 files
移动完成后先复制一份
# 连接到本地数据库,用户名 `root`,密码自定义
$ mysql -u root -p
Enter password:
Welcome to the MySQL monitor.  Commands end with ; or \g.
Your MySQL connection id is 109
Server version: 5.7.24 MySQL Community Server (GPL)

Copyright (c) 2000, 2018, Oracle and/or its affiliates. All rights reserved.

Oracle is a registered trademark of Oracle Corporation and/or its
affiliates. Other names may be trademarks of their respective
owners.

Type 'help;' or '\h' for help. Type '\c' to clear the current input statement.
- 列出当前数据库列表
语法 :
mysql> show databases;
+--------------------+
| Database           |
+--------------------+
| information_schema |
| mysql              |
| performance_schema |
| security-plus      |
| sys                |
+--------------------+
5 rows in set (0.00 sec)
- 创建测试数据库
语法 :
# 创建 `test` 数据库并指定编码格式为 `utf8`
mysql> create database IF NOT EXISTS test default charset utf8 COLLATE utf8_general_ci;
Query OK, 1 row affected (0.00 sec)

# 再次查询当前数据库列表,新增 `test` 数据库
mysql> show databases;
+--------------------+
| Database           |
+--------------------+
| information_schema |
| mysql              |
| performance_schema |
| security-plus      |
| sys                |
| test               |
+--------------------+
6 rows in set (0.00 sec)
- 列出当前数据表列表
语法 :
# 使用 `test` 测试数据库
mysql> use test;
Database changed

# 列出当前全部数据表
mysql> show tables;
Empty set (0.00 sec)
- 创建测试数据表
语法 :
# 创建 `user` 用户表 mysql> CREATE TABLE `test`.`user` ( `id` BIGINT(11) UNSIGNED NOT NULL AUTO_INCREMENT COMMENT '用户 id', `name` VARCHAR(45) NOT NULL DEFAULT '' COMMENT '姓名', PRIMARY KEY (`id`), UNIQUE INDEX `id_UNIQUE` (`id` ASC)) ENGINE = InnoDB DEFAULT CHARACTER SET = utf8 COMMENT = '用户表'; Query OK, 0 rows affected (0.01 sec) # 再次列出当前数据表列表 mysql> show tables; +----------------+ | Tables_in_test | +----------------+ | user | +----------------+ 1 row in set (0.00 sec)- 查看数据表结构
语法 :
mysql> desc user;
+-------+---------------------+------+-----+---------+----------------+
| Field | Type                | Null | Key | Default | Extra          |
+-------+---------------------+------+-----+---------+----------------+
| id    | bigint(11) unsigned | NO   | PRI | NULL    | auto_increment |
| name  | varchar(45)         | NO   |     |         |                |
+-------+---------------------+------+-----+---------+----------------+
2 rows in set (0.00 sec)
- 查看数据表创建语句
语法 :
mysql> show create table user \G *************************** 1. row *************************** Table: user Create Table: CREATE TABLE `user` ( `id` bigint(11) unsigned NOT NULL AUTO_INCREMENT COMMENT '用户 id', `name` varchar(45) NOT NULL DEFAULT '' COMMENT '姓名', PRIMARY KEY (`id`), UNIQUE KEY `id_UNIQUE` (`id`) ) ENGINE=InnoDB DEFAULT CHARSET=utf8 COMMENT='用户表' 1 row in set (0.00 sec)- 查询数据
语法 :
mysql> select id,name from user;
Empty set (0.00 sec)
- 插入数据
语法 :
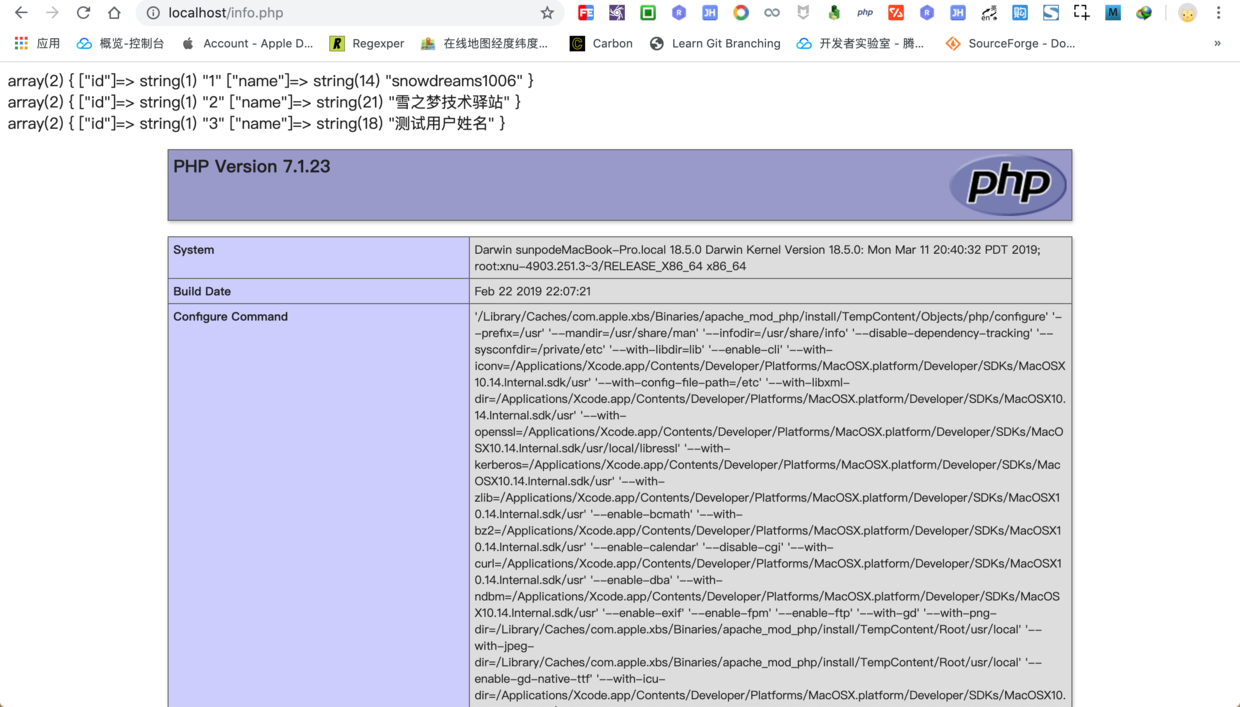
mysql> INSERT INTO `test`.`user` (`name`) VALUES ('snowdreams1006'); Query OK, 1 row affected (0.00 sec) mysql> INSERT INTO `test`.`user` (`name`) VALUES ('雪之梦技术驿站'); Query OK, 1 row affected (0.00 sec) mysql> INSERT INTO `test`.`user` (`name`) VALUES ('测试用户姓名'); Query OK, 1 row affected (0.00 sec) mysql> select id,name from user; +----+-----------------------+ | id | name | +----+-----------------------+ | 1 | snowdreams1006 | | 2 | 雪之梦技术驿站 | | 3 | 测试用户姓名 | +----+-----------------------+ 3 rows in set (0.00 sec)- 退出数据库
语法 :
mysql> exit
Bye
$
- 导出数据
语法 :
$ tree /usr/local/mysql/bin
/usr/local/mysql/bin
├── innochecksum
├── lz4_decompress
├── my_print_defaults
├── myisam_ftdump
├── myisamchk
├── mysql
├── mysql_client_test_embedded
├── mysql_config
├── mysqlbinlog
├── mysqlcheck
├── mysqld
├── mysqld-debug
├── mysqld_multi
├── mysqld_safe
├── mysqldump
├── resolveip
└── zlib_decompress

0 directories, 38 files
所以,应该是如下命令才能调用
$ /usr/local/mysql/bin/mysqldump --version
mysqldump  Ver 10.13 Distrib 5.7.24, for macos10.14 (x86_64)
不过这也太长了吧,肯定不是很不变,一劳永逸的方法是将
$ sudo ln -fs /usr/local/mysql/bin/mysql /usr/local/bin/mysql
$ sudo ln -fs /usr/local/mysql/bin/mysqldump /usr/local/bin/mysqldump
实测可用,但是这并不是优雅的操作方式,
$ mysqldump --version
mysqldump  Ver 10.13 Distrib 5.7.24, for macos10.14 (x86_64)
所以,现在我们考虑将
# mysql
export PATH=$PATH:/usr/local/mysql/bin
设置完毕后下次重启电脑就会生效,或者运行下述命令立即生效.
$ source ~/.bash_profile
为了测试环境变量是否生效,我们先删除原来的软链接.
# 备份文件位于当前目录
$ cat $(pwd)/database_test.sql
备份
-- MySQL dump 10.13  Distrib 5.7.24, for macos10.14 (x86_64)
--
-- Host: localhost    Database: test
-- ------------------------------------------------------
-- Server version   5.7.24

/*!40101 SET @OLD_CHARACTER_SET_CLIENT=@@CHARACTER_SET_CLIENT */;
/*!40101 SET @OLD_CHARACTER_SET_RESULTS=@@CHARACTER_SET_RESULTS */;
/*!40101 SET @OLD_COLLATION_CONNECTION=@@COLLATION_CONNECTION */;
/*!40101 SET NAMES utf8 */;
/*!40103 SET @OLD_TIME_ZONE=@@TIME_ZONE */;
/*!40103 SET TIME_ZONE='+00:00' */;
/*!40014 SET @OLD_UNIQUE_CHECKS=@@UNIQUE_CHECKS, UNIQUE_CHECKS=0 */;
/*!40014 SET @OLD_FOREIGN_KEY_CHECKS=@@FOREIGN_KEY_CHECKS, FOREIGN_KEY_CHECKS=0 */;
/*!40101 SET @OLD_SQL_MODE=@@SQL_MODE, SQL_MODE='NO_AUTO_VALUE_ON_ZERO' */;
/*!40111 SET @OLD_SQL_NOTES=@@SQL_NOTES, SQL_NOTES=0 */;

--
-- Table structure for table `user`
--

DROP TABLE IF EXISTS `user`;
/*!40101 SET @saved_cs_client     = @@character_set_client */;
/*!40101 SET character_set_client = utf8 */;
CREATE TABLE `user` (
  `id` bigint(11) unsigned NOT NULL AUTO_INCREMENT COMMENT '用户 id',
  `name` varchar(45) NOT NULL DEFAULT '' COMMENT '姓名',
  PRIMARY KEY (`id`),
  UNIQUE KEY `id_UNIQUE` (`id`)
) ENGINE=InnoDB AUTO_INCREMENT=4 DEFAULT CHARSET=utf8 COMMENT='用户表';
/*!40101 SET character_set_client = @saved_cs_client */;

--
-- Dumping data for table `user`
--

LOCK TABLES `user` WRITE;
/*!40000 ALTER TABLE `user` DISABLE KEYS */;
INSERT INTO `user` VALUES (1,'snowdreams1006'),(2,'雪之梦技术驿站'),(3,'测试用户姓名');
/*!40000 ALTER TABLE `user` ENABLE KEYS */;
UNLOCK TABLES;
/*!40103 SET TIME_ZONE=@OLD_TIME_ZONE */;

/*!40101 SET SQL_MODE=@OLD_SQL_MODE */;
/*!40014 SET FOREIGN_KEY_CHECKS=@OLD_FOREIGN_KEY_CHECKS */;
/*!40014 SET UNIQUE_CHECKS=@OLD_UNIQUE_CHECKS */;
/*!40101 SET CHARACTER_SET_CLIENT=@OLD_CHARACTER_SET_CLIENT */;
/*!40101 SET CHARACTER_SET_RESULTS=@OLD_CHARACTER_SET_RESULTS */;
/*!40101 SET COLLATION_CONNECTION=@OLD_COLLATION_CONNECTION */;
/*!40111 SET SQL_NOTES=@OLD_SQL_NOTES */;

-- Dump completed on 2019-05-19 12:49:35
- 导入数据
语法 :
mysql> drop database test_import;
Query OK, 1 row affected (0.01 sec)
编程连接
如果没有更改过项目的部署路径,那么我们之前有个测试
<?php $username="root";
$userpass="root";
$dbhost="127.0.0.1";
$dbdatabase="test";

// 连接到本地服务器
$db=new mysqli($dbhost,$username,$userpass,$dbdatabase);
$db->set_charset("utf8");
if(mysqli_connect_error()){
    echo "连接失败: " . mysqli_connect_error();
    exit;
}

# 查询用户列表
$result = $db->query("SELECT id,name FROM user");
if ($result->num_rows > 0) {
    // 输出数据
    while($row = $result->fetch_assoc()) {
        echo var_dump($row). "<br>";
    }
}

# 关闭数据库连接
$db->close();

phpinfo();

?>
现在再次启动
apache
服务器,访问http://localhost/info.php
测试成功!
环境搭建要点总结
apache
服务默认已安装,启动服务器后,在浏览器中访问http://localhost/
会显示It works!,表明apache
能正常使用.- 查看
apache
服务器版本 :apachectl -v
- 启动
apache
服务器 :sudo apachectl start
- 停止
apache
服务器 :sudo apachectl stop
- 重启
apache
服务器 :sudo apachectl restart
-
apache
服务器安装路径 :/private/etc/apache2
-
apache
服务器部署路径 :/Library/WebServer/Documents
php
服务默认已安装,集成到apache
服务器只需要在/private/etc/apache2/httpd.conf
配置文件中启用LoadModule php7_module libexec/apache2/libphp7.so
模块即可,重启apache
服务器即可支持php
环境.- 查看
php
版本信息 :php -version
-
php
默认配置文件路径 :/private/etc/php.ini.default
mysql
数据库默认没有安装,需要手动前往https://www.mysql.com/downloads/
官网进行下载安装.如果需要在终端命令行内访问
mysql
服务端,最好将mysql
的安装路径添加到系统环境中,或者添加软链接也可以.-
mysql
安装路径 :/usr/local/mysql
- 系统环境变量路径 :
~/.bash_profile
-
mysql
二进制文件添加到系统环境变量 :export PATH=$PATH:/usr/local/mysql/bin
- 刷新系统环境变量配置 :
source ~/.bash_profile
-
mysql
命令添加软链接 :sudo ln -fs /usr/local/mysql/bin/mysql /usr/local/bin/mysql
- 查看
mysql
版本信息 :mysql --version
- 查看
mysql
服务器状态 :mysql.server status
- 启动
mysql
服务器 :mysql.server start
- 停止
mysql
服务器 :mysql.server stop
- 重启
mysql
服务器 :mysql.server restart
- 登录
mysql
服务器 :mysql -u root -p
- 退出
mysql
服务器 :exit
最后,
php
不仅仅可以面向过程也可以面向对象,虽然是拍簧片,但真的很强大,魅力不小呢!以上就是《php 学习笔记之搭建开发环境(mac版)》的详细内容,更多关于mysql的资料请关注golang学习网公众号!
- 查看
- 重启
- 停止
- 启动
声明:本文转载于:SegmentFault 如有侵犯,请联系study_golang@163.com删除
相关阅读
更多>
-
499 收藏
-
244 收藏
-
235 收藏
-
157 收藏
-
101 收藏
最新阅读
更多>
-
404 收藏
-
427 收藏
-
351 收藏
-
156 收藏
-
405 收藏
-
497 收藏
-
133 收藏
-
319 收藏
-
141 收藏
-
256 收藏
-
259 收藏
-
167 收藏
课程推荐
更多>
-

- 前端进阶之JavaScript设计模式
- 设计模式是开发人员在软件开发过程中面临一般问题时的解决方案,代表了最佳的实践。本课程的主打内容包括JS常见设计模式以及具体应用场景,打造一站式知识长龙服务,适合有JS基础的同学学习。
- 立即学习 543次学习
-

- GO语言核心编程课程
- 本课程采用真实案例,全面具体可落地,从理论到实践,一步一步将GO核心编程技术、编程思想、底层实现融会贯通,使学习者贴近时代脉搏,做IT互联网时代的弄潮儿。
- 立即学习 516次学习
-

- 简单聊聊mysql8与网络通信
- 如有问题加微信:Le-studyg;在课程中,我们将首先介绍MySQL8的新特性,包括性能优化、安全增强、新数据类型等,帮助学生快速熟悉MySQL8的最新功能。接着,我们将深入解析MySQL的网络通信机制,包括协议、连接管理、数据传输等,让
- 立即学习 500次学习
-

- JavaScript正则表达式基础与实战
- 在任何一门编程语言中,正则表达式,都是一项重要的知识,它提供了高效的字符串匹配与捕获机制,可以极大的简化程序设计。
- 立即学习 487次学习
-

- 从零制作响应式网站—Grid布局
- 本系列教程将展示从零制作一个假想的网络科技公司官网,分为导航,轮播,关于我们,成功案例,服务流程,团队介绍,数据部分,公司动态,底部信息等内容区块。网站整体采用CSSGrid布局,支持响应式,有流畅过渡和展现动画。
- 立即学习 485次学习

