Mac 下 Nginx、PHP、MySQL 和 PHP-fpm 的安装和配置
来源:SegmentFault
时间:2023-02-23 14:08:32 167浏览 收藏
数据库小白一枚,正在不断学习积累知识,现将学习到的知识记录一下,也是将我的所得分享给大家!而今天这篇文章《Mac 下 Nginx、PHP、MySQL 和 PHP-fpm 的安装和配置》带大家来了解一下Mac 下 Nginx、PHP、MySQL 和 PHP-fpm 的安装和配置,希望对大家的知识积累有所帮助,从而弥补自己的不足,助力实战开发!
说明:原文:Mac 下 Nginx、PHP、MySQL 和 PHP-fpm 的安装和配置个人博客永久地址。
博客中做了更新,可参考后面的更新记录。
杂七杂八的杂
Mac下搭建MNPM环境是每个使用者mac的phper必备的技能。一般都是找到新工作入职的第一天做的事情--配置环境。
如上,今天入职的,配置开发环境。公司配备的硬件设备很屌,15年产macbook pro笔记本一台(13寸),配置了8GB DDR3内存,2.7GHz core i5处理器,120GB的闪存。当然了,没我自己买的配置高,哈哈~~
安装 Mac 的包管理器 - homebrew
home-brew是什么?先这样说吧,home-brew与OS X就像nodes与npm,java与maven(或者gradle),php与composer,apt-get与Ubutun,yum与centos,还有其他等等吧,都是宿主的开发工具或包的依赖管理。
安装Homebrew之前,先安装xcode命令行工具,安装成功后,打开xcode的应用,查看Xcode是否为最新,如果不是最新的请在App Store中升级Xcode。
安装xcode命令行工具的命令:
xcode-select --install
Note【NEW】:如果是Mac 10.x的版本,请下载Mac命令行工具安装包。Mac新版本不支持使用ruby -e "$(curl -fsSL https://raw.githubusercontent.com/Homebrew/install/master/install)"网上很多关于安装homebrew的文章相较时间早,所以很多文章依然提供下面这种安装,其实测试发现改地址已经返回404,并不能提供资源服务。
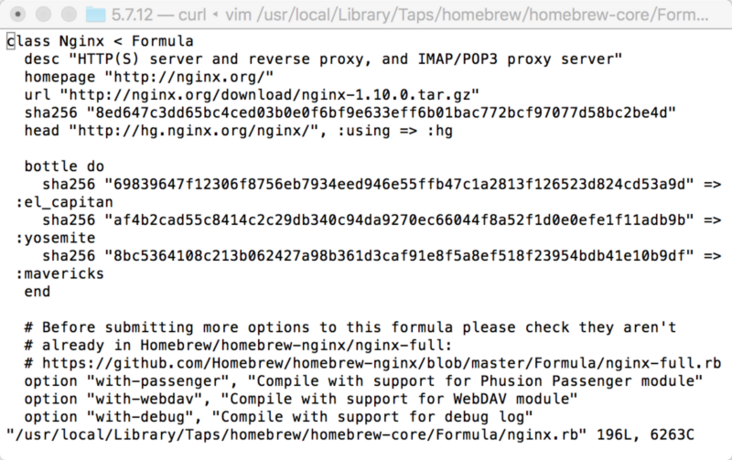
brew install nginx如果需要安装nginx的其他版本,可以使用
 class Nginx  :hg

 bottle do
 sha256 "69839647f12306f8756eb7934eed946e55ffb47c1a2813f126523d824cd53a9d" =>
 :el_capitan
 sha256 "af4b2cad55c8414c2c29db340c94da9270ec66044f8a52f1d0e0efe1f11adb9b" =>
 :yosemite
 sha256 "8bc5364108c213b062427a98b361d3caf91e8f5a8ef518f23954bdb41e10b9df" =>
 :mavericks   end

 #Before submitting more options to this formula please check they
 aren\'t   # already in Homebrew/homebrew-nginx/nginx-full:   #
 https://github.com/Homebrew/homebrew-nginx/blob/master/Formula/nginx-full.rb
 option "with-passenger", "Compile with support for Phusion Passenger module"   option "with-webdav", "Compile with support for WebDAV module"   option "with-debug", "Compile with support for debug log"
从上面信息可以看出nginx的下载地址等信息,可以根据自己的需求修改。
brew执行完之后,nginx服务器就算安装好了,运行下面几条命了测试一下:
# 启动 nginx服务
sudo nginx

# 重新加载配置|重启|停止|退出 nginx
nginx -s reload|reopen|stop|quit

#测试配置是否有语法错误
nginx -t
nginx启动后,在浏览器中输入
# 启动 nginx
sudo ngixn -c /usr/local/etc/nginx/nginx.conf

#测试配置是否有语法错误
nginx -t -c /usr/local/etc/nginx/nginx.conf
补充
开机自启动nginx服务设置:
mkdir -p ~/Library/LaunchAgents
cp /usr/local/Cellar/nginx/1.10.0/homebrew.mxcl.nginx.plist ~/Library/LaunchAgents/
launchctl load -w ~/Library/LaunchAgents/homebrew.mxcl.nginx.plist
配置非管理员开机nginx自动启动的权限和分组:
sudo chown root:wheel /usr/local/Cellar/nginx/1.10.0/sbin/nginx
sudo chmod u+s /usr/local/Cellar/nginx/1.10.0/sbin/nginx
说明:{尊重知识,尊重别人的劳动成果}
参考文章:Mac下Nginx、MySQL、PHP-FPM的安装配置安装和配置 MySQL 服务器
安装mysql同nginx一样简单,执行brew命令:
brew install mysql执行完brew命令,如果没有出错,mysql算是安装到本机或者服务器了,当然,此过程会看到很多信息打印到shell窗口。
接下来,我们执行一些简单的配置命令。
- a.初始化mysql数据库:
mysql_install_db --verbose --user=`whoami` --basedir="$(brew --prefix mysql)" --datadir=/usr/local/var/mysql这里需要说明一下,网上很多资料显示需要tmpdir参数,如下:
mysql_install_db --verbose --user=`whoami` --basedir="$(brew --prefix mysql)" --datadir=/usr/local/var/mysql --tmpdir=/tmp这个会出错,具体原因暂时不知道,在segmentfault上有人提问过了,目前没有完美的答案。
- b.查看mysql数据库是否启动,如果没有启动则使用
ps -ef | grep mysql如果没有启动,使用安装的mysql目录下的mysqld命令启动mysql:
/usr/local/Cellar/mysql/5.7.12/bin/mysqld当然,你可直接使用
which mysqld结果发现:
 MacBook-Pro:joyven $ which mysql
 /usr/local/bin/mysqld
此时的数据库没有密码,即使是root用户,也无需密码就可登录到数据库服务。因此,需要设置数据库密码:
/usr/local/bin/mysqladmin -u root password 'new-password'现在访问 mysql 还是不用密码就可以连接,如果要设置一些登陆密码的安全访问限制,则需执行下面的 mysql安全安装指令:
/usr/local//bin/mysql_secure_installation主要是设置修改root密码(设置过了可以不用设置,略过)、删除匿名访问、删除root网络访问、删除test数据库。指令执行完后,登陆mysql就需要密码验证了:
mysql -u root -p开机启动 mysql
mkdir -p ~/Library/LaunchAgents/
cp /usr/local/Cellar/mysql/5.7.12/homebrew.mxcl.mysql.plist ~/Library/LaunchAgents/
launchctl load -w ~/Library/LaunchAgents/homebrew.mxcl.mysql.plist
如果要停止 mysql 服务则:
launchctl unload ~/Library/LaunchAgents/homebrew.mxcl.mysql.plist安装 PHP56 和 PHP-fpm
php的安装很简单,php-fpm目前已经集成到php的内核,可以当作内核来安装了。很久以前不是哦,请注意,我不记得是什么时候加入到内核的,如果你乐意查,查了请在评论区告诉我一下。
至于他为什么是内核的原因,参考《搞不清FastCgi与PHP-FPM之间是个什么样的关系》的提问,主要看看下面各位大神@的回答。
这是2018年3月份之前的安装方式:安装php之前,请先用brew tap命令引入第三方的php库,brew仓库中没有php的安装包。
brew tap homebrew/dupes brew tap josegonzalez/homebrew-phpNote:【NEW】由于Homebrew/php自来水在2018年3月底被弃用,并将所有PHP公式转移到
brew install php56 --with-imap --with-tidy --with-debug --with-pgsql --with-mysql --with-fpm下面是输出的信息:
brew install php56 --with-imap --with-tidy --with-debug --with-pgsql --with-mysql --with-fpm --with-curl=/usr/local/Cellar/curl/
==> Installing php56 from josegonzalez/php
==> Installing dependencies for josegonzalez/php/php56: readline, postgre
==> Installing josegonzalez/php/php56 dependency: readline
==> Downloading https://homebrew.bintray.com/...
####################################################################### 100.0%
==> Pouring readline-6.3.8.el_capitan.bottle.tar.gz
==> Caveats
This formula is keg-only, which means it was not symlinked into /usr/local.OS X provides the BSD libedit library, which shadows libreadline.
In order to prevent conflicts when programs look for libreadline we are defaulting this GNU Readline installation to keg-only.Generally there are no consequences of this for you. If you build your own software and it requires this formula, you'll need to add to your build variables:
export PATH="$(brew --prefix php54)/bin:$PATH"到此,php以及PHP-fpm已经安装成功了。那么我们还是设置php-fpm开机启动,在哪里找这段代码呢,安装过程打印的信息,也就是我为什么要把安装过程信息完完整整贴一遍的原因:
mkdir -p ~/Library/LaunchAgents
cp /usr/local/opt/php56/homebrew.mxcl.php56.plist ~/Library/LaunchAgents/
launchctl load -w ~/Library/LaunchAgents/homebrew.mxcl.php56.plist
顺便说一下或许对你在安装过程很有用的命令:
- 杀死一个进程的命令:
sudo kill -9 pid #pid替换为你的进程号
- 比如你要杀死php-fpm进程,也可以使用如下命令:
sudo killall php-fpm
# 或者
sudo killall -HUP php-fpm
- 如何查看进程号:
ps -ef | grep php-fpm配置 Nginx 服务器
Nginx服务器的配置,这里只作简单的配置部分说明,至于想对较为繁琐的配置,比如ip_hash,upstream,gzip,反向代理等内容放到它章作解。
假如你的网站根目录是在
#user  nobody;
worker_processes  4;

#error_log  logs/error.log;
#error_log  logs/error.log  notice;
#error_log  logs/error.log  info;

#pid        logs/nginx.pid;


events {
    worker_connections  1024;
}


http {
    include       mime.types;
    default_type  application/octet-stream;

    log_format  main  '$remote_addr - $remote_user [$time_local] "$request" '
                      '$status $body_bytes_sent "$http_referer" '
                      '"$http_user_agent" "$http_x_forwarded_for"';

    access_log  /usr/local/var/log/nginx/access.log  main;

    sendfile        on;
    #tcp_nopush     on;

    #keepalive_timeout  0;
    keepalive_timeout  65;

    #gzip  on;

    server {
        listen       80;
        server_name  localhost;

        charset utf-8;

        access_log  /usr/local/var/log/nginx/localhost.access.log  main;

        root /var/www;
        location / {
            #root   html;
            index  index.html index.htm index.php;
            try_files $uri /$uri index.php?$args;
        }

        #error_page  404              /404.html;

        # redirect server error pages to the static page /50x.html
        #
        error_page   500 502 503 504  /50x.html;
        location = /50x.html {
            root   html;
        }

        # proxy the PHP scripts to Apache listening on 127.0.0.1:80
        #
        #location ~ \.php$ {
        #    proxy_pass   http://127.0.0.1;
        #}

        # pass the PHP scripts to FastCGI server listening on 127.0.0.1:9000
        #
        location ~ \.php$ {
            #root           /var/www;
            fastcgi_pass   127.0.0.1:9000;
            fastcgi_index  index.php;
            fastcgi_param  SCRIPT_FILENAME  /var/www$fastcgi_script_name;
            include        fastcgi_params;
        }

        # deny access to .htaccess files, if Apache's document root
        # concurs with nginx's one
        #
        location ~ /\.ht {
            deny  all;
        }
    }

    include sites-enabled/nginx-*.conf;

    # another virtual host using mix of IP-, name-, and port-based configuration
    #
    #server {
    #    listen       8000;
    #    listen       somename:8080;
    #    server_name  somename  alias  another.alias;

    #    location / {
    #        root   html;
    #        index  index.html index.htm;
    #    }
    #}

    # HTTPS server
    #
    #server {
    #    listen       443 ssl;
    #    server_name  localhost;

    #    ssl_certificate      cert.pem;
    #    ssl_certificate_key  cert.key;

    #    ssl_session_cache    shared:SSL:1m;
    #    ssl_session_timeout  5m;

    #    ssl_ciphers  HIGH:!aNULL:!MD5;
    #    ssl_prefer_server_ciphers  on;

    #    location / {
    #        root   html;
    #        index  index.html index.htm;
    #    }
    #}
    #include servers/*;
}
上面的太乱了,我们简化一下吧:
worker_processes  4;

events {
    worker_connections  1024;
}

http {
    include       mime.types;
    default_type  application/octet-stream;

    log_format  main  '$remote_addr - $remote_user [$time_local] "$request" '
                      '$status $body_bytes_sent "$http_referer" '
                      '"$http_user_agent" "$http_x_forwarded_for"';

    access_log  /usr/local/var/log/nginx/access.log  main;

    sendfile        on;
    keepalive_timeout  65;


    server {
        listen       80;
        server_name  localhost;

        charset utf-8;

        access_log  /usr/local/var/log/nginx/localhost.access.log  main;

        root /var/www; #你的网站根目录
        location / {
            index  index.html index.htm index.php;
        try_files $uri /$rui index.php?$args;
        }

        error_page  404              /404.html;
        error_page   500 502 503 504  /50x.html;
        location = /50x.html {
            root   html;
        }

        location ~ \.php$ {
            fastcgi_pass   127.0.0.1:9000;
            fastcgi_index  index.php;
            fastcgi_param  SCRIPT_FILENAME  /var/www$fastcgi_script_name;
            include        fastcgi_params;
        }

        location ~ /\.ht {
            deny  all;
        }
    }

    include sites-enabled/nginx-*.conf;
}
这是一份相对简单的nginx配置,相对复杂一点的配置会在复杂的场景中使用,一般初步开发这些就可以满足了。
下面给出一份sites-enabled文件夹下的nginx的配置。需要说明的是,上面的配置中的server节点中的内容,包括server,可以单独拿出来,放在一份单独的配置中,由最后一句的include的命令引入。
nginx-test.conf
server {
    listen 80;
    server_name test-local.com;

    charset utf-8;
    access_log /usr/local/var/log/nginx/test-local.com.access.log main;
    error_log /usr/local/var/log/nginx/test-local.com.error.log;

    root /var/www/test-php/backend/web;

    location / {
        try_files $uri $uri/ /index.php?$args;
        index index.html index.htm index.php;
    }

    location ~ \.php$ {
        fastcgi_pass 127.0.0.1:9000;
        fastcgi_index index.php;
        fastcgi_param SCRIPT_FILENAME /var/www/test-php/backend/web$fastcgi_script_name;
        include fastcgi_params;
        try_files $uri =404;
    }
}
如上,打开浏览器输入
127.0.0.1 test-local.com结束之前,扩展几点
大多数时候,我们不得不安装php的扩展,比如 GD,mcrypt,CURL,XML,MEMCACHED 等扩展配置,这些东西在我们的开发中常常用到,对于几个相对较难的扩展,做一些记录吧。
- curl安装
- mcrypt安装
- memcached安装
更新日志
更新:2016-05-10 23:19
- 残片断章
- 补充php和php-fpm的安装
- mac下安装php扩展:
brew install php56-apcu php56-intl php56-redis php56-uuid php56-zookeeper \
php56-thrift php56-solr php56-ssh2 php56-gmagick php56-kafka php56-libevent \
php56-imagick php56-msgpack php56-geoip php56-mcrypt php56-swoole \
php56-scrypt php56-xdebug php56-yaf php56-yaml php56-xhprof \
php56-memcache php56-memcached php56-gearman
更新:2019-10-06 20:43:50
- 增加了xcode安装命令行工具
xcode-select --install失败的情况,建议下载命令行工具dmg文件安装- 增加了使用
brew tap homebrew/dupes和brew tap josegonzalez/homebrew-php在2018年3月份被废弃后安装时报错误的解决方法。今天关于《Mac 下 Nginx、PHP、MySQL 和 PHP-fpm 的安装和配置》的内容介绍就到此结束,如果有什么疑问或者建议,可以在golang学习网公众号下多多回复交流;文中若有不正之处,也希望回复留言以告知!
-
499 收藏
-
244 收藏
-
235 收藏
-
157 收藏
-
101 收藏
-
351 收藏
-
156 收藏
-
405 收藏
-
497 收藏
-
133 收藏
-
319 收藏
-
141 收藏
-
256 收藏
-
259 收藏
-
167 收藏
-
496 收藏
-
333 收藏
-

- 前端进阶之JavaScript设计模式
- 设计模式是开发人员在软件开发过程中面临一般问题时的解决方案,代表了最佳的实践。本课程的主打内容包括JS常见设计模式以及具体应用场景,打造一站式知识长龙服务,适合有JS基础的同学学习。
- 立即学习 543次学习
-

- GO语言核心编程课程
- 本课程采用真实案例,全面具体可落地,从理论到实践,一步一步将GO核心编程技术、编程思想、底层实现融会贯通,使学习者贴近时代脉搏,做IT互联网时代的弄潮儿。
- 立即学习 516次学习
-

- 简单聊聊mysql8与网络通信
- 如有问题加微信:Le-studyg;在课程中,我们将首先介绍MySQL8的新特性,包括性能优化、安全增强、新数据类型等,帮助学生快速熟悉MySQL8的最新功能。接着,我们将深入解析MySQL的网络通信机制,包括协议、连接管理、数据传输等,让
- 立即学习 500次学习
-

- JavaScript正则表达式基础与实战
- 在任何一门编程语言中,正则表达式,都是一项重要的知识,它提供了高效的字符串匹配与捕获机制,可以极大的简化程序设计。
- 立即学习 487次学习
-

- 从零制作响应式网站—Grid布局
- 本系列教程将展示从零制作一个假想的网络科技公司官网,分为导航,轮播,关于我们,成功案例,服务流程,团队介绍,数据部分,公司动态,底部信息等内容区块。网站整体采用CSSGrid布局,支持响应式,有流畅过渡和展现动画。
- 立即学习 485次学习


